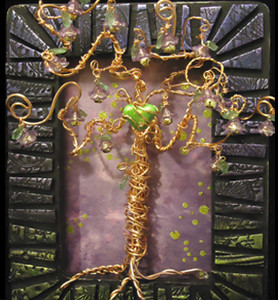
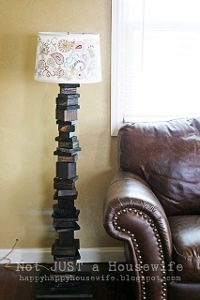
Scrap Wood Lamp
Make your own lamp from scratch with these easy directions. You'll be so in awe of this homemade scrap wood lamp with a hand painted lampshade, you'll want to make your own right away!

Materials:
- Lamp shade
- Deco Art paint
- Small pointed brush
- Scrap pieces of wood
- Miter saw
- Sand paper
- 3/4 inch bore bit
- Stain
- Gorilla wood glue
- Nail gun
- Cord
Instructions:
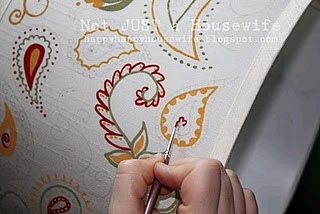
- The first thing I did was lightly pencil a design onto the lamp shade. I am slightly obsessed with paisley so that is what I chose.

- I used a small pointed brush to paint on the design. If you don't want to hand paint your shade you can by all means cover your shade in fabric. A little spray adhesive or modpodge and your set.
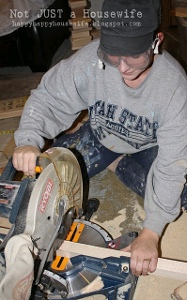
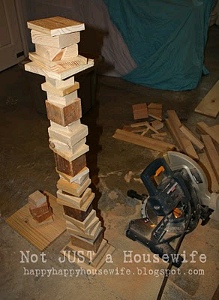
- Now for the base. I had my husband gather up all my scrap pieces of wood from past projects. I cut all the wood with my miter saw. I didn't even measure. I just grabbed it and cut random sizes.
- As I was cutting I stacked them up to make sure I was cutting enough to get the height I wanted.
- When they were all cut, I sanded the heck out of them. I wanted all the edges and corners to be smooth. I have kids whose heads seem to be magnetically drawn to sharp edges.
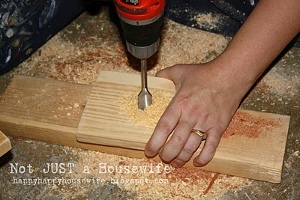
- I used a bore bit (3/4 inch) to make holes in the center of each one. Again, I did not measure. Great huh? That is probably why I like this project so much. I put the piece I was drilling on top of a piece that would not be used for the lamp.
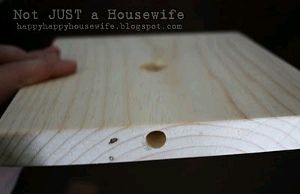
- I did not want the cord coming out of a hole in the very bottom piece or else the lamp would wobble. So I did not drill a hole in the very bottom board. I took the second the last board and drilled a hole on the side that went all the way through until it met up with the center hole. You will get a better idea of what I am talking about when you see me put the cord through this hole a little later. All you need to understand now is that I am a genius for thinking that up.
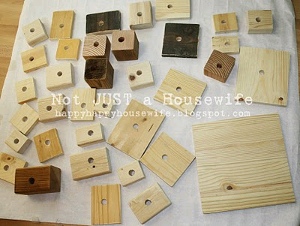
Here are all the pieces to my lamp puzzle!
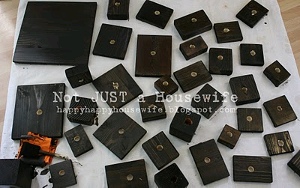
- Then I stained them all a dark walnut. This is right after I stained them. The stain sinks into the wood slowly. It ended up being lighter than this. I like dark stain for many reasons and one of them is that it hides imperfections quite well. Since this was all scrap wood, there were definitely imperfections!
- Time to assemble! I used Gorilla wood glue on the bottom of the board and then added it to the base.
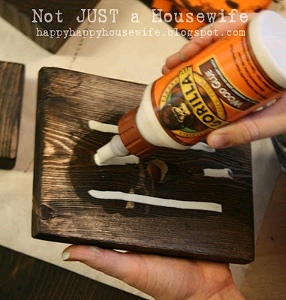
- I nail gunned it so it would stay in place while the glue dried. Also, I just like any excuse to pull out my favorite tool :)

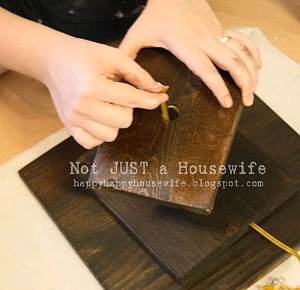
- Then I strung the cord through.
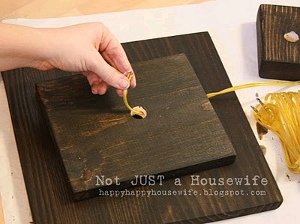
- After that it is pretty much like you are stringing giant beads onto a string. Glue, string it on, nail once or twice and repeat. Now, I need to point out that some of the chunks of wood were too thick to nail. But the glue when dry will be strong enough. I didn't worry about it. I figured that it was better to have most of them held in place than none of them. I literally just grabbed and stuck it on, then grabbed another. No rhyme or reason. I have found that if you want a truly random look that it is best to make it truly random. Because of that and not measuring anything, this was an EASY project.
Read NextBeautiful Flea Market Coffee Table
Your Recently Viewed Projects
Thanks for your comment. Don't forget to share!
kreed07 9722626
Apr 16, 2012
Very cool. Have to try it...it just amazes me how creative people can be...as well as resourceful. Great work!
lennycurreri 24224 31
Mar 17, 2012
Love it. I have a friend who I tease because he can't bear to part with even the tiniest piece to wood because "you never know when you might need it." I'm going to pass this project along to him.
dlclose5 7893610
Mar 17, 2012
Great use of scrap wood! I love recycling or UPcycling as it is called sometimes. The lamp stand reminds me of a stack of books. That would make an interesting project wouldn't it? Love that it is not tied to any one style so it can go with any way you've decorated your house! Great project and without measuring, it is right up my ally
red dirt girl 2221
Mar 17, 2012
Where have you been all my life! It is 7:55 a.m and I can't wait to get started! Thank you very much. I have a rainbow room and I can't wait to make one to go in it! And I am thinking of all the other places I can put one! Love it!
Ren6496
Dec 12, 2011
I am loving this. Such a great idea. I always have scrap left from my projects, I keep them in hopes I will find something todo with them. Thank you for showing the way to use 'em. Perfect. I can't wait to do this and surprise my husband. He is continually complaining about my scraps. No more, they'll be gone tonight!
evamontoya 3537718
Jun 16, 2011
I love the lampshade design - did you make it up or copy it from somewhere? If you have a pattern can you share it? My email address is evamontoya@yahoo.com. Thanks!
Report Inappropriate Comment
Are you sure you would like to report this comment? It will be flagged for our moderators to take action.
Thank you for taking the time to improve the content on our site.