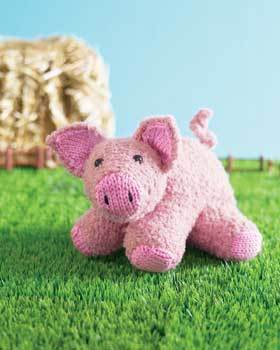
Piglet Toy Knitting Pattern
The tail on this cute piglet is the perfect touch in this stuffed animal knitting pattern from Bernat Yarns. Give to a little child who wants a little pig to cuddle.

Materials:
- Yarn: Bernat® Soft Bouclé (140 g/5 oz)
Main Color (MC)
(Light Pink) 2 balls
Bernat® Satin (100 g/3.5 oz)
Contrast A
(Pink) 1 ball
- Knitting Needles: Size 6 mm (U.S. 10) knitting needles or size needed to obtain gauge.
- Stuffing.
- Purchased brown Animal Eyes 15 mm diameter.
- Short length of black yarn for snout embroidery.
Measurements: Approx 13 ins [33 cm] long (snout to back end).
Gauge: 12 sts and 16 rows = 4 ins [10 cm] in stocking st with 2 strands of MC worked together.
Abbreviations:
Alt = Alternate.
Approx = Approximately.
Beg = Beginning.
Cont = Continue.
Dec = Decrease.
Inc = Increase 1 stitch by knitting into front and back of next stitch.
K = Knit.
K2tog = Knit next 2 stitches together.
M1P = Make one stitch by picking up horizontal loop lying before next stitch and purling into back of loop.
P = Purl.
Psso = Pass slipped stitch over next stitch.
Rem = Remaining.
Rep = Repeat.
Sl1 = Slip next stitch knitwise.
St(s) = Stitch(es).
RS = Right side.
WS = Wrong side.
Yfwd = Yarn forward.
Instructions:
UPPER BODY
Beg at back of Pig, with 2 strands of MC, cast on 48 sts, placing a marker on 9th st in from each end of row.
Beg with a knit row (WS), work 9 rows reverse stocking st.
Shape Back Legs: Cast off 4 sts beg next 2 rows, then dec 1 st each end of needle on next 5 rows. 30 sts.
Work 7 rows even in reverse stocking st.
Shape Front Legs: Next row: P1. M1P. Purl to last st. M1P. P1.
Next row: Knit.
Rep last 2 rows 3 times more. 38 sts.
Next row: P1. M1P. P12. Cast off 12 sts. P12 (including st on needle after cast off). M1P. P1.
Next row: K14. Turn. Leave rem sts on a spare needle.
Cont on these 14 sts, dec 1 st each end of next and following alt rows until there are 8 sts, then on every row until there are 2 sts. Work 2tog. Fasten off.
With WS facing, join MC to rem 14 sts on opposite side and work to correspond to first side, reversing all shapings.
GUSSET and LOWER BODY
With 2 strands of MC, cast on 3 sts.
1st row: (WS). Knit.
2nd row: P1. M1P. Purl to last st. M1P. P1.
Work 3 rows reverse stocking st.
Rep last 4 rows twice more. 9 sts.
Next row: (RS). P1. M1P. Purl to last st. M1P. P1.
Next row: Knit.
Rep last 2 rows once more. 13 sts.
Work a further 5 rows in reverse stocking st (21 rows in total). Place markers at each end of last row.
Cast on 9 sts beg next 2 rows. 31 sts.
Work 8 rows even.
Divide for Back Legs: Cast off 4 sts beg next 2 rows.
Dec 1 st each end of needle on next 5 rows. 13 sts.
Work 7 rows even.
Shape Front Legs: 1st row: (P1. M1P. P5. M1P) twice. P1. 17 sts.
2nd and alt rows: Knit.
3rd row: (P1. M1P. P7. M1P) twice. P1. 21 sts.
5th row: (P1. M1P. P9. M1P) twice. P1. 25 sts.
7th row: (P1. M1P. P11. M1P) twice. P1. 29 sts.
8th row: Knit.
Divide for Front Legs: Next row: (RS). P1. M1P. P13. Cast off center st. P13 (including st on needle after cast off). M1P. P1.
Next row: K15. Turn. Leave rem sts on a spare needle.
Cont on these 15 sts, dec 1 st each end of next and following alt rows until there are 8 sts, then on every row until there are 2 sts. Work 3tog. Fasten off.
With WS facing, join MC to rem 15 sts and work to correspond to first side, reversing all shapings.
HEAD
Beg at back with 2 strands of MC and larger needles, cast on 7 sts.
1st row: (WS). Knit.
2nd row: P1. (M1P. P1) 6 times. 13 sts.
3rd row: Knit.
Next row: P1. (M1P. P1) 12 times. 25 sts.
Work 3 rows reverse stocking st.
Next row: P1. (M1P. P3) 8 times. 33 sts.
Work 13 rows reverse stocking st.
Next row: P1. (P2tog) 16 times. 17 sts.
Work 3 rows reverse stocking st.
Cast off (nose opening). Sew seam.
Following manufacturer’s instructions, attach eyes as shown in picture. Insert stuffing through nose opening.
EARS
Outer Ears: (make 2)
Beg at bottom with 2 strands of MC, cast on 11 sts.
Work 7 rows garter st (knit every row), noting first row is WS.
Next row: (RS). K1. Sl1. K1. psso.
Knit to last 3 sts. K2tog. K1.
Next row: Knit.
Rep last 2 rows twice more. 5 sts.
Next row: K1. Sl1. K2tog. psso. K1.
Next row: K3.
Next row: Sl1. K2tog. psso. Fasten off.
Ear Lining: (make 2)
With 2 strands of A, cast on 10 sts.
Work 6 rows stocking st.
Dec 1 st each end of needle on next and following alt rows to 2 sts.
Next row: P2.
Next row: K2tog. Fasten off.
BACK FEET PADS (make 2)
With 2 strands of A, cast on 5 sts.
Knit 1 row (RS).
Cont in stocking st, inc 1 st each end of next 2 rows. 9 sts.
Work 5 rows even in stocking st.
Dec 1 st each end of needle on next 2 rows. 5 sts. Cast off.
FRONT FEET PADS and SNOUT (make 3)
With 2 strands of A, cast on 6 sts.
Knit 1 row (RS).
Cont in stocking st, inc 1 st each end of needle on next 2 rows. 10 sts.
Work 7 rows even in stocking st.
Dec 1 st each end of needle on next 2 rows. 6 sts. Cast off.
TAIL
With 2 strands of MC, cast on 7 sts.
1st row: *(K1. yfwd. K1) all in next st.
Rep from * to end of row.
Cast off knitwise.
FINISHING
Sew Ear Lining to Outer Ear. Sew Snout to nose opening of Head. Sew Gusset to Upper Body matching markers at back and sewing 3 sts of cast on edge of Gusset to Center Back of Upper Body at top edge. Leave Feet open. Leave an opening at neck and back to insert stuffing. Stuff body. Sew back opening closed. Leave neck opening open. Sew Head to neck covering neck opening. Fold Ears slightly and sew to head. Sew feet pads in position. Embroider snout with black yarn as illustrated. Sew Tail in position.
Read NextEasy Kids Knit Poncho
Your Recently Viewed Projects
Thanks for your comment. Don't forget to share!
JennyBee1
Nov 11, 2011
@ChouxChoux, I'm sorry to hear of your trouble. I have two options for you: 1. You can contact the pattern designer directly for help. The designer is specified in the byline. 2. I might also suggest that you try posting your question to our sites Facebook page. It is monitored by the editor and is a great resource for helpful tips and suggestions from our Facebook friends; perhaps they can offer some guidance! Here is the link: http://www.facebook.com/FaveCrafts --Editors of FaveCrafts
ChouxChoux
Nov 08, 2011
Hi All, I have been working on this pattern (a birthday present for my little sister) and encountered a problem, which relates to the size of legs. They turned out to be too small to be stuffed. Is it correct that we only need to knit single rows for the reverse stocking stitches because that creates such a small piece of knitting. Moreover, finishing seems to be a challenge too. It would be much clearer if there is an illustration of the shape of individual pieces and how to seal them together. Any advice is greatly appreciated. Am looking forward to hear from you. Thank you so much.
bettyboopnl
Oct 03, 2010
I'm really confused if reverse stocking stitch means you begin with a pearl row and make this the right side how can you begin with a knit row and work 9 reverse stocking stitch . someone please help i'm one very confused newbie knitter !
paver2
Dec 09, 2018
It doesn't matter which row you start with for a reverse stockinette stitch. It's just that the "right" side is the "wrong" side when you go on with the pattern or start to put the piece together.
Report Inappropriate Comment
Are you sure you would like to report this comment? It will be flagged for our moderators to take action.
Thank you for taking the time to improve the content on our site.