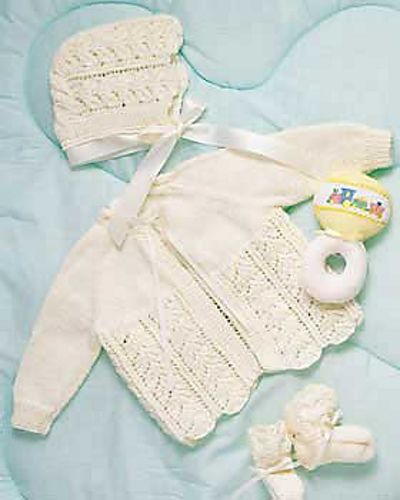
Pretty Floral Cardigan
Precious cable knit cardigan from Patons for baby with floral detail. Intermediate skill level - perfect in baby blue or baby pink.

MATERIALS
- Patons® Astra (50 g/1.75 oz)
- Main Color (MC) (White)
- 0-6 months 2 balls
- 6-12 months 2 balls
- 12-18 months 3 balls
- 18-24 months 3 balls
- Contrast A (Pink) 1 ball for all sizes.
- Small quantity of Contrast B (Lilac) for embroidery.
- Knitting Needles: Sizes 3¼ mm (U.S. 3) and 4 mm (U.S. 6) or size needed to obtain tension.
- Cable needle.
- 5 buttons.
SIZES
Chest measurement
- 0-6 months: 16 ins [41 cm]
- 6-12 months: 18 ins [46 cm]
- 12-18 months: 20 ins [51 cm]
- 18-24 months: 22 ins [56 cm]
Finished chest
- 0-6 months: 19½ ins [49 cm]
- 6-12 months: 21½ ins [54 cm]
- 12-18 months: 23½ ins [60 cm]
- 18-24 months: 25½ ins [65 cm]
TENSION
22 sts and 30 rows = 4 ins [10 cm] in stocking st with larger needles.
ABBREVIATIONS
M1 = make one st by picking up horizontal loop lying before next st and working into back of it.
C2B = slip next st onto cable needle and leave at back of work. K1, then K1 from cable needle.
C2F = slip next st onto cable needle and leave at front of work. K1, then K1 from cable needle.
Cr2R = slip next st onto cable needle and leave at back of work. K1, then P1 from cable needle.
Cr2L = slip next st onto cable needle and leave at front of work. P1, then K1 from cable needle.
INSTRUCTIONS
The instructions are written for smallest size. If changes are necessary for larger sizes, the instructions will be written thus ( ).
BACK
With smaller needles and A, cast on 57 (63-71- 77) sts.
1st row: (RS). K1. *P1. K1. Rep from * to end of row.
Break A and join MC.
Cont using MC only as follows:
2nd row: Purl.
3rd row: K1. *P1. K1. Rep from * to end of row.
4th row: P1. *K1. P1. Rep from * to end of row.
Last 2 rows form (K1. P1) ribbing.
Work a further 5 (5-7-7) rows ribbing, ending with WS facing for next row.
Next row: (WS). Rib 7 (7-8-8) sts. *M1. Rib 7 (8-9-10) sts. Rep from * to last 8 (8-9-9) sts. M1. Rib 8 (8-9-9) sts. 64 (70-78-84) sts.
Change to larger needles and proceed in pat as follows:
1st row: (RS). P3 (6-3-6). *C2B. P5. Rep from * to last 5 (8-5-8) sts. C2B. P3 (6-3-6).
2nd row: K3 (6-3-6). *P2. K5. Rep from * to last 5 (8-5-8) sts. P2. K3 (6-3-6).
These 2 rows form pat.
Cont in pat until Back from beg measures 10 (11-12-12½) ins [25.5 (28-30-32) cm], ending with RS facing for next row.
Cast off, placing markers either side of center 24 (26-28-30) sts to mark back neck edge.

LEFT FRONT
With smaller needles and A, cast on 28 (30-34- 38) sts.
1st row: (RS). *K1. P1. Rep from * to last 2 sts. K2.
Break off A and join MC.
Cont using MC only as follows:
2nd row: K1. Purl to end of row.
3rd row: *K1. P1. Rep from * to last 2 sts. K2.
4th row: *K1. P1. Rep from * to end of row.
Last 2 rows form (K1. P1) ribbing.
Work a further 5 (5-7-7) rows ribbing, ending with WS facing for next row.
Next row: (WS). Rib 5 (5-5-7) sts. *M1. Rib 6 (5-6-8) sts. Rep from * to last 5 (5-5-7) sts. M1. Rib 5 (5-5-7) sts. 32 (35-39-42) sts.
Change to larger needles and proceed in pat as follows:
1st row: (RS). P3 (6-3-6). (C2B. P5) 1 (1-2-2) time(s). C2B. P10. (Cr2R. Cr2L) twice. P2.
2nd row: K2. P1. K2. P2. K2. P1. K10. P2. (K5. P2) 1 (1-2-2) time(s). K3 (6-3-6).
3rd row: P3 (6-3-6). (C2B. P5) 1 (1-2-2) time(s). C2B. P7. K2tog. P1. yrn. K1. P2. C2F. P2. K1. P2.
4th row: K2. P1. K2. P2. (K2. P1) twice. K7. P2. (K5. P2) 1 (1-2-2) time(s). K3 (6-3-6).
5th row: P3 (6-3-6). (C2B. P5) 1 (1-2-2) time(s). C2B. P6. K2tog. P1. yrn. P1. (Cr2L. Cr2R) twice. P2.
6th row: K3. P2. K2. P2. K4. P1. K6. P2. (K5. P2) 1 (1-2-2) time(s). K3 (6-3-6).
7th row: P3 (6-3-6). (C2B. P5) 1 (1-2-2) time(s). C2B. P5. K2tog. P1. yrn. P3. C2F. P2. C2F. P3.
8th row: K3. P2. K2. P2. K5. P1. K5. P2. (K5. P2) 1 (1-2-2) time(s). K3 (6-3-6).
These 8 rows form pat.
Cont in pat until Left Front from beg measures 5¼ (6-6¼-6¾) ins [13 (15-16-17) cm], ending with RS facing for next row.
Shape front: Place marker at beg of last row to mark beg of front shaping.
Next row: (RS). Pat 8 (11-15-18) sts. P2tog. C2B. Pat 20 sts. 31 (34-38-41) sts.
Next row: Pat 20 sts. P2. K1. Pat to end of row.
Cont working dec 22 sts in from front edge, as set by last 2 rows, dec 1 st at front slope edge on next and every following alt row until 23 (23- 25-27) sts rem.
Sizes 0-6 and 6-12 months only:Work 1 row even.
Dec 1 st at beg of next and following 2 (0) alt rows. 20 (22) sts.
All Sizes: Cont even in pat until Left Front measures same length as Back to shoulders, ending with RS facing for next row. Cast off.

RIGHT FRONT
With smaller needles and A, cast on 28 (30-34- 38) sts.
1st row: (RS). K2. *P1. K1. Rep from * to end of row.
Break A and join MC.
Cont using MC only as follows:
2nd row: Purl to last st. K1.
3rd row: K2. *P1. K1. Rep from * to end of row.
4th row: *P1. K1. Rep from * to end of row.
Last 2 rows form (K1. P1) ribbing.
Work a further 5 (5-7-7) rows in ribbing, ending with WS facing for next row.
Next row: (WS). Rib 5 (5-5-7) sts. *M1. Rib 6 (5-6-8) sts. Rep from * to last 5 (5-5-7) sts. M1. Rib 5 (5-5-7) sts. 32 (35-39-42) sts.
Change to larger needles and proceed in pat as follows:
1st row: (RS). P2. (Cr2R. Cr2L) twice. P10. C2B. (P5. C2B) 1 (1-2-2) time(s). P3 (6-3-6).
2nd row: K3 (6-3-6). (P2. K5) 1 (1-2-2) time(s). P2. K10. P1. K2. P2. K2. P1. K2.
3rd row: P2. K1. P2. C2F. P2. K1. yrn. P1. Sl1K. K1. psso. P7. C2B. (P5. C2B) 1 (1-2-2) time(s). P3 (6-3-6).
4th row: K3 (6-3-6). (P2. K5) 1 (1-2-2) time(s). P2. K7. (P1. K2) twice. P2. K2. P1. K2.
5th row: P2. (Cr2L. Cr2R) twice. P1. yrn. P1. Sl1K. K1. psso. P6. C2B. (P5. C2B) 1 (1-2-2) time(s). P3 (6-3-6).
6th row: K3 (6-3-6). (P2. K5) 1 (1-2-2) time(s). P2. K6. P1. K4. P2. K2. P2. K3.
7th row: P3. C2F. P2. C2F. P3. yrn. P1. Sl1K. K1. psso. (P5. C2B) 2 (2-3-3) times. P3 (6-3- 6).
8th row: K3 (6-3-6). (P2. K5) 2 (2-3-3) times. P1. K5. P2. K2. P2. K3.
These 8 rows form pat.
Cont in pat until Right Front from beg measures 5¼ (6-6¼-6¾) ins [13 (15-16-17) cm], ending with RS facing for next row.
Shape front: Place marker at end of last row to mark beg of front shaping.
Next row: (RS). Pat 20 sts. C2B. P2togtbl. Pat 8 (11-15-18) sts. 31 (34-38-41) sts.
Next row: Pat to last 23 sts. K1. P2. Pat 20 sts.
Cont working dec 22 sts in from front edge, as set by last 2 rows, dec 1 st at front slope edge on next and every following alt row until 23 (23- 25-27) sts rem.
Sizes 0-6 and 6-12 months only:Work 1 row even.
Dec 1 st at end of next and following 2 (0) alt rows. 20 (22) sts.
All Sizes: Cont even in pat until Right Front measures same length as Back before shoulders, ending with RS facing for next row. Cast off.
SLEEVES
With smaller needles and A, cast on 29 (31-33- 37) sts.
1st row: (RS). K1. *P1. K1. Rep from * to end of row.
2nd row: Purl.
Break A and join MC.
3rd row: (RS). K1. *P1. K1. Rep from * to end of row.
4th row: P1. *K1. P1. Rep from * to end of row.
Last 2 rows form (K1. P1) ribbing.
Work a further 5 (5-7-7) rows in ribbing, ending with WS facing for next row.
Next row: (WS). Rib 2 (3-1-3) st(s). *M1. Rib 4 (3-3-3) sts. Rep from * to last 3 (4-2-4) sts. M1. Rib 3 (4-2-4) sts. 36 (40-44-48) sts.
Change to larger needles and proceed in pat as follows:
1st row: (RS). P3 (5-7-9). (C2B. P5) 4 times. C2B. P3 (5-7-9).
2nd row: K3 (5-7-9). (P2. K5) 4 times. P2. K3 (5-7-9).
These 2 rows form pat.
Cont in pat, shaping sides by inc 1 st at each end of next and every following 4th row until there are 46 (52-58-64) sts, taking inc sts into reverse stocking st.
Cont even in pat until Sleeve from beg measures 5½ (5¾-6¼-7) ins [14 (14.5-16-18) cm], ending with RS facing for next row.
Cast off.

FINISHING
Sew shoulder seams.
Button Band: With smaller needles and MC, cast on 7 sts.
1st row: (RS). K2. P1. K1. P1. K2.
2nd row: K1. (P1. K1) 3 times.
Rep these 2 rows until band, when slightly stretched, fits up left front edge to shoulder and then across to center back neck, sewing in place as you work and ending with RS facing for next row. Cast off.
Mark positions for 5 buttons on this band with first to come ½ inch [1 cm] up from cast-on edge, last to come ½ inch [1 cm] below beg of front shaping and rem 3 buttons evenly spaced between.
Buttonhole Band: Work as given for Button Band with the addition of 5 buttonholes to correspond with button markers.
Make buttonhole (RS): K2. P1. K1. yfwd. K2tog. K1.
Sew ends of bands tog at center back neck.
Place center of cast-off edge of Sleeves to shoulder seams, then sew Sleeves to Back and Fronts. Sew side and sleeve seams. Sew on buttons to correspond to buttonholes.
Embroider flowers onto Fronts as illustrated.
With A, embroider flowers by working 9 lazy daisy stitches radiating out from one point.
With B, embroider straight stitch stems and lazy daisy stitch leaves.

Read NextBaby Hoodie Knitting Pattern
Your Recently Viewed Projects


Thanks for your comment. Don't forget to share!
JennyBee1
Sep 27, 2011
@gajburk 4151492, For help with a specific question for this project, we suggest you contact the original designer of the pattern. In this case, Patons; here is a direct link to their contact info: www.patonsyarns.com/contact.php --Editor of FaveCrafts
gajburk 4151492
Sep 23, 2011
Has anyone answered this question? I have the same problem. This method of decreasing brings the cable together and it doesn't seem correct. I've already ripped it out twice and soon I'll put it away and forget about it because it's frustrating. I hope someone can explain what I'm missing. Thanks
Crafter 7888451
Apr 19, 2010
DEAR madam I am attempting to knit the pretty floral cardigan,with much difficulty.I have the back done, but am having difficulty with the sides,I had no problem with left side up to shape front.I am having a problem understanding the decreasing.what do you mean.continue working dec 22 sts in from front edge as set by last 2 rows. I would greatly appreciate your help, as this is a lovely pattern. thank you rochelle
Report Inappropriate Comment
Are you sure you would like to report this comment? It will be flagged for our moderators to take action.
Thank you for taking the time to improve the content on our site.