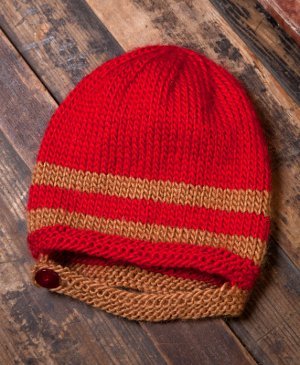
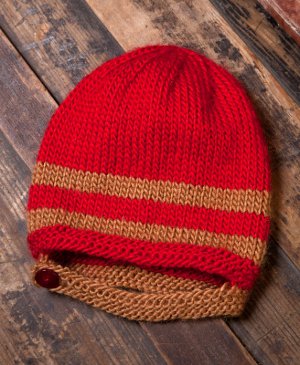
Classic Knit Pilot Hat
Dress up your little co-pilot in this Classic Knit Pilot Hat from Vickie Howell. This easy knit hat pattern works up easily and is prefect for babies and toddlers. Customize it to be any colors you'd like! Add a sweet flower on the side if you're making one for a little girl!
Materials:
- Stitch.Rock.Love. Sheep(ish) from Caron (70% Acrylic/30% Wool; 3oz/85g, 167yds/153m) (#00015 Red(ish) (MC) and #0010 Camel(ish) (CC), 1 skein each)
- One pair size US 9 (5.5 mm) needles or size needed to obtain gauge
- One pair size U.S. 8 (5mm) needles
- Yarn Needle
- One 3/4"/2cm button
SIZES
Baby (Toddler)
FINISHED MEASUREMENTS
Circumference: 15 (17)”/38 (43)cm (slightly stretched)
Instructions:
GAUGE: In St st with larger needles, 18 sts and 22 rows = 4"/10cm
STITCHES USED
- Garter stitch Knit every row.
- Stockinette stitch: Knit on WS, purl on WS.
NOTE: Carry colors not in use loosely along side of work.
CAP:
- With smaller needles and MC, CO 56 (70) sts. Work in Garter st for 5 rows. Change to larger needles and St st. Change to CC.
- Beginning on RS, work in St st 4 rows CC, 4 rows MC, then 4 rows CC. Cont with MC only in St st until cap measures 4 (5)”/10 (12.5)cm from CO edge, ending with WS row.
Crown:
- Row 1 RS): *K5, k2tog; rep from * to end—48 (60) sts.
- Row 2 and all WS rows: Purl.
- Row 3: *K4, k2 tog; rep from * to end—40 (50) sts.
- Row 5: *K3, k2 tog; rep from * to end—32 (40) sts.
- Row 7: *K2, k2 tog; rep from * to end—24 (30) sts.
- Row 9: *K1, k2 tog; rep from * to end—16 (20) sts.
- Row 11: *K2tog; rep from * to end—8 (10) sts.
- BO, leaving a 14”/35.5cm tail. Thread tail through yarn needle and weave through rem sts. Gather tightly and secure on WS.
- Sew back seam.
Lower Band and Chin Strap:
- With smaller needles and CC, CO 18 (26) sts, then holding the cap upside down with RS facing, count 12 (18) sts to the right of back seam and pick up 1 st in the 12th (18th) st and in each st to back seam, pick up 1 st in seam and in next 12 (18) sts. Note: If longer strap is desired add about 5 more sts to the CO sts at the beginning of the band.
- Work in Garter st for 2 rows.
- Buttonhole row: K to last 5 sts, k2tog, yo, k3.
- Work in Garter st for 2 more rows.
- BO.
FINISHING
- Weave in all ends. Sew button on band opposite buttonhole.
Read NextBeginner Hat Knitting Pattern