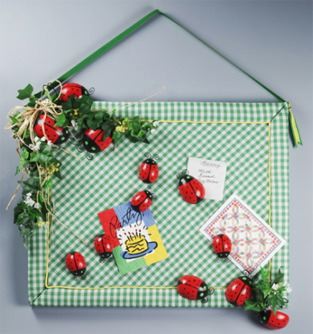
Great Garden Ladybug Memo Board
Normally bugs scare me, but these bugs are here to decorate. With paints, fabrics and some other materials we can learn how to make fabric memo boards.
Materials:
- STYROFOAM Brand Foam:
- Sheet, 36" x 12" x 1"
- Eggs: 2", three; 2-1/2", three; 3", one
- Extra-loft quilt batting, crib size or 45" wide, 1/6 yd.
- Satin varnish
- Gesso
- Pre-mixed patching plaster
- Acrylic paints: red; black; bright green; white
- White/green gingham fabric, 45" wide, 1-1/2 yds.
- One package yellow jumbo piping
- Grosgrain ribbon, 1 yd. each: yellow, 3/8"; green, 5/8"
- Black plastic-coated wire, 18- and 22-gauge, one package each
- Natural raffia
- Clear plastic push pins, seven
- Serrated knife
- Candle stub or paraffin
- Artificial greenery, one stem each: ivy cluster; small white flowers; small yellow flowers
- Fine-line black permanent marker
- Round pencil with new eraser
- Yardstick, or ruler
- 17 Round toothpicks
- Paintbrushes: medium flat; small round
- Disposable palette
- Water basin
- Paper towels
- Scissors
- Glass-head straight pins, two
- Wire cutters
- Needlenose pliers
- Awl, or metal skewer
- Putty knife, 1" wide
- Painter's mask (to be worn while sanding plaster)
- Sandpaper: medium; very fine
- Low-temp glue gun and glue sticks
- Thick, white craft glue
Steps:
Board
- Wax serrated knife with candle stub or paraffin. Use marker to draw two 10" x 16" rectangles onto foam sheet; cut out.
- Use glue gun to glue five toothpicks, equally spaced, halfway into one long edge of one foam rectangle. Use glue gun to apply glue to protruding toothpick ends, foam edge, and one long edge of second rectangle. Working on flat surface, quickly and firmly press second rectangle onto toothpicks, flush with first. Let dry. Finished board should measure 16" x 20".
- Using yardstick and marker, draw 1-1/2"-wide border around board. Draw diagonal lines from border corners to board corners. Score all lines with sharp pencil.
- Cut two 1-1/2" x 20" strips and two 1-1/2" x 16" strips from batting. Trim strip ends to fit within mitered corners. Use white glue to glue batting strips to borders. Let dry.
- Measure and cut on straight grain one 22" x 26" gingham rectangle. Measure and cut on bias (diagonal) one 14" x 18" gingham rectangle.
- Center back of board over wrong side of larger gingham rectangle. Bring fabric allowance around to front, over batting-covered border. Working on opposite sides, from center out, use putty knife to tuck seam allowances into scored lines. Push knife straight down into scored line to keep even tension. Trim fabric at corners and tuck into mitered corners. Center bias fabric over center of board and tuck edges into scored lines.
- Beginning and ending in one corner, tuck piping seam allowance into scored edge of border.
- For hanger, center yellow ribbon over green; secure with white glue. Let dry. Cut inverted "v" into each end of ribbon. Knot ribbon, 3" from each end. Dip glass-head pins into white glue. Push pins through ribbon just below knot, then into edge of board, 1" below top corners. For extra strength, use glue gun to spot glue knots to board.
Ladybugs
- Wax serrated knife with candle stub or paraffin. Cut all foam eggs in half lengthwise; set aside one half of one medium egg for another project.
- Insert toothpick into flat side (bottom) of each half-egg body. Holding toothpick, use fingers to coat rounded surface of body with plaster. Push toothpicks into scrap foam; let dry.
- Sand bug bodies first with medium, then very fine, sandpaper. Recoat, let dry, and sand again. Repeat as needed until completely smooth surface is achieved.
- Apply one coat gesso to all surfaces of each bug, let dry, then sand with very fine sandpaper. Repeat.
- Use flat brush to paint bugs red; let dry. Apply second coat; let dry. Using photo as guide, use round brush to paint black head and wing separation line; use round brush handle to paint black wing dots. Let dry.
- For large bugs, use pencil eraser to paint bright green dots for eyes; use round brush handle to add white highlight dots to centers. For medium and small bugs, use brush handle for eyes and toothpick for highlight dots. Let dry.
- Apply three coats varnish to each bug; let dry between coats. Remove toothpicks.
- For antennae, cut the following from 22-gauge wire: twelve 1-1/2" lengths (small bugs); ten 2" lengths (medium bugs); four 2-1/2" lengths (large bugs). Use pliers to bend spiral into one end of each antenna. Use awl to poke two 1/4"-deep holes in top of each head, 1/8" above bottom edge of body and 1/8" apart. Use white glue to glue antennae into holes.
- Use awl to poke holes in bottom of three medium and all small bugs. Enlarge holes in small bugs and one medium bug to accommodate push pins, so only pin protrudes. Use white glue to glue push pins into holes. Let dry overnight.
- For "flying" bugs, cut two 9" lengths from 18-gauge wire. Leaving 1" straight wire tail, bend each wire length into three irregular loops. Use white glue to glue curled wire end into holes in two medium bugs; use glue gun to secure. Set aside.
- Use wire cutters to cut three 5-1/2" and three 9" lengths from ivy. Cut six small sprigs each from white and yellow flowers.
- Using photo as guide and glue gun, glue two 9" ivy lengths down left side and one length across top. Glue 5-1/2" ivy lengths to top left corner, to end of 9" length at top of board, and to bottom right corner.
- Holding seven strands of raffia together as one, tie bow. Glue bow into ivy at top left corner. Glue flowers to board as desired. Glue bugs without pins or wires to board. Glue wire tails of flying bugs into board at top left and bottom right corners.
®™ Trademark of The Dow Chemical Company ("Dow") or an affiliated company of Dow. For more project ideas, please see styrofoamstyle.com.
Read NextAdorable Farmhouse Mason Jar Craft
Your Recently Viewed Projects

Thanks for your comment. Don't forget to share!
kimbecker1216 9995 228
Jan 25, 2014
use metal for backing, make ladybugs from clay and glue magnets to back, cover with cotton fabric, decorate- the foam will wear our with frequent use and makes it useless.
Report Inappropriate Comment
Are you sure you would like to report this comment? It will be flagged for our moderators to take action.
Thank you for taking the time to improve the content on our site.