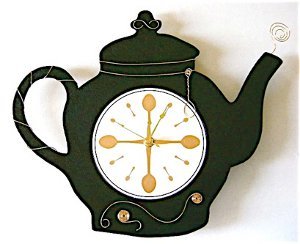
Wired Tea Pot Clock
Looking forward to a little break in the day? With this Wired Tea Pot Clock from Gloria Uhler, it's tea time all the time! This is a great kitchen accessory and you won't believe how easy it is to make. This would also make a great gift for housewarming party.

Materials:
- Gold Enamel Paint Marker
- Gloss Black Paint
- Glosscote Clear Lacquer
- Craft Knife
- Aztek airbrush
- Art Minds Teapot Plaque
- Art Minds Clock Movement Kit for 3/8” surfaces
- Beadalon 20 gauge Gold Wire
- Round & flat nose pliers
- Wire cutters
- E-6000 Glue
- DMC Tapestry needle #18
- Drill
- 3M 1” wide Painter’s Tape
- Transparency sheet
- Round object/ thread spool, metal tube, etc.
- Clock Face Template
- Assembly Instructions
Instructions:
-
Print the clock face template page onto card stock. Using scissors or a craft knife, cut around the outer black line. Cut out the small center circle.
-
Cut a duplicate shape of the clock face from the transparency sheet.

-
Using the Gold paint marker, paint over the printed, four, large spoons to give them a metallic look.
-
Drill a 1/2” hole in the center of the teapot.

-
Airbrush the front and all edges of the teapot with black paint. Allow to dry.

-
All the wire spirals are formed the same way. Different looks are achieved by wrapping some tighter than others.
-
To create a spiral, wrap the end of a piece of wire around the edge of round nose pliers to form a tiny circle. Grasp the circle with the flat nose pliers to hold it stationary. Pull the wire around to follow the circle. Work in small sections, moving the pliers around the growing circle until it is the size you want.
-
To create smooth curves in the wire, shape it with your fingers around a circular object like a spool of thread. To create “S” curves, create half the “S” by smoothing in one direction, then go to the end of the curve and smooth in the opposite direction.

-
Create the spoon by wrapping wire around a round object and twisting the ends. Make the twisted section 1” long. Finish the ends with a spiral. Pull on the end of the spoon’s bowl to make the circle into an oval.
-
Make sharp bends in the two horizontal wires at the upper pot so they sit flat on the edges of the wood. Cut them long enough to meet at the back of the pot. Hang the spoon on the wire before wrapping the remaining wire around the back of the pot and twisting to secure it. Cut off the excess.

-
Drive a thick darning needle into the wood spout with a screwing motion to create a hole about ½” deep.
-
Dip the edge of the spout wire into E-6000 glue then insert it into the spout hole.

-
Use glue on the backside of wire to attach shapes like those at the very bottom of the teapot.
-
Wrap wire around the teapot handle. Turn the teapot over and twist the beginning and ending wires together. Tape the ends down and apply glue between the wire and the wood. Allow it to dry, then remove the tape and trim the ends.

-
Insert the clock shaft into the back of the clock. Set the card stock clock face over it followed by the transparency.
-
See the easy assembly clock instructions included with the download. For some reason, complete assembly instructions are not included in the Clock Movement Kit but I found them online.

Read NextClassy Kitchen Hutch