Exotic Necklace
Colors of brown and navy combine with black cording, glass and copper beads for a striking necklace from AMACO.

Materials:
AMACO® Professional Bead Roller Set #1 - 19 x 7mm oval
AMACO® Professional Bead Roller Set #2 - 12mm round
AMACO® Professional Bead Roller Set #4 - 28 x 11mm oval
AMACO® Professional Bead Roller Set #8 - 6mm round, 7mm round
AMACO® Rub 'n Buff® wax metallic finish - Autumn Gold
AMACO® Needle Tool
AMACO® Bead Baking Rack
Polymer clay - Navy Blue, Brown
Sandpaper or sanding sponges - fine, extra fine
Black Cording - stretch, hemp or nylon
12 copper Seed beads / 4 copper Spacer beads
2 complimentary Glass beads (11mm round)
Future® floor polish
Fine paint brush
Polybonder (recommended) or some form of CYANOACRYLATE glue such as Super glue or zap a gap
4 Head pins (Copper)
2 Eye hooks (Copper)
Wire Ear ring hooks (Copper)
(optional) Preferred clasp (Lobster claw, Toggle, etc.)
Steps:
- Following manufacturers instructions, use Bead Roller Set #1 to make two 19 x 7mm ovals with brown polymer clay. Pierce each of these beads 1/4" from the top (sideways) for stringing. Place one seed bead onto a head pin and insert into the opposite end (bottom) of each bead until the seed bead sits flush against the clay. Do not press the seed bead into the clay as shown in image #1.
Make four 28 x 11mm oval beads using Bead Roller Set #4 with navy blue polymer clay. Two of these beads should then be pierced 1/4" from the top (sideways) for stringing. The remaining two beads are going to become your earrings. To do so, one eye hook should be inserted flush with the top of each bead (see image #2) and a seed bead and head pin inserted into the bottom (see image #1).
Make two 6mm, two 7mm and two 12mm rounds also in navy blue, using Bead Roller Set #2 and #8. Pierce each of the beads using the AMACO® Needle Tool through the center and place them on your bead baking rack. Set all beads aside.

- Next you will form the cabochon or centerpiece of your focal bead. Using the navy blue polymer clay, shape a 1-1/4" oval. The top will be slightly domed or rounded and the back is flat (see image #3).
Once the cabochon is formed, pierce a hole at the top (approximately 1/4" from the edge). You must ensure that the hole is large enough to fit several pieces of cording through it (approximately 1/4"). Place on a flat surface and bake along with your beads according to manufacturers instructions.

- Once the beads have cooled, you will want to sand them to remove any imperfections using a fine sanding sponge. I recommend wet sanding as this keeps the dust to a minimum and allows for a smoother finish. You can add a drop of dish detergent to the water as well. When finished, switch to an extra fine sanding sponge and continue to sand until the beads are smooth to the touch. Repeat this step on your cabochon and earring beads.
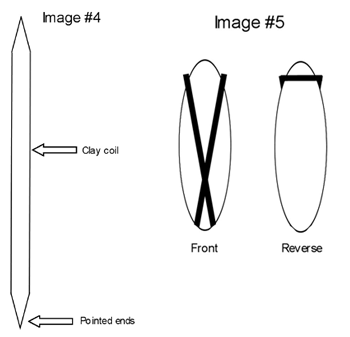
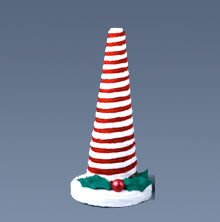
- Make a 4" coil or clay snake (between 1/4" and 1/2" around) using brown polymer clay. Shaping both ends to a point (see image #4), wrap the coil loosely around your pre-made cabochon and shape. Be sure not to cover the hole you have already made previously in your cabochon. Next, do the same thing for the earrings using a much thinner coil of clay. Wrapping the coil around the earring in an "X" pattern (see image #5). Use Polybonder to attach the coil to the pre-made bead. Using the included application brush, paint the Polybonder onto one side of the coil and place over the earring carefully. Bake these pieces according to manufacturers instructions.

- Once your focal piece has cooled, you must carefully separate the coil frame from the cabochon. This makes it easier to apply the Rub 'N Buff® to the entire coil without getting any on your blue cabochon. This will be reattached later.
You are now ready to add Rub 'N Buff® to create a metallic look. Using a soft rag, paintbrush or your finger, apply enough Rub 'N Buff® to the coil to completely cover the brown clay. Buff with a soft cloth to desired finish and allow to dry. Set aside and repeat this step for the two brown oval beads you made in Step 1. For the earrings, use a fine paintbrush to apply the Rub 'N Buff to the brown clay detail. You can also add some Rub 'N Buff® details to your complimentary glass beads at this time.
- Using a paintbrush, apply several thin coats of Future® floor polish to each of your navy blue beads, including the earrings. Use caution to avoid the decorative coil details you added. Do this to the centerpiece (cabochon) of your focal as well. These can then be heat set for added shine in a warm oven (no hotter than 200 F) for 10 minutes.
- After your Navy cabochon has cooled, apply Polybonder to the outside edge of your cabochon and join it to the coil frame. A small amount of pressure will help to insure a seamless connection.
- Loop the cording through the opening in your focal piece several times allowing 1/4" extra for each loop. This excess cording is how you will thread your necklace and join it to the other beads. Secure in the back with a knot. String your beads onto a new piece of cording as follows:
- One seed bead
- One spacer
- One 6mm navy round
- One spacer
- One 7mm navy round
- One seed bead
- One glass focal
- One seed bead
- One large navy oval
- One seed bead
- One small copper oval
- One seed bead
- One 12mm navy round
At this point you will thread your focal bead onto the cording and then repeat the remaining beads in reverse. Finish with your preferred clasp or just a knot.
Read NextFiligree Earrings