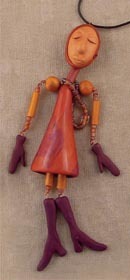
Daggers Necklace
Learn how to make a very interesting piece of jewelry that will have all of your friends talking. This necklace is stunning as it lays at the base of the neck.

Materials:
- One spool of black Nymo thread, size D
- Size 11 or 12 beading needles
- Thread Heaven
- Toho Black Matte Seed Beads, size 11, approx. 30 grams (A)
- Toho Gold Metallic Beads, size 11, approx. 10 grams (B)
- Eleven small jet black bicones (either Swarovski crystal or fire polished glass)
- Ten round lampwork beads – approx 5 mm diameter
- Gold colored clasp
- Two clamshell bead tips
- Two gold split rings
Steps:
- First, we will make the daggers using two-drop brick stitch, and then stitch the daggers between the lampwork beads to assemble the necklace. I made 11 daggers for my necklace. As pictured, the necklace lays at the base of the neck. You may wish to make more daggers for a longer necklace, or fewer daggers if you are using larger lampwork beads or wish to place more beads between each dagger.
- A basic knowledge of brick stitch is required to make this necklace. If you need a tutorial, many are available on the Internet. A good starting point is beadwork.about.com. (Note: You may have another sponsored link you prefer to this one, but there are many free brick stitch tutorials on the Internet.)
- Start by conditioning a comfortable amount of thread with thread heaven, thread the needle.
- String one A bead and pass back through to make a stopper bead. Leave at least a 6 inch tail. String 3 B beads and pass back through the first B bead and the A bead to make the start of a two-bead ladder.
- Continue the 2-bead ladder by stringing and A and B bead and passing the needle down through the previous two beads and back through the two new beads. Continue doing the two-bead ladder stitch to make 8 additional rungs of one A and one B bead. (To make the pattern correct, you will need to alternate stringing the A and B beads in the appropriate order.) Make one final run of your ladder for the top row with 2 B beads.
- Pass back down through the last A/B rung of your ladder stitch row. If your needle is not correctly placed, you may need to hook your thread around one of the stitches and pass the needle down to the proper position.
- String 2 B and 2A beads. Stitch through the thread towards the middle and back up the two A beads. Brick stitch the row in the following order: 2A, 1B1A, (5 times) 2A, 2A, 2B. You are at the end of the second row. Run your needle up through the end two B beads and back down through the next row and down through the next to the last row, positioning your needle for the next row.
- Row 3: we are going to start the first of two legs for each side of the V-shaped opening. String 2B and 2A. Brick stitch towards the center and back up through the 2A beads. Stitch 2A and 2B.
- Row 4: String 2B and 2A. Stitch back towards the edge and back up through the 2A beads. Stitch 2A and 2B. We will again need to reposition the needle. Go back down the 2B immediately next to the needle, circle around the previous row and come back out the 2B beads.
- Row 5: Same as row 3. When you are done, we will reposition to start the second leg. Go down through the adjacent 2B of the current row, then down through the edge rows of Row 4 and 3, back to the base row. Continue the needle down through the two base rows, working towards the middle. Turn around back through the two base rows in the opposite direction, down and back around.
- Second leg Row 3: String 2B and 2A. Stitch one towards the outside and back up through the 2A beads. Brick stitch 2A and 2B. You are at the end of the row. Reposition the needle back going down through the 2B adjacent to your thread, down, around, and back up those 2B.
- Second leg Row 4: String 2B and 2A. Brick stitch towards the center and back up through the 2A beads. Stitch 2A and 2B.
- Second leg Row 5: String 2B and 2A. Brick stitch towards the outside and back up through the 2A beads. Stitch 2A and 2B. Use the same thread path to reposition the needle for Row 6.
- Row 6: This is the row where you will join the two legs together. First, String 2B and 2A. Brick stitch towards the center and back up through the 2A beads. Brick stitch 2A and ladder stitch on 2B. To join the two legs together, go down through the 2B from the second leg and back up the 2B from the first leg, then back up through the 2B from your current working row. Continue on brick stitching 2A, 2A, 2B.
- Row 7: String 2B and 2A, brick stitch towards center and come up through the 2A, as in all previous rows. Stitch 2A, 2A, 2A, 2B.
- Row 8: String 2B and 2A, brick stitch towards center and come up through the 2A, as in all previous rows. Stitch 2A, 2A, 2B. Reposition the needle using the thread path from figure 3 to come back out the last 2A of this row. (Note: This is the same as row 7, but with one less 2A)
- Row 9: Same as Row 8, but stitch only 2A and 2B after the first stitch.
- Row 10: String 2B and 2A, brick stitch towards center and come up through the 2A, as in all previous rows. Stitch 2B.
- Row 11: String 2B, a bicone, and 1B. Skip the 1B and pass back through the bicone, 2B and 2A from Row 10 immediately above it. Weave through a number of rows, knotting in between, cut threads. Weave in the original tail and cut threads.
To assemble the necklace:
- Secure the thread in the top row of one dagger, come out the uppermost B bead in one corner, string a lampwork bead, and pass the thread down through the 2B beads in the opposite top corner of a second dagger. Pass back through the lampwork bead and up the 2B beads on the first dagger. Repeat this several times to secure.
- Repeat this until all of the daggers are sewn together in a line.
Read NextDiy Paper Bead Earrings