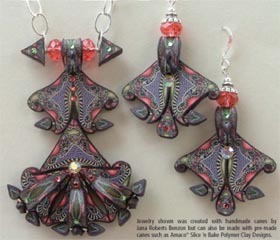
Hinged Whimsy Necklace and Earrings
Polymer clay canes give an interesting and detailed look to these jewelry pieces.
By Jana Roberts Benzon for AMACO
Materials:
- FIMO® Slice ‘n Bake Polymer Clay Designs Canes – 4 to 6 canes
- (using several different, coordinating designs of canes gives an interesting, detailed look to the finished piece)
- Liquid FIMO® Decorating Gel
- Amaco® PolyRuler
- Amaco® PolyBlade
- Amaco® Double-Ended Drill
- Wire, 18 gauge, color of your choice
- Flat back rhinestones – 19
- Super glue
- Saucer beads – 2
- Bead caps – 2
- Chain – 20"
- Clasp
- Headpins – 2
- Earwires – 2
- Round nose pliers
- Wire cutters
- Tile or cookie sheet to bake on
Steps:
- Using fingers, shape and manipulate Millefiori canes into the shapes shown at the end of the instructions (approximately a 1½" to 2" cane length of each shape, with the exception of the Medium Teardrop Cane which needs to be approximately ½" in length). To mark the cane for uniform slicing, use your PolyRuler. Press the 5mm side of the PolyRuler into the large triangle cane, small triangle cane and medium teardrop cane, and press the 3mm side of the PolyRuler into the elongated almond and the small teardrop canes.
- For the necklace, use the Amaco® PolyBlade to cut six 5mm thick slices from the large triangle cane, using the markings made with your PolyRuler as a guide. On two slices, curl one edge down into a swirl, and one edge out slightly. Place these two pieces together. Next, place one of the large triangle slices into the space between the two curved-edge triangle slices. These three pieces form the top portion of the necklace. (See Diagram A).
- On two of the remaining large triangle slices, curl one tip in and slightly indent one side of the triangle. Place these two pieces on either side of the remaining triangle. These pieces will form the lower portion of the necklace. Butt this three piece section onto the top portion of the necklace as in Diagram B.
- Cut four 3mm thick slices from the elongated almond shaped cane, using the markings you made with your PolyRuler as a guide. Curl one end of each slice up. Place three of these pieces on each of the three bottom triangles of the necklace, with the curled edge attaching to thebottom of each triangle. On all three of these almond shaped slices, make sure to leave a gap in the curled end for the wire to fit through. Place the remaining curled almond shaped slice on the top of the necklace as a hanger, with the curled end sitting on the top front and the other end looping over the top of the necklace and attaching on the top back of the necklace. Make sure that you leave a “loop” or gap on this almond shaped slice for the wire to fit through.
- Cut a piece of wire approximately 1¼" long (or to fit) and insert it into place through the top portion of necklace. (See Diagram C). Cut two 3mm thick slices from the small teardrop shaped cane, using the PolyRuler markings as a guide. Put a small dab of FIMO® Liquid on each end of the wire and push the two teardrop slices into place on wire ends. Bake according to manufacturer’s instructions.
- Cut three small pieces of wire (approximately ½" long, or to fit) and place them into the gaps of the three bottom almond shaped cane slice curls. Cut six 3mm thick slices from the small teardrop shaped cane. Put a dab of FIMO liquid on the six ends of the wire, and place one of the small teardrop shaped slices on each of the wire ends. Bake at 265ºF (130ºC) for 10 minutes. Let cool.
- Cut a 1¼" (or size to fit) piece of wire and place it through the gap in the curl of the almond shaped cane slice on the top of the necklace. Put one saucer bead on the wire on each side. Place a dab of FIMO® Liquid on each end of the wire. Cut two 5mm thick slices from the small triangle cane and place one cane slice the each end of the wire. Bake for 15 minutes at 265ºF (130ºC) degrees.
- When the necklace has cooled, glue rhinestones in place with super glue. Next attach two of the chain ends to the wire on the top of the necklace and place the clasp on the other ends of the chain. If any of the small teardrops or triangles are not secure on the wires, you can remove them and glue back in place with super glue.
- For the earrings, cut four 5mm thick slices from the large triangle cane, curl the ends in and place two slices together as in Step One. Do this step for each earring. Cut two 5mm thick slices from the medium teardrop shape and insert in place in the space between the two triangle spots on each earring.
- Cut two 1" (or to fit) pieces of wire and insert them through the tips of the triangle and the top of the teardrop on each earring. (see Diagram D). Cut four 3mm thick slices from the small teardrop shaped cane. Place a dab of FIMO® Liquid on each end of the wire and place one teardrop shape in place on each wire end.
- Slice two 3mm thick slices from the almond shaped cane and curl as in Step Four. Place one on top of each earring, following the instructions in Step Four for placing the curled almond slice on the top of the necklace. Bake according to manufacturer’s instructions.
- When the earrings have cooled, glue rhinestones in place with super glue. Using the smaller end of your Amaco® Double-Ended Drill tool, drill a hole into the top of each earring through the center top of the curled almond shaped slice. Put the headpin through the hole you drilled (bringing it up from the bottom inside of the curled almond shaped slice that loops over the top of the earring), add a saucer bead and bead cap and then form a loop with your round nose pliers out of the remaining wire on the headpin. Trim wire. Attach ear wires.