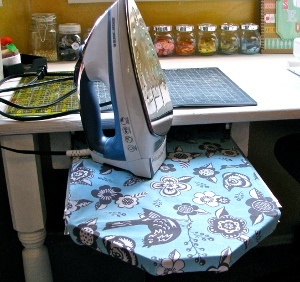
Slide-Out Ironing Board Cover
After you make a slide-out ironing board, learn how to make ironing board covers! The best part about making your own is that you can fit any shape and size ironing board, and you can use whatever fabric you like! Watch and learn.

Materials:
- Quilting-grade cotton (enough to cover your board, plus approx. 1 in. extra width and 7 inches extra length)
- Heat-resistant metallic fabric, same dimensions (available at JoAnn’s)
- Velcro, sew-on, 1 in. width (approx. 12 inches)
- Velcro, self-adhesive, 1 in. width (approx. 12 inches)
- Sewing machine, thread, iron
Video:
Instructions:
- You should already have traced your slide-out ironing board onto a piece of wrapping paper. Now we’ll enlarge the template by adding a 1/2 inch to each of the long sides. The two short ends will need an extra 2 1/2 inches, plus the height of your board. For me, that means I’ll be adding 3 1/2 inches to the short ends.
- I’m using a layer of heat-reflecting fabric underneath my cotton cover. This helps heat to radiate from underneath the fabric as well as from the iron above. You can buy it from JoAnn’s fabric, it’s found by the upholstery fabrics. Make sure your fabrics are free of wrinkles, then lay both fabrics face up on the table, with the cotton on top. Pin the pattern in place and cut out.
- Turn the fabrics face down. Fold the raw edge under 1/4 inch, then fold another 1/4 inch to encase the raw edge. Press and pin, all the way around. Lay the fabric on top of your board to check the fit. The edges on the two long sides should cover the wood, but not overlap the metal slides.
- Sew in place with a 1/8 inch seam.
- Pin the fuzzy side of the sew-on Velcro to the wrong side of t he back straight edge. Sew in place using a zig-zag stitch.
- Lay the fabric face down on the table. Press a rough piece of adhesive Velcro onto the strip you just sewed. Lay the ironing board on top and fold up the edge, pressing the sticky Velcro in place.
- Flip the ironing board over so you can position the fabric in front. With the back still Velcroed in place, pull the fabric taut. Fold it under and around the slanted edges, like you’re wrapping a present. Tuck the fabric on one corner so it has a nice sharp edge, then place a pin through this pleat. Remove cover and sew through the pleat with a straight stitch.
- Velcro the back in place once more, and replace the fabric at front. Now create a pleat on the other side.
- We’ll use the opposite pieces of Velcro for the front, so we won’t have unmatched Velcro left over. Sew the rough side of the Velcro to the front and angled portions of the fabric using a zig-zag stitch.
- Add the fuzzy adhesive Velcro on top, then fold over to the bottom of the board and press firmly in place.
Read NextRecycled Rug Poufs
Your Recently Viewed Projects
Thanks for your comment. Don't forget to share!
mccandlessquilts
Mar 06, 2017
I love this project. I have 2 old wooden ironing boards, now I know what I can do with one of them! #NationalCraftMonth2017
littlegrannie 5643 241
Nov 12, 2011
What I want to know is how to make the slide out ironing board? This is a wonderful idea, never saw a slide out ironing board before! My husband is very handy at building things for me. is there directions somewhere for the board? He is needing another project to work on!
purpleheartAW2mom
Feb 19, 2012
http://www.youtube.com/watch?v=j5ZLxfptHRg - I know this is almost 3 months later than the posting, but in case littlegrannie checks her post, here is the web site on how to build the slide-out ironing board. Good luck!
Report Inappropriate Comment
Are you sure you would like to report this comment? It will be flagged for our moderators to take action.
Thank you for taking the time to improve the content on our site.