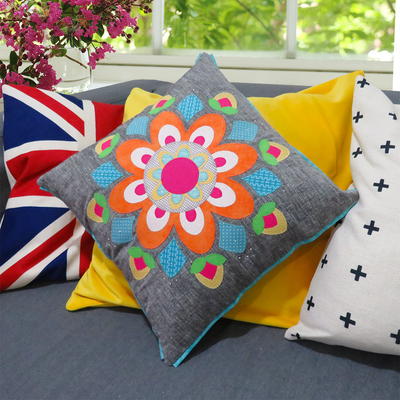
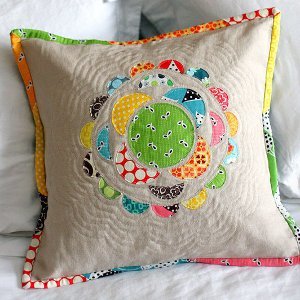
Scrapalicious Throw Pillow
Gather up all those scraps that you've been saving and get ready to put them on display! This Scrapalicious Throw Pillow from Fiskars is a great way to show off all your favorite fabric pieces while creating a lovely pillow at the same time! This tutorial is meant for more advanced sewists, but that doesn't mean it's impossible! Redecorate your living room or add some color to your bedroom with this fun DIY throw pillow. As an added bonus, you'll be cleaning out your fabric stash, too!

Materials:
- Squeeze Punch: Large - Round 'n Round
- Squeeze Punch: Extra-Large - Round 'n Round
- Shape Template - Circle
- 45mm Comfort Grip Rotary Cutter
- 24" x 36" Cutting Mat
- 5" Micro-Tip® Scissors
- 8" Razor Edge Scissors
- 2 sided iron on fabric adhesive
- Linen
- Coordinating quilting weight cotton fabric for backing
- Batting
- Thread
- Fabric scraps
- Sewing machine
- Needle
- Pins
- Throw pillow insert
Instructions:
NOTE: measurements given in directions are based on my 15 inch square throw pillow insert. You will need to alter measurements to fit your own pillow size, if different.
-
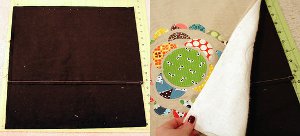
Start by trimming an 18 inch square piece of linen to use as base of front of pillow. (I like to over-trim just in case) Next gather a variety of multi colored scrap fabric to use for your applique bits. Following wonder-under (or other fabric adhesive) directions, apply wonder-under to the back of each scrap.
-
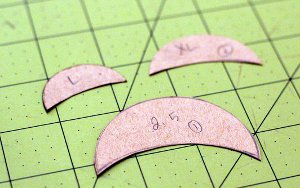
Next use your traditional Fiskars papercrafting tools to create your template pieces for your flower motif applique. Use the 3.5 inch circle from the circle template as the center of your flower. Next use the 2.5 inch circle on the template to trim a circle from cardstock. Lightly draw a curve through about 1/3 of the circle to form a shape similar to the one in my photo. Trim away excess circle and this will be the template piece for the ring of petals around the center of your flower. Next punch an XL and L circle using the Round 'n Round squeeze punch from cardstock. Draw a similarly curved line through the circle and trim excess so that you now have three template pieces (+ center circle) for your flower motif.
-
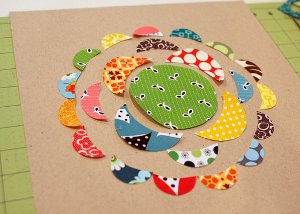
Use largest and midde sized template pieces to trace and trim four petals from each (8 petals total) from scrap fabric. Trace onto backside of fabric that wonder-under has been applied to. Fiskars 5 inch Micro-Tip® scissors work best for trimming precisely. Use the smallest sized template piece to trace and trim 15 pieces from scrap fabric.
-
Arrage pieces around center circle, creating a flower motif, as shown in photo. Starting with center circle, peel adhesive backing and follow instructions to heat bond with an iron to your fabric. Work your way outward with the flower motif design until complete.
-
Time to quilt the front of your pillow! Trim batting (I like to use warm and natural 100% cotton low loft batting) to roughly the same size of pillow front base - or just a tad bigger - i trimmed to 19x19. Layer underneath linen front panel and secure using large quilting safety - or basting - pins. Use a tan thread to secure each applique piece in place permanenty with a simple straight stitch around the inside of the applique piece (as close to the inside as possible). With time, applique edge may fray slightly - I like this look. While you are doing this, it is also creating a quilty-pocket inside each applique piece.
-
After all applique pieces have been stitched and secured, continue quilting around the edge of flower motif design using an echo-quilting technique - which simply means to follow the shape of the flower. Once quilting is complete, remove all pins and trim base to 16.5 inch square.
-
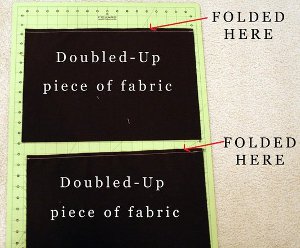
Using the Fiskars Rotary Trimmer and cutting mat, trim two pieces of coordinating quilting weight cotton (I used brown) to 19x16.5 so that when folded in half (as shown in photo) they measure 8.5x16.5. Iron to press/crease along fold, and then seam top where folded using straight stitch and 1/4 inch inseam.
-
Lay two backing pieces right side down, seamed and folded edges facing inwards, slightly overlapped so that when overlapped and placed together, they form a 16.5 inch square.
-
Lay linen applique base directly on top, rightside up. Pin outer edges with straight pins. Machine stitch around edge using a straight stitch and 1/4 to 1/2 inch inseam. Edges will appear "rough" like an unfinished quilt, and need binding.
- Finish pillow by "binding" rough edges. Follow my "how to quilt" article here for step by step directions on how to bind. I used scraps for binding as well - simply selecting longer scraps that were at least 3 inches in width and piecing together to form my binding strip. Pillow covering will then be complete and ready for throw pillow insert. Enjoy!
Read NextDoor Stop Monster
Your Recently Viewed Projects
Thanks for your comment. Don't forget to share!
mulberrygalprinces s
May 25, 2018
This is very nice and not hard at all. The directions are simple enough that anyone can follow them. I would like to use some pieces of material that I have saved and have memories attached to them. By the way my grand mother was Pennsylvania Dutch and she would not consider quilting on a machine!
The Designing Peng uin
Dec 08, 2016
A bright and cheerful accent to any room - and a chance to test the quilting waters. I think this would be a great project for the dark evenings in January
smilinggoatstudio 8292044
Jan 27, 2013
This is a really great idea! Love how it looks. Am planning on quilting a summer weight quilt for our bed and these would make a lovely compliment to it. Thanks for sharing!
Report Inappropriate Comment
Are you sure you would like to report this comment? It will be flagged for our moderators to take action.
Thank you for taking the time to improve the content on our site.