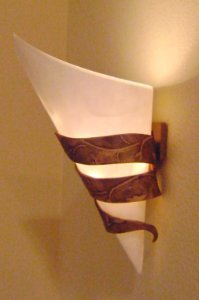
Daring DIY Wall Sconce
 Visit Gloria at Domestic Diva.
This Daring DIY Wall Sconce may look like it cost a fortune, but it's actually made out of supplies that you can get at your local craft store for a few dollars apiece. Learn how to make a wall sconce cover out of paper and clay, and you'll be able to give your house a makeover without breaking the bank. You'll hardly believe how simple it is to put together this timeless look. This wall sconce is inspired by the elegance of ancient cultures as well as the simplicity of modern interior design.
You can find this project, as well as many other fabulous blogger projects, in our new eBook, The Best Blogger Craft Ideas 2014: Decoupage, Sewing, Jewelry Making, and More free eBook. Download your own free copy today!

Materials:
- Polyform Sculpey shaping tools
- Fiskars scissors
- Cylindrical cardboard container
- Transparent tape
- Aluminum foil
- Baking sheet
- Stapler
- Blank stencil
- Printing paper
- Vellum paper
- Polyform Premo! Clay (copper)
- Aztek Paint (black)
- Clay conditioning machine
- Plaid Martha Stewart Tendrils Stencil
- Acrylic clay roller
- Small paint brush
- Soft cloth
- Screw or nail
- Battery-powered LED 18 light string
Instructions:
- Cut an oatmeal container in half, following the line down each side. Pull off the bottom. Overlap bottom edges and staple them together.
- Peel off label and smooth aluminum foil over container. The front should be slightly curved and the back side should be flat.
- Condition 2 oz. copper clay on a clay conditioning machine using the thickest setting. Cut clay into 1" strips.
- Place stencil on clay and roll over it to transfer design. Cut clay into three strips measuring 7/8" wide and 7," 8," and 6" long. Use shaping tools to create a curl on the upper and lower strip ends.
- Drape clay strips over the container, bringing flat edges to the back side. When all 3 strips are positioned with equal distance, press back edges together to join them.
- Cut a thick piece of clay measuring about 2" square. With clay shaping tools, make a hole to accommodate the nail or screw that will be used to hang the sconce.
- Bake hanger and sconce, positioned curved side up at 275 degrees for 30 minutes on a foil-lined baking sheet. Allow clay to cool before handling.
- Cut 3 cones: 1 from a blank stencil to provide support; 1 from regular paper to diffuse lights; and 1 from eggshell vellum paper. Each cone should measure 6.5" square.
- One cone at a time, place edges together and join them with transparent tape.
- Place cones inside each other, leaving the vellum cone on the outside.
- Working in small sections with a brush, apply wash to the clay. You can make the was out of a splash of water and some black paint. With soft cloth, wipe away paint from raised areas immediately to create an antique look.
- Hang sconce on wall. Set cone into the clay. Slip battery pack into cone and arrange lights inside. Position the switch for the battery pack near the top so that it is easy to access.
- Turn it on and let the light shine!
Read NextPom Pom DIY Rug