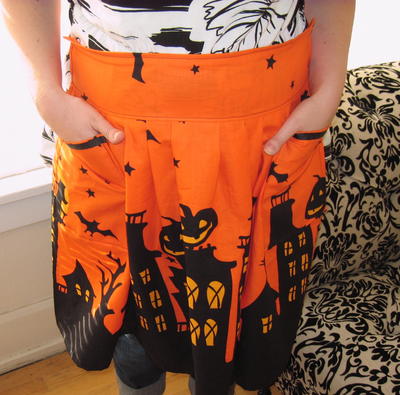
Sewn Halloween Apron
Bake those ghoulish cookies and eyeball treats wearing your cute sewn Halloween apron. Using ribbon and fabric you can have this great pattern for your kitchen apron.

Materials:
- Hand sewing needle
- Measuring tape/yard stick
- 2 yards fabric
- 1 spool coordinating thread
- Coordinating ribbon (optional)
- Scissors
- Straight pins
- Pattern
Steps:
I find having an iron and ironing board on hand very helpful throughout the whole project. It makes hemming much easier. A sewing machine is not required for this project, but is recommended. With a sewing machine, the whole project takes only a few hours to complete.
Additionally, in this tutorial I use a fabric that has a decorative border, which means that I must be careful where I cut my pieces from. If you don't use a decorative border fabric, you can cut the pieces out more efficiently using the pattern guide below.
Note: click the image for a larger version.

- Cutting the Pieces
Cut your pieces using the pattern guide. I start with the skirt first, then the tie pieces and waistband and fold them in that order. That way, the pieces won't get mixed up with each other. If you chose a decorative border print and wish to match your pocket to your skirt to maintain the integrity of the print, consider these facts: the top of the finished and hemmed pocket will be approximately 1" from where the skirt and waistband meet, and the edge of the finished and attached pocket will be about 1" from the left or right edge of the skirt; hemming takes up approx. 1/2" of fabric from the piece.


- Preparing the Skirt
To hem the skirt, fold, iron, and pin the bottom, left, and right edges of the skirt, leaving the top edge undone. Fold each edge twice at the 1/4" mark, snipping the corner fabric from the two bottom corners after the first fold to reduce the amount of fabric that runs through the sewing machine. Sew the hems down using your machine. You can use a basic straight stitch, or get creative with a decorative stitch if your machine has that option. Use your hand sewing needle to securely tie off the excess thread at the beginning and end of your stitches.

- Preparing the Waistband
Fold, iron, and pin the top, left, and right edges of the waistband, leaving the botton edge undone. FOl each edge twice at the 1/4" mark, snipping the corner fabric from the two top corners after the first fold. Sew only the top edge down, tying off the excess thread with your hand sewing needle.


- Preparing the Ties
Place two of the tie pieces together, print-sides facing each other. At this point you may want to consider cutting the end of the fabric at a diagonal. If so, I suggest cutting all four tie pieces at the same time, to ensure the diagonal is consistent for both ties. Sew the two tie pieces together, wrong side out. Do the same for the remaining tie pieces. Tie off the excess thread with your hand needle. Turn the ties right side out. Carefully iron the ties flat. Sew along the entire edge of the piece, 1/4" from the edge of the tie, to create a border and to maintain the shape of the tie. Tie off the excess thread with your hand sewing needle.

- Attaching the Waistband to the Skirt
Find the middle of the skirt and mark with a straight-pin. Do the same for the waistband. Pin the center of the top of the skirt to the center of the bottom of the waistband, the two unfinished edges, so that their print sides are facing each other. Pleat and pin the skirt to the left and right of the center until the left and right edges of the skirt align with the left and right edges of the waistband. Iron the pleats flat. Sew the two pieces together. Tie off the excess thread with your hand sewing needle.


- Attaching the Ties to the Waistband
Fold, iron, and pin the rough end of the tie twice at the 1/4" mark. Line up the folded end of the tie to the side of the waistband and pin, adding a pleat tuck to ensure they match. Sew the two pieces together. Tie off the excess thread with your hand needle.

- Preparing and Attaching the Pockets
Fold, iron, and pin all edges of each pocket, folding at the 1/4" mark and snipping the fabric from each corner after the first fold. I like to use decorative coordinating ribbon on the top edge of the pocket. If sew, add this piece now. Sew the top edge of the pocket. Tie off the excess thread with your hand needle. Place the pocket on the skirt, approx 1" from the top and right or left edge. Pin the left, bottom, and right edge of the pocket to the skirt. How you pin your pocket's interior edge will determine how jauntily your pocket sticks out at the top. Personally, I prefer jaunty pockets. Sew the pinned edges. Tie off the excess thread with your needle.
Read NextThanksgiving Dress