Perfect Posies Greeting Cards
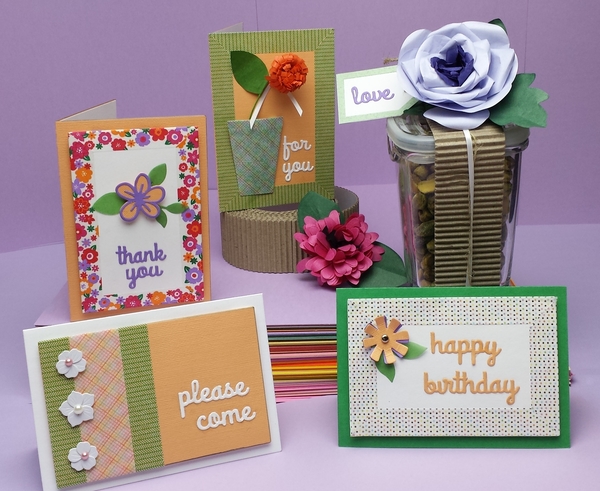
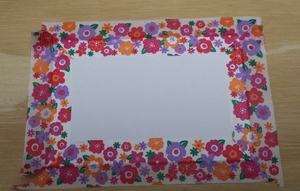
Paper craft ideas are always in style, but these Perfect Posies Greeting Cards are perfect for spring. Channel the best aspects of the season into your own homemade greeting cards and show your loved ones how much you care. In fact, people will look forward to every holiday once you start sending your own handmade cards. DIY greeting cards help you go above and beyond - not only are you saying thanks, but you also have the chance to show off your creative side. The floral embellishments on these cards make them a real standout.
Primary TechniquePaper Crafts

SeasonSpring
Materials:
- Little B Paper Flower Kits:
- White Daisy Petal Strips (100503)
- Bright Pink Daisy Petal Kit (100490)
- Pansy Petal Strips (100499)
- Little B Designer Cutting Dies:
- Cards (100385)
- Bouquet (100394)
- Handwritten (100396)
- Birthday (100391)
- Tags (100386)
- Perfect Positioner (100407)
- Little B Decorative Paper Tape:
- Colorful Mini Flowers 25mm (100062)
- Pastel Weave 25mm (100560)
- Green Herringbone 15mm (100559)
- Gold Foil Pastel Polka Dots 15mm (100571)
- Decorative Mini Embellishments - Pearl Flowers (100327)
- Corrugate Tape (100422)
- Cardstock - Peach, Green, Orchid, White
- Adhesive (for small die cuts)
- Dimensional Foam Adhesive
- Small Brad (paper fastener)
- Thin (1/8”) White Ribbon
- Die Cut Machine
- Small Hole Punch
- Metal Ruler
- Craft Knife
Instructions:
Read through all instructions first before beginning your final project. If new to making mitered corners practice the process first to become familiar with the steps.
Creating with Paper Flowers
It’s great fun to make paper flowers. We encourage you to have fun working with the many Petal Strips to come up with the look that you like for your personality. All of the pieces for completing 6 paper flowers are included in the kit; it just depends on what size flower you are making. The how-to’s could not be easier!

Basic Card Instructions
Each of the cards is made with the largest card shape from the Cards Die Set. Three cards use the large rectangle as an accent piece on top. Three cards have mitered corners using Decorative Paper or Foil Tape. Die cut sentiments and flower accents are cut out from the die sets, layered and glued in place.
Mitered Corners
- Make sure you have clean hands and a clean work surface that can tolerate a craft knife (self-healing mat is good).
- Lay decorative tape down along the edge of both long sides, leaving about ½” tails off the end. Press tape down lightly to adhere it in place to the card (you will be cutting in the corners so don’t press down too hard in this area).
- Now place tape across both short ends and again press each strip in place lightly.
- On the first corner, use a metal ruler and craft knife to cut a firm clean line from inner point to outer point. Cut firmly enough to go through the two layers of tape but not firmly enough that the cardstock is cut.
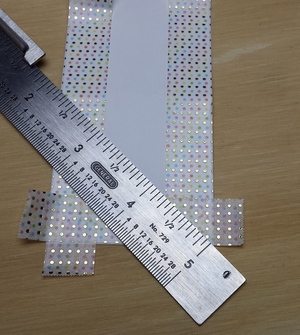
- Now comes the fun part! Make a quick tug on each of the two loose ends (pulling away from the cut). Since the tape is not secured to the paper, the excess piece under and over will release and the result is perfect cuts that line up!
- Carefully burnish the cut ends by pressing firmly to adhere the tape to the paper. You can use a soft cloth or the curved side of a bone folder – just do not press too hard so as to mar or tear the surface.
- Repeat this process to make clean miter cuts on the other 3 corners.
PLEASE COME INVITATION
- Die cut largest card shape from Cards Die Set in white cardstock. Fold.
- Die cut the largest rectangle from Cards Die set in peach cardstock.
- Die cut “please” and “come” shapes from Handwritten Die Set in white cardstock.
- Edge the large rectangle with 3 strips of decorative paper tape as shown. First place Green Herringbone in place followed by Basket Weave and then finished with Green Herringbone again. Bring all ends around to fasten on back of rectangle.
- Position Pearl Flowers mini embellishments in place on top of tape lines as shown.
- Glue handwritten “please come” die cut to front of card.
- Adhere decorated white rectangle to front of card using dimensional foam adhesive.
- If desired, glue a white liner sheet inside of card for writing a personal note.
THANK YOU CARD
- Die cut largest card shape from Cards Die Set in peach cardstock. Fold.
- Die cut the largest rectangle from Cards Die set in white cardstock.
- Die cut “thank” and “you” shapes from Handwritten Die Set in orchid cardstock.
- Die cut small layered flowers and leaves from Bouquet Die Set in cardstock colors as shown (peach, orchid, and green).
- Edge the large rectangle with Colorful Mini Flowers decorative paper tape. Since this is a 25mm wide tape, position the tape equally over the edge so that only a smaller strip shows.
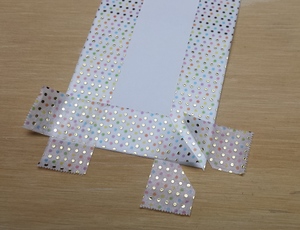
- Miter the corners as instructed above. Once all corners are mitered and burnished in place, make a diagonal cut across outside of each corner and remove excess. Then simply fold excess tape to back to finish.

- Layer and glue die cut flower shapes together as shown. Use a dimensional foam adhesive to secure in place. Glue leaves underneath as accent.
- Glue handwritten “thank you” die cut to front of card.
- Adhere decorated white rectangle to front of card using dimensional foam adhesive.
- If desired, glue a white liner sheet inside of card for writing a personal note.
HAPPY BIRTHDAY CARD
- Die cut largest card shape from Cards Die Set in green cardstock. Fold.
- Die cut the largest rectangle from Cards Die set in white cardstock.
- Die cut “happy” and “birthday” shapes from Handwritten Die Set in peach cardstock.
- Die cut small pinwheel shape from Birthday Die Set in cardstock colors as shown (peach and orchid).
- Edge the large rectangle with Gold Foil Pastel Polka Dots decorative paper tape.
- Miter the corners as instructed above.
- Make small hole in center of each pinwheel shape.
- Layer shapes together with brad paper fastener and attach in place to front of decorated white rectangle. Glue leaves underneath as accent.
- Glue handwritten “happy birthday” die cut to front of card.
- Adhere decorated rectangle to front of card using dimensional foam adhesive.
- If desired, glue a white liner sheet inside of card for writing a personal note.
FOR YOU CARD
- Die cut largest card shape from Cards Die Set in peach cardstock. Fold.
- Die cut “for” and “you” shapes from Handwritten Die Set in white cardstock.
- Edge the large rectangle with Green Herringbone decorative paper tape.
- Miter the corners as instructed above.
- Cut out a small “vase” shape from green cardstock and cover with strips of Pastel Weave decorative paper tape. Adhere in place to lower left hand area of card using dimensional foam adhesive.
- Make a mini orange bud from the White Daisy Petal Strips kit. Glue a single leaf in place on the stem and tie on a thin piece of ribbon as an accent. Trim stem end and curl up tightly for inserting in “vase”.
- Glue handwritten “for you” die cut to front of card.
- If desired, glue a white liner sheet inside of card for writing a personal note.
LOVE FLOWER JAR
- Assemble a two-tone flower from the Pansy Petal Strips kit. On this version, the petals were curled outward, resulting in the look of a rose. The fun with working with the Petal Strips is making it your own style! Add on 3 leaves to back of flower.
- Die cut two small tag shapes from Tags Die Set in light green and white cardstock, making light green with an open center. Layer light green tag over white and glue together.
- Die cut “love” shape from Handwritten Die Set in orchid cardstock. Glue in place to tag center. Make a small hole at end of tag for attaching.
- Wrap Corrugate Tape around filled jar and secure in place, placing seam at bottom.
- Secure Paper Flower to top of covered jar with adhesive.
- Layer twine and ribbon over wrapped jar and tie on tag. Tie ends off at base of flower and secure all ends in place.
Read NextFloral Free Watercolor Printable