Cherry Blossoms Card
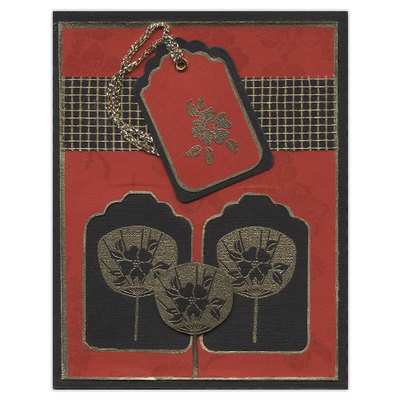
A red and gold card stamped with cherry blossoms is sure to dazzle the recipient. Let this card from Posh Impressions inspire you to create a Japanese set. The stamped images are sophisticated and lovely.

Materials:
- Black card stock 8-1/2 inches by 5-1/2 inches folded in half
- Red card cut to 5-1/4 inches by 4 inches
- Medium tag punch by Marvy Uchida
- Small round corner punch
- VersaMark and Brilliance Galaxy Gold ink pads
- Gold fine embossing powder by Ranger
- Gold Krylon leafing pen
- Gold brad
- Gold fiber/cord
- Adhesive of your choice
- Strip of dry wall screen
- Scraps of black and white paper or cardstock
- POSH-20 Japanese Set
Steps:
- Place the red card in your tag punch leaving a border of approximately 3/8 inch from the bottom of the card and the same distance from the right-hand side and punch out tag. Turn the red card over and do the same, ending up with two red cut out tags at the bottom. Ink the cherry blossom branch image using the VersaMark pad and randomly stamp the red card. Heat set.
- Using a scrap of black cardstock, punch out a black tag. Trim one red tag (left from step one)approximately 1/8 inch on all sides. Ink the tiny cherry blossom image with VersaMark and stamp the red tag, emboss in gold, outline with leafing pen (heat set) and attach to the black tag; add the brad and gold cord. On a scrap of black card, stamp the fan using VersaMark and emboss in gold, cut out and set aside. Using your Brilliance gold pad, place the dry wall screen on a scrap of white paper and cover with ink and heat set.
- To complete card, adhere your red card over the black folded card and position the fan image that has been inked with VersaMark and stamp inside of each cutout area on the black card and emboss with gold embossing powder. Outline the red card with the gold leafing pen and heat set. Attach the gold wall tape, prepared in step 2, to a strip of black cardstock and glue to the upper section of the card as shown, trimming the ends to match the red card. Glue the extra fan to the bottom between the two cut-out areas. Attach the tag to the top.
- The completed card front is ready to attach to the folded black card.
Read Next64 Handmade Cards for Every Occasion