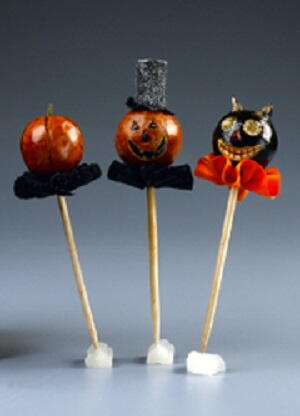
Decorate Your Food with Halloween Picks
Make your Halloween treats come to life with these cute folk art picks. There are three different friends to choose from. Acrylics and ribbon bring these Halloween picks together for a great decoration on your treats.

Materials:
- STYROFOAM™ Brand Foam:
- Balls, 1-1/2", three
- Acrylic paints: black, brown, burnt orange, cream, leaf green, red, yellow
- Brown antiquing gel medium
- Air-dry clay: black, yellow
- Orange grosgrain ribbon, 1" x 1/3 yd.
- Black crepe paper roll
- Iridescent ultra-fine glitter
- Ruler
- Wooden skewers, five
- Paintbrushes: liner, small round, small flat
- Disposable palette
- Water basin
- Paper towels
- Scissors: standard, pinking decorative-edge
- Sewing needle and black button thread
- Spray adhesive
- Low-temp glue gun and glue sticksThick, white craft glue
Steps:
Cut pointed ends of three skewers to 6-1/2" long. Insert cut ends into foam balls. Dab holes with glue to secure skewers; let dry.
Pumpkin
- Mix small amount of burnt orange paint into yellow clay until desired pumpkin shade is achieved.
- Apply small bits of clay to surface of foam ball until covered; smooth clay with fingers. Use pointed end of one remaining skewer to press four segment lines into pumpkin. Let clay dry completely.
- Use liner brush to paint segment lines brown. Cut 1/2" from pointed end of last skewer and paint it green. Glue and insert stem into top of pumpkin. Let dry.
- Use flat brush to apply antiquing gel to pumpkin; blot excess with paper towel. Let dry.
- Cut one 36" length from black crepe paper. Use button thread to sew a gathering stitch along one long edge. Pull threads to gather paper into a ruffled collar; knot and clip threads. Insert skewer through hole; hot glue ruffle to pumpkin.
Jack-o-Lantern
- Repeat Pumpkin Steps 1 and 2. Use pointed end of skewer to make triangle eyes and nose and crescent mouth; etch inside of mouth to add dimension. Let clay dry completely.
- Use liner brush to paint eyes, nose and mouth black. Outline nose with red and mouth with yellow. Use handle end of brush to dot eyes cream. Paint eyebrows green and yellow. Let dry.
- Repeat Pumpkin Step 4.
- Cut two 36" lengths from black crepe paper. Repeat Pumpkin Step 5 using first length.
- Roll second crepe paper piece into a cylinder for hat crown. Trace one end onto crepe paper scrap and cut out; glue to top of hat. Use pinking scissors to cut a 1-1/2" circle from another crepe paper scrap and glue to bottom of hat for brim.
- Spray hat with adhesive and sprinkle with glitter; let dry. Glue hat to head.
Kitty
- Repeat Pumpkin Step 2 using black clay. Use pointed end of skewer to make triangle nose, rounded eyes and crescent mouth; etch inside of mouth to add dimension.
- Make two small cone-shaped ears from clay and press to head. Let clay dry completely.
- Use round brush to stipple eyes, ears and inside of mouth cream. Use liner brush to paint nose and lines inside mouth red. Outline mouth yellow. Use handle end of brush to dot eyes yellow; use skewer to dot each pupil green. Use very tip of liner to add a small cream highlight to each green dot. Let dry.
- Repeat Pumpkin Step 4. Repeat Pumpkin Step 5 using orange ribbon.
®™ Trademark of The Dow Chemical Company ("Dow") or an affiliated company of Dow. For more project ideas, please see styrofoamstyle.com.
Read NextSteampunk Top Hat