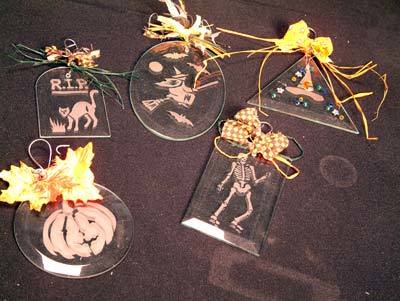
Spooky Halloween Ornaments
Create your own spooky Halloween decorations using glass ornaments and stencils. You can hang these ornaments from Etchworld Armour on the wall or from a ceiling fixture.

Materials:
- Armour Etch Cream
- Glass Beveled Ornaments
- Contact Vinyl
- Stencil designs (from pattern sheet)
- Transfer paper
- Hot Fix Wand w/ rhinestone embellishments
- Orange & Black Rafia
- Torn strips of Halloween print material or fabric ribbon
- Flocked fall leaves
- 12” lengths of 12 gauge, gray floral wire
- Glass cleaner, soft paper towels
- 1/2” wide masking tape
- Plastic or rubber gloves
- Disposable craft brush
- Craft knife, Pencil, Scissors
- Stylus or sewing needle (optional)
- Piece of freezer paper or other non-stick paper (can also use frosted
- backing sheet from Rub N Etch stencil)
- Glass glue
Steps:
General Directions for Etching:
- Clean ornament with glass cleaner and paper towels. Make sure ornament is dry and lint free before applying contact vinyl.
- Lay ornament on top of contact vinyl and trace around outside edge with a pencil. Cut out shape, peel off backing and apply to front side of ornament, starting from one side, smoothing it out as you go, covering ornament completely. Work out any bubbles and rub down vinyl firmly to glass.
- Trace desired design onto contact vinyl with transfer paper. Cut out with craft knife, lifting out pieces with tip of knife blade, stylus or sewing needle.
- After all pieces of design have been removed, rub over entire design with freezer paper, checking cutout as you go. Make sure all cut edges of design are secure to the glass. Spray a small amount of glass cleaner on a paper towel (do not spray directly onto ornament). Gently clean open areas of cutout design (this will remove any glue left on glass from the contact vinyl). Let dry.
- Tape around entire edge of ornament with masking tape, overlapping edge of contact vinyl and fold around to backside of ornament.
- Etch ornament, following directions on bottle of Etch cream.
Finishing your Ornament:
Attach hanger: Fold 12” length of gray floral wire in half. Twist wire several times to make a 11/2” long loop. Insert one open end of wire into backside of hole. Twist together with other end on front side of ornament. Wrap ends of wire around a pencil or bend into zigzag shapes as shown.
Decorating:
- Attach rhinestone embellishments using the Hot Fix Wand, using picture as a guide on the Witches hat ornament.
- With glass glue, attach fall leaves to top of pumpkin ornament.
- On all Ornaments-Tie strands of raffia, in either in black, orange, or both colors, to twisted base of wire hanger, making strands into a bow on some ornaments, and leaving hanging on others.
- Tie strips of Halloween fabric over raffia, either in a bow or hanging straight down.
Read NextCute Polly Pumpkin