Frightening Clay Zombie
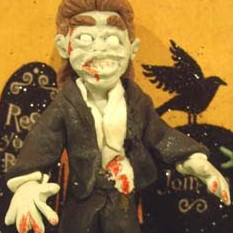
You've never seen a snappier looking zombie than this Frightening Clay Zombie. There's no need to run from this fun Halloween craft idea. This could be used as a fun Halloween decoration idea or gift for zombie fans. This tutorial will have you amazed that you can create such a detailed little monster of your very own. Learn how to make a clay zombie that is perfect for setting on a desk or bedside table. Just don't let the little guy out of your sight, or you might join him.
Primary TechniqueClay

SeasonFall
Materials:
- Polymer Clay - black, white, green and as many other colors as you like for clothes and such
- Two 18" pieces of floral wire for each zombie
- A small amount of aluminum foil
- A knitting needle or other tool for smoothing the clay
- A craft knife
- A red gel pen for blood
- A means for baking the zombie - a toaster oven reserved for crafts or a conventional oven that you only use for crafts occasionally.
Instructions:
- Begin by folding one 18" piece of floral wire in half and in half again. Twist an opening in the middle of the wire for the head, a little further down twist an opening for the body and fold a small amount of wire on the ends for feet. If you can make it stand on its own, you're off to a good start. If you can't, don't worry the clay feet will still work.
- Crumple bits of foil and wrap around the head, body and legs.

- Fold the other piece of floral wire the same way you did the first piece and wrap it around the neck a couple of times.
- Condition your polymer clay by squishing, folding and rolling it with your hands until it's very pliable. If you haven't worked with polymer clay before follow these rules for the best results: Hold the piece you're working on as though it was a baby bird - any pressure you put on it will change the shape, and smooth the clay with a very soft touch
- Mix bits of black and green clay into a ping pong ball sized piece of white clay until you have the skin color you want. You can always reserve your zombie skin color for later, but it's not easy to match the color if you run out.
- Take a marble size piece of skin color rolled into a ball and flatten it to about an 1/8 " thick. Wrap it around the head of your zombie starting under the chin and around to the back. Don't worry about how the back looks, unless your zombie doesn't have hair.

- Follow the same steps to cover the neck and chest area of the body, assuming of course that you're going to have an open collared shirt.
- Smooth the neck where you join the two pieces by very gently rolling a knitting needle over the joint until it's no longer visible.
- Cover the frame with a basic shirt shape and pant legs.
- Again, it starts with marble size pieces. Roll each one into a ball then flatten into the shapes you need. Smooth the joints.

- Use the same method as before to make the sleeves.
- Take a large marble size of the color that will cover the back, flatten and gently press into place. Take a bit of the shirt and pants colors to make a collar and waste band. Flatten two marble size pieces of pants color into elongated tear drop shapes. Attach them to the front of the jacket, narrow end up and smooth the joints.

- Now add bits of the shirt color in the the ends of the sleeves. Stick two balls of your shoe color onto the bottom of the pant legs.
- The hands and face are the most delicate so I save them for last. Here's where I add some gore. I pushed some flesh color on the belly and add a bit of shirt color to look like a torn shirt.

- Use your craft knife to open the mouth
- Roll a small bit of white clay that's wider in the middle than the ends. Press into place with the back side of the craft tool and define the teeth as well.
- Use the knitting needle to open eye holes. Press in then wiggle a bit to widen. Roll tiny bits of white for the eyes. Place them gently into the eye sockets. The idea is to add eyelids without squashing the eye.
- Make these pieces smaller than you think you'll need them. You can always add more clay, but it's hard to take it away without distorting your work. The only thing missing are the upper and lower eyelids.
- The eyelids are very small and should not cover too much of the eye. Again, very gently put them into place and smooth with the knitting needle. If they begin to cover too much of the eyes, very carefully remove clay with the craft tool. Add the forehead piece and smooth.
- Now put the nose, lips and cheek pieces on and smooth. Take your time with this, it really gives the zombie character.
- Now is the time to consider the facial expression. Is he snarling, or do you want his jaw slack? Are there cuts on his face? Maybe he's missing an eye, or even missing one side of his face? Zombie it up!
- Now make holes in the ends of the arms to attach hands.
- The hands start as mitten shapes, then use your craft knife to separate the fingers. Body parts may fall off. It's a fact of zombiehood.
- Add hair and then ears. Make the hair colored clay by adding a small amount of white to brown clay. Then condition it, roll it, fold it, and twist it, until there are tiny stripes of white.
- Bake according to the directions of the clay you're using. If you bake him in a toaster oven, lay him down for baking so his head doesn't burn. Ideally, he should bake standing up, but, if you do that, put a Pyrex cup (or other heat safe props) in front and back of him. After the zombie cools, you can use a red gel pen to add blood.
Why This Halloween Craft is Scary Great!
Top 3 Reasons to Make the Frightening Clay Zombie Craft Project:
1. Perfect Halloween Decor: This clay zombie is the perfect addition to your Halloween decorations. Its eerie appearance will spook your friends and guests, adding a fun and festive touch to your home during the spooky season.
2. Great Gift Idea: If you have any zombie-loving friends or family members, this clay zombie makes a unique and thoughtful gift. Handmade gifts are always appreciated, and this little monster is sure to be a hit with anyone who loves all things creepy and crawly.
3. Fun and Creative Activity: Making this clay zombie is a fun and creative activity that can be enjoyed by crafters of all skill levels. Whether you're a seasoned crafter or just starting out, this project is a great way to get your creative juices flowing and have a blast crafting your very own frightening zombie. Plus, you'll feel a sense of accomplishment when you see your completed creation sitting proudly on your desk or bedside table.