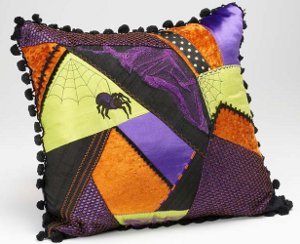
Eeks! Spider Pillow
Make a creepy crawly quilted pillow with these Halloween sewing patterns from Baby Lock. Learn how to make a decorative pillow that will make you say "Eeks! Spider!"

Materials:
- Baby Lock Sewing/Embroidery Machine
- Scraps of velvet, silk, metallic nettings, ribbons and trims in Halloween colors
- ¾ yard of fabric for back of pillow
- ¾ yard of quilt batting
- 1 pillow form, 24” x 24”
- 3 yards of black ball fringe
- Hot fix crystals, red for back of spider and olive green for spider eyes
- Embroidery thread and conventional sewing thread
- Amazing Designs embroidery designs:
Spider
Spider Webs
Instructions:
- Cut a 27” x 27” square of batting for base of crazy quilting.
- Begin stitching random pieces of fabric to the batting base. Lay a scrap of fabric on to the batting with the wrong side facing down on the batting next lay another piece on top of the first right sides facing. Sew a seam along one side of the fabrics. Fold the top fabric back over to expose the right sides of fabrics. Press. Select a decorative stitch to sew along the just stitched seam; using contrast thread.
- Select another piece of fabric and stitch to the batting as in step 2. Laying the fabric slightly over the first piece stitched. Continue covering the batting with pieces of fabric, stitching one over another and using different decorative stitches on each piece.
- On some of the pieces, add netting that is crinkled up, zigzag the netting to the base and cut away any excess. Press.
- Set the machine for embroidery and embroider a couple of spider webs and a spider to the face of the pillow. Omit the embroidery color stops for the face on the spider. No stabilizer should be necessary, since the fabrics are stitched to the batting.
- Stitch ribbons and trims to some of the pieces, buttons can also be added.
- From the back side of the pillow top, measure and mark a square 24” x 24”. Baste along this line, and then trim away excess fabric and batting.
- Stitch the ball fringe to the edge of the pillow, with the balls facing in towards the center of the pillow top.
- Heat set two crystals to the head of the spider for the eyes and two red crystals to the back of the spider for the black widow marking.

- Cut the pillow back (24” x 24”) from the backing fabric. Pin the pillow back to the front of the pillow, right sides together. Make sure all of the balls on the fringe are lying towards the center of the pillow.
- Stitch the pillow front and back together, leaving a 10” to 12” opening along the bottom, for insertion of the pillow form.
- Turn pillow right side out and insert pillow form. Stitch the opening closed.
Read NextCute Polly Pumpkin