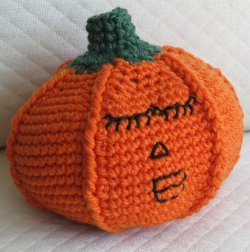
Crochet Jill O Lantern
Crochet yourself some lovely Halloween crafts. This free crochet pattern from Phyllis Serbes is a fabulous Jill-o-lantern that can be made with yarn, stuffing and pantyhose. You don't always have to have a Jack-O-Lantern.
Check out this project and more ideas in 17 Pumpkin Patterns: Free Projects for Halloween!

Materials:
- 1 skein light worsted (light # 3) weight yarn (shown here, Shepherd’s Wool, 100% worsted spun fine wool, 250 yds, Orange #042)
- 5 to 6 yards of light worsted weight yarn in green
- 1 to 2 yards of black yarn or thread
- Yarn or embroidery needle
- Crochet hook size F/5/3.75 mm
- Acrylic or polyester stuffing
- An old, clean pair of kneehighs or pantyhose (optional)
Finished pumpkin will be about 16 inches in circumference and about 5 inches high
Abbreviations:
ch = chain
dec = decrease (insert hook into next st and pull up yarn, insert hook into next st and pull up yarn, yarn over and pull yarn through all three loops on hook)
fpdc = front post double crochet (yarn over and slide crochet hook under dc from row below and pull up a loop, complete dc as usual
RS = right side
sc = single crochet
sl st = slip stitch
st = stitch
Gauge
5 sts = 1 inch; 4 rows = 1 inch
Main Body:
ROUND 1 • (RS): Starting with the orange yarn, ch 4, join with a sl st to 1st ch
ROUND 2 • Ch 2, 12 dcs into ring, sl st to top of 1st dc
ROUND 3 • Ch 2, [1 fpdc into dc below, 2 scs in next st] 6 times, sl st into top of 1st fpdc
ROUND 4 • Ch 2, [1 fpdc into fpdc below, 2 scs in each of next 2 sts] 6 times, sl st into top of 1st fpdc
ROUND 5 • Ch 2, [1 fpdc into fpdc below, 2 scs in next st, 1 sc in each of next 2 sts, 2 scs in next st] 6 times, sl st into top of 1st fpdc
ROUND 6 • Ch 2, [1 fpdc into fpdc below, 1 sc in next st, 2 scs in next st, 1 sc in each of next 2 sts, 2 scs in next st, 1 sc in next st] 6 times, sl st into top of 1st fpdc
ROUND 7 • Ch 2, [1 fpdc into fpdc below, 1 sc in each of next 8 sts] 6 times, sl st into top of 1st fpdc
ROUND 8 • Repeat Round 7
ROUND 9 • Ch 2, [1 fpdc into fpdc below, 2 scs in next st, 1 sc in each of next 6 sts, 2 scs in next st] 6 times, sl st into top of 1st fpdc
ROUND 10 • Ch 2, [1 fpdc into fpdc below, 1 sc in each of next 10 sts] 6 times, sl st into top of 1st fpdc
ROUNDS 11 through 19 • Repeat Round 10
ROUND 20 • Ch 2, [1 fpdc into fpdc below, 1 dec, 1 sc in each of next 6 sts, 1 dec] 6 times, sl st into top of 1st fpdc
ROUND 21 • Ch 2, [1 fpdc into fpdc below, 1 dec, 1 sc in each of next 4 sts, 1 dec] 6 times, sl st into top of 1st fpdc
ROUND 22 • Ch 2, [1 fpdc into fpdc below, 1 sc in each of next 4 sts] 6 times, sl st into top of 1st fpdc
At this point, you might want to go ahead and embroider a face on your pumpkin and stuff it (tip: first you might want to cut off the foot and part of the ankle of a pair of pantyhose and put some of the stuffing in the hose, then place it inside the pumpkin and put in more stuffing until it’s stuffed the way you want it, then tuck in the ends of the hose and go on to Round 23).
ROUND 23 • Repeat Round 22
Stem:
ROUND 24 • Attach green yarn, ch1, 1 sc in same st (should be on top of 1 fpdc below), [1 dec in next 2 sts, 1 dec in next 2 sts, 1 sc on top of 1 fpdc below] 6 times, sl st to 1st st (18 sts)
ROUND 25 • Ch 1, 1 sc in same st and each of next 17 sts, sl st to
1st st (18 sts)
ROUND 26 • Ch 1, [1 dec in next 2 sts] 9 times, sl st to 1st st (9 sts)
ROUND 27 • Ch 1, 1 sc in same and each of next 8 sts, sl st to 1st st (9 sts)
ROUND 28 • Repeat Round 27, fasten off.