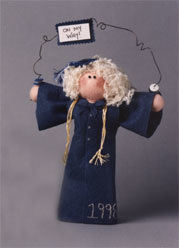
"Finding My Way" Graduation Doll
You can create this personalized graduation gift by dressing the graduate doll in school colors for that big day. Use as a special graduation gift or display as a centerpiece or keepsake at graduation parties. This makes a great easy handmade graduation gift. Find this craft and 17 others in our FREE Graduation Craft eBook.

Materials:
- STYROFOAM Brand Products:
- 2 Ball, 1"
- 1 Ball, 2"
- 1 Cone, 9"
- Felt:
- 1- 9 1/2" x 12" sheet apricot
- 3- 9 1/2" x 12" in school color (model used blue)
- Acrylic craft paint, school color (model used blue)
- Silver glitter fabric paint
- Doll hair, hair color of graduate
- Rayon thread, 1 skein each in school colors
- Small piece of white paper
- 8mm beads, black half-round
- Wooden shapes: 1 1 1/2" square; (3) 1" circles
- Craft wire, 18-gauge, 1 yard
- Tie wire, 26-gauge
- 7 Buttons, 1/2"
- Scissors
- Wire cutters
- Paintbrush, small flat
- Low temperature glue gun and glue sticks
Steps:
- Insert a 4" length of 18-gauge wire halfway into the ball (head) and the top of cone (body); glue in place.
- Head: Center 9" square of apricot felt over head; pull felt tightly around ball to the neck and secure with 26-gauge wire. Glue excess felt to cone.
- Arms: Glue and insert 1" balls on either end of 9" length of 18-gauge wire. Gather a 5" square of apricot felt around each "hand". Secure around the wrists with 26-gauge wire; twist wire around the arm wire to hold in place.
- Glue together long edges of 7" x 18" piece blue felt, forming 18" long tube. Insert arms into tube and wire arms in place behind neck.
- Gown: Fold in half a 7" x 18" piece of blue felt; the folded piece should measure 7" x 9". Following Diagram 1, cut a notch in the fold as shown; this will be the neck opening. Measure in 2" from each shoulder and draw a line from these points to the bottom corners (see Diagram 2); cut along these lines. Glue side seams together; cut open the front of gown, from neck to hem line. Dress doll in gown, with opening in front; glue opening shut.
- Cut out bow using Pattern A. Cut a 1/4" x 1" piece of felt and glue around center of bow. Glue bow to neck.
- Blush cheeks; glue on eyes. Glue hair to head.
- Paint wood pieces blue; let dry. Stack and glue together 1" circles; glue square on top of 1" circles.
- Make a tiny tassel: Wrap both colors of rayon thread four times around two fingers; wrap a 6" thread several times around one end, 1/4" from end (see Diagram 2). Knot thread and cut off excess; cut thread loops and fluff. Glue to center of wood square, and glue hat to doll's head.
- Cut a small sign out of white paper and write "On My Way" (see Diagram 3). Cut a piece of blue felt 1/4" larger than sign; glue to back of sign. Glue sign to an 18" length of 18-gauge wire, 8" from one end. Twist wire and wrap around a pencil to shape. Slip three buttons on left side of wire and four buttons on the right side. Insert ends of wire into hands; glue securely.
- Cut four, 10" lengths of rayon thread; tie together 1" from each end. Glue to back of doll's neck and let hang down the front.
- Using silver paint, make "buttons" down the front of the dress. Write the year on the bottom front of gown.
®™ Trademark of The Dow Chemical Company ("Dow") or an affiliated company of Dow.
For more project ideas, please see styrofoamstyle.com.
Read NextInspiration Jar DIY Graduation Gift