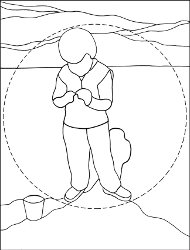
Stained-Glass Seashells
Not sure what to do with your collection of seashells after a long day at the beach? Make this super awesome Stained-Glass Seashells motif from Diamond Tech! This free stained glass pattern is a great backdrop to home decor anywhere in the house.

Materials:
- Stained Glass – Your choice of colors
- Studio Pro™ Soldering Iron
- Studio Pro™ Foil Shears (optional)
- Studio Pro™ Flux
- Studio Pro™ Glass Cutter or band saw
- Studio Pro™ Foil
- Horseshoe nails
- Paint Brush (to apply flux)
- Fid
- Max Grinder
- Assorted Sea Shells
- Marine-grade or Liquid Nails™ Adhesive
- Homosote board or heat resistant surface
PROJECT TIPS:
Before you begin find a place to work that has great ventilation where you can open a window and use a fan.
An area safe from children and pets is recommended.
The less you move an unfinished project, the less likely you are to have damage.
Please read and follow all directions carefully. When working with glass, protect your feet and legs by wearing pants and closed toe shoes. Eye protection is essential.
Instructions:
- Make a duplicate copy of the pattern; this copy will be used later on in the project.
- Number or code both patterns exactly the same.
- Mark direction of glass onto pattern copy. The color or texture of your stained glass will determine the direction of your glass, which will enhance your panel if used correctly.
- Using a sharp pair of foil shears carefully cut apart the pattern. Accuracy is important for proper fitting finished pieces. No foil shears? Then cut on the inside of the dark pattern outlines.
- Separate pattern pieces according to color and store in a plastic bag or envelope until ready to glue to glass.
- Clean glass and place smooth side up.
- Using an opaque paint marker or permanent marker, trace the pattern pieces on the glass. Write the number from the pattern piece onto the glass. If you are using textured glass in your design, cut on the reverse (smooth side) of the glass, make sure the pattern is turned face down when cutting. This will ensure your cut pieces will be correct when turned back over.
- Using a glass cutter or a band saw, cut pattern pieces from your glass. Some of the panels have pattern pieces with small inside curves. You will need a ¼” grinder head or band saw to cut these pieces.
- Use a grinder to smooth glass edges if necessary.
- Select proper foil and patina for the color and thickness of your glass. Burnish foil onto glass, easing foil into inside curves for consistent solder lines with the fid.
- Place pattern on the heat resistant surface and position foiled cut on top. Carefully remove pattern and secure glass in place with horseshoe nails or layout blocks.
- Preheat the soldering iron. Apply flux in small areas at a time with a little brush. Remember, if you make a mistake (using copper foil), you can re-flux and go over it again.
- First, solder the corners to secure the glass, and hold it in place. Something to note throughout the process is to let the solder flow at its own pace. You are the guide.
- It is best to start at the top of your pattern and solder down. This is so you don't accidentally hit the solder before it dries.
- Place the solder close to the foil. With the soldering iron tip, slowly melt the solder onto the flux and foil to run a bead of solder along each joint.
- Finish by soldering the balance of the foil. Remember to apply the flux a little at a time. Take your time. Patience is a virtue in any art form.
- Solder the entire front side then turn over to solder the back- use same method as above. If you get a thick, bumpy appearance, you either need more flux or heat.
- Solder both sides with equal accuracy and neatness using a minimum of flux. Soldering should be done in one day to prevent oxidation. Clean all solder thoroughly before applying patina. Apply glass polish, following directions on package.
- Add a frame to your panel for a more finished look.
- Using marine grade adhesive or clear Liquid Nails ™ adhesive, glue real seashells in the hands of the child and randomly around the sand portion of the panel.