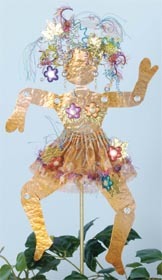
Garden Girl Plant Stake
Bring your garden to life with this copper girl plant stake from AMACO. Pattern for garden girl plant stake included.

Materials:
- AMACO ArtEmboss — Medium Copper, Light Bright Gold
- AMACO WireMesh — Copper
- AMACO WireForm WireRod — Copper
- AMACO Fun Wire — Assorted Colors and Gauges
- AMACO Friendly Plastic — Assorted Colors
- AMACO Friendly Cutters — Set #3
- AMACO ArtEmboss Tool Set
- Leaf Punch
- 1/16", 1/8" and Rectangle Hole Punches
- Decorative Yarns and Threads
- 1/8" Eyelets and Eyelet Tool
- E6000 Glue
- Fun Foam Sheet
- Heat Gun
- Metal Baking Sheet
- Scissors and Decorative Scissors
- Brayer
- Pliers
- Pencil
Instructions:
-
Enlarge pattern pieces to the desired size, copy onto card stock and cut out.
-
Trace around pattern pieces onto the Medium Copper ArtEmboss® sheet using a stylus and cut out. Use a 1/16" hole punch to make the holes in the girls head for her hair. Use a 1/8" hole punch to make the holes where indicated on torso, arms and legs.
-
Texture and emboss the body pieces as desired. Read the package instructions for tips on embossing with ArtEmboss®. To give a soft hammered texture, place the ArtEmboss® Medium Copper pieces onto a sheet of fun foam and lightly pound with the eraser end of a pencil. Gently roll over each piece with a brayer to flatten back out.
-
With decorative scissors, cut a 3" x 8" rectangle of the Copper WireMesh®. Punch 1/16" holes across the top (waist) 1/2" apart. At the bottom (hemline) punch assorted round and rectangle holes in a random pattern to give a lace effect.
-
Place the Copper WireMesh® onto a metal baking sheet. Heat each of the pieces with a heat gun to create a patina finish. With prolonged heat in one area the copper will turn orange, then rust, then red, then blue, then gold. By moving the heat gun around, you can create some unusual patterns of color. To create the “dots” on the skirt, keep the heat generated in one spot until the color changes, then lift the gun and move to another spot. Let the copper cool, then continue with project.
-
Assemble all of the body parts together using the eyelets and the eyelet tool to secure them into place.
-
Cut a 1" x 5" piece of Medium Copper ArtEmboss® and wrap it around the end of the wire rod, forming a tube. Remove the tube and squeeze one end flat with pliers. Glue the tube to the back of the girl’s body using E6000 glue. Let glue dry completely.
-
Cut seven 6" lengths of Clear/Copper Fun Wire™ and fold each wire in half. Lace one of the folded wires through each hole in the girl’s head. Twist to secure. Bend the wire ends every 1/2" in a random direction to form a framework for the hair.
-
Hair — Wrap the assorted wires around various size rods to form spirals of varying lengths and sizes. Weave these spirals in and around the framework wires, stretching and bending some.
-
Skirt — Lace an 8" length of decorative yarn or thread through the holes punched in the hem of the skirt. Lace an 8" length of Clear/Copper Fun Wire™ through the holes at the top (waist). Gather the mesh as you would fabric to fit around the girl’s waist, twist the wire in the back to secure and trim.
-
Make six Friendly Plastic® flowers in assorted colors using the Friendly Cutters™. Follow the package instructions for working with the plastic and the cutters. Glue two of the flowers to the bust area, one in the hair and three onto the skirt. Continue to embellish as desired adding Bright Gold ArtEmboss® leaves and decorative threads.
- Free form the WireForm® WireRod into desired shape. Place the Garden Girl onto the rod by sliding the rod into the tube on her back.
For more great garden crafts, click here for our garden crafts eBook!
Read NextRope and Can Bird Feeder
Your Recently Viewed Projects
Thanks for your comment. Don't forget to share!
Member 9541787
Aug 11, 2014
This project is incredible. You have a creative mind. I have enjoyed making this. Making Mixed Media Dolls was always my cup of tea. I have found some amazing stencils online.
Report Inappropriate Comment
Are you sure you would like to report this comment? It will be flagged for our moderators to take action.
Thank you for taking the time to improve the content on our site.