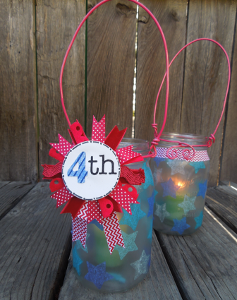
Patriotic Mason Jar Luminaries
Throw a party this July 4th and decorate your table with a few Patriotic Mason Jar Luminaries. These fourth of July decorations are so easy to make and can be created using recycled glass mason jars. Now you can save money and celebrate the USA at the same time.

Find this project, and many more, in our free eBook, 20 Crafts with Mason Jars: Wedding Ideas, Centerpieces, Decor, and More.

Materials:
- Aleene’s Turbo Tacky Glue
- Aleene’s Decoupage – Matte
- Mason jar (wide mouth)
- Brush
- Cardboard circles – white, red or blue (for center of medallion) (I used circles from ribbon spools spray painted white)
- Ribbons – various patterns and colors
- Tissue paper (various colors of blue, light blue, aqua, turquoise)
- White copy paper
- Star punch
- Scissors
- Prima Resist Canvas Alphabet Sticker (I colored mine with blue marking pen)
- Glitter alphabet letters (black)
- Marking pen (black)
- Clothespins
- Electrical wire (approximately 40″ for each luminary)
- Wire cutters
- Round nose pliers
Instructions:
-
Cut ribbons to 4″ lengths. Cut “v” from tips to create notched ends.
-
Cut two streamers for bottom of medallion.
-
Glue ribbons in place on cardboard, overlapping and alternating ribbon patterns until entire circle is covered.
-
Glue ends of streamers to the back of circle.
-
Use clothespins to hold the layers together while drying.
-
With black marking pen, create dots and dashes around outside circle of second cardboard piece.
-
Stick lettering in place. Let aside until ribbon medallion glue is set and then glue on front of medallion and set aside until dry.
-
Punch layers of tissue paper. Note: it is easier to get the star punch to punch cleanly through the tissue paper if you sandwich pieces of copy paper to the outside of multiple layers of tissue. Pull the tissue stars apart and sort by color.
-
Working small sections at a time, brush Aleene’s Decoupage on outside of mason jar. Use wet brush to pick up first tissue star and place it in the wet Decoupage medium. Brush gently over top of tissue to hold in place. Repeat until desired star patterns are glued to outside of mason jar. Let dry.
-
For wide mouth mason jar cut two pieces of wire – 17″ (neck) and 22″ (handle). Measure in approximately 2″ from each end of handle wire and turn up with pliers to create u-shape. Loosely wrap neck wire around jar and hold in place while catching the u-shaped ends under the wire. Pull neck wire snug around jar and twist ends several times to hold in place.
-
Gently squeeze u-shape with pliers until it is snug around neck wire. Begin wrapping 2″ end around and around handle wire. Press end snug against handle or cut to fit. Repeat for second side of handle.
-
Use round nose pliers to swirl ends of twisted neck wire.
- Apply glue to front of swirls and glue ribbon medallion in place on front of luminary. Use clothespins to hold in place while glue dries.
Read NextButton Flag Tray