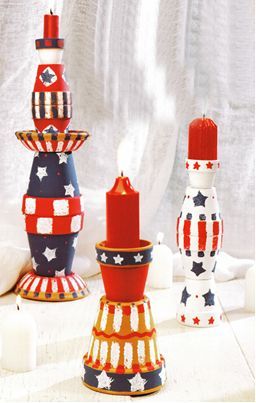
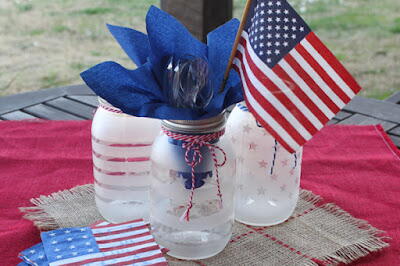
July 4th Candleholders
Stacked clay pots painted in stars and stripes become patriotic candleholders thanks to this project from Heidi Borchers. These are a great addition to your July 4th centerpieces.

Materials:
- Aleene’s® Super Thick Tacky Glue™
- Clay pots: 2 (1-3/4” diameter), 6 (2-1/4” diameter), 3 (3-1/4” diameter)
- 2 (4” diameter) clay pot saucers
- Acrylic paint – red, navy blue, white
- Paintbrushes: sponge, ¼” flat shader, fine-tip
- Pop-up craft sponge
- Fun Foam scrap
- Pencil with eraser
- Waxed paper
- Toothpick (optional)
- Pattern
Instructions:
- For small candleholder: paint bottom of 1 (2-1/4”) pot red and rim with navy blue. Paint rim of 1 (3-1/4”) pot navy blue.
- For medium candleholder, paint 1 (1-3/4”) pot and 3 (2-1/4”) pots white.
- For large candleholder, paint bottom of remaining 1-3/4” pot white and rim navy blue. Paint bottom of each remaining 2-1/4” pot red. Paint bottom of each remaining 3-1/4” pot navy blue and rim of each red. Paint bottom of each saucer red, leaving rim unpainted, and inside of 1 saucer white. Let dry.
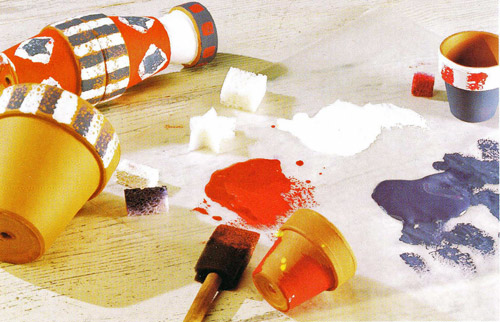
- For each candleholder, transfer patterns to pop-up craft sponge and cut 1 of each design except small star. Dip each sponge into water to expand and wring out excess water. Transfer small star pattern to Fun Foam scrap and cut out. Glue small star to pencil eraser to make stamp. Let dry.
- Pour separate small puddles of paint onto waxed paper. Dip 1 sponge into desired color of paint and “tap, tap, tap” your sponge beside paint puddle on waxed paper. This helps to distribute the paint and saturate the sponge. But don’t over-saturate the sponge – it doesn’t take much paint to stamp these designs! Using photo as guide, determine pattern and press sponge onto first pot where desired. Repeat to create design. Let dry. To change colors, wash sponge thoroughly and wring out excess water completely. Dip into next paint color and repeat. To stamp paint small stars, brush paint onto foam stamp and press onto pot. Repeat to create design. Let dry. To paint small dots, dip toothpick or end of paintbrush into desired color of paint and dot on pot. Let dry. Use fine-tip brush to paint wavy lines. Let dry.
- To assemble small candleholder: glue bottom of blue-rimmed 2-1/4” pot to bottom of blue-rimmed 3-1/4” pot.
- To assemble medium candleholder: glue 2 white 2-1/4” pots together around rima dn then glue bottom of remaining white 2-1/4” pot to 1 end of joined pots. Glue bottom of white 1-3/4” pot to opposite end of joined pots.
- To assemble large candleholder, glue blue and red 3-1/4” pots together arund rim. Glue bottom of 1 saucer to each end of joined pots. Glue red 2-1/4” pots together around rim. With white saucer up, center and glue 1 end of joined pots on saucer. Glue bottom of remaining 1-3/4” pot to free end of joined 2-1/4” pots. Let dry.
Heidi’s Designer Tip:
- Be sure you use plenty of glue to secure these candlesticks together and let your glue dry completely. If you can’t find clay pots in the exact sizes I have used, have fun mixing and matching your own sizes and shapes!
Read NextPicnic Party Mason Jars
Your Recently Viewed Projects
Thanks for your comment. Don't forget to share!
Marilyn B
Jun 11, 2017
WOW are these impressive! These would look so stunning flanking each side of a big porch or on the patio. I never would have thought these candlesticks were made with pots. The painting design in them is so pretty and of course, very patriotic! I would love to get together with my gal pals and create these as a very fun and productive project. Thanks for sharing!
Report Inappropriate Comment
Are you sure you would like to report this comment? It will be flagged for our moderators to take action.
Thank you for taking the time to improve the content on our site.


