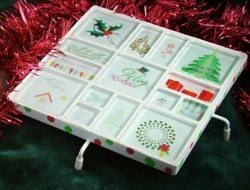
Mosaic Christmas Trivet
Have you ever wondered, "how do I make a mosaic?" This Mosaic Christmas Trivet from Diamond Tech would be a great holiday craft to make for yourself, or to give as a gift.
Materials:
- KraftyBlok™ Image Art Transfer Paper 2 pieces
- Images of your choice sized to fit your chosen tiles
- 6" Square Trivet (delphiglass.com)
- Glass Crafting Squares: 5 large square, 4 small square and 6 rectangular glass tiles
- White Grout – 1/2 cup
- White Spray Paint
- Mosaic Adhesive or Clear Silicone
- Mixing Bowl and Spoon - for Water & Grout
- Paper Towels and Newspaper
- Sponge or Scrubby
- Bowl and water for transfers
- Acrylic Paint – red and green
- Pencil with an eraser unused
- Scissors
- Disposable Glove
- White Glass Glitter
- Soft Cloth
Instructions:
- Select your trivet. For this project we are using 6" square trivet.
- Next, place an assortment of rectangles, large and small square glass tiles onto the base of the trivet, leaving at least 1/8” between each tile for grout. We used 5 large square, 4 small square and 6 rectangular glass tiles.
- Once you have all the various size tiles chosen for your project, you will need to choose your images for each tile. Using any software on your computer that allows you to manipulate and print images, scan and resize images to fit each tile.
- Set up your printer per the instructions on the KraftyBlok™ Image Art packaging.
- Follow printers’ instructions and print transfer. Allow transfer to set 10 to 15 minutes to dry.
- While the decals dry, spray paint your trivet white, including the wooden trivet base and allow to dry.
- There is a smooth and textured side to the clear glass crafting tiles. The decal will be applied to the textured side of the tile. Clean each tile with rubbing alcohol to remove dirt and smudges.
- Trim each decal to size using scissors. Place the transfers, one at a time, into a bowl of water and wait approximately 30 seconds.
- Slightly moisten the textured side of the tile. Gently slide the Image Art transfer from the backing paper onto the tile. Use your fingers to smooth the transfer as you slide away from the backing paper.
- Gently pat and smooth the Image Art transfer with a moist paper towel, eliminating air pockets and wrinkles.
- Layout completed tiles on a cookie sheet, transfer side up.
- Continue steps 4 through 10 until all pieces are completed.
- Allow to dry overnight.
- Permanently set the transfer: preheat a conventional oven to 345°F. Place the cookie sheet on a baking rack. Bake for 15 minutes. Turn off oven, prop door slightly, and leave in the oven for 20 minutes.
- Use hot mitts to remove from oven.
- When completely cooled, wipe with water and dry with a paper towel.
- Glue one tile at a time to the painted wooden base. Leave 1/8” space between each tile and edges. Once all tiles are glued to the base and is dry, insert it back into the trivet frame.
- Measure a ½ cup of grout into a bowl. Reserve a few tablespoons of grout and set aside. Adding 1 tablespoon of water at a time to grout, mix with spoon until the grout reaches “fudge-like” consistency. If it is too watery, add the reserved dry grout in small amounts until the consistency is correct.
- Wearing a disposable glove, spread the grout into all the spaces between the glass and along the outer edges of the trivet. Wait about 15 minutes for grout to set.
- Gently wipe away the excess grout using a paper towel or sponge, taking care not to pull grout out of tile spaces. It is very important to remove any grout from the tile surface before grout is completely dry.
- Pour several teaspoons of white glass glitter over the wet grout. Gently push glitter to set into the grout. Let dry for approximately 15 to 20 minutes.
- Use a soft cloth to buff the tiles to a clean shine.
- Allow 24 hours for the mosaic to dry.
- To create alternating dots on the side of the trivet, squeeze a small amount of red and green paint onto a paper plate. Use a new pencil in which the eraser has not been used. Dab pencil eraser into the first color. Press eraser onto the trivet frame. Reload paint and continue to add dots leaving enough space between each for another set of dots. Rinse eraser and repeat process for the second color of dots.
Tip: This project requires the use of a laser printer, not an inkjet.