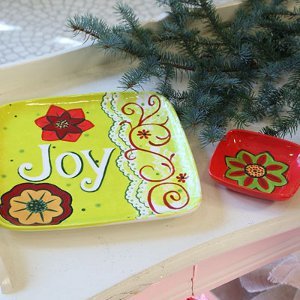
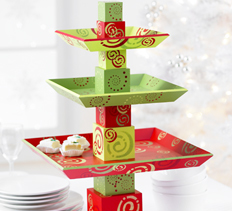
Stackable Holiday Trays
Before your next Christmas party, be sure to create your own Stackable Holiday Trays. This is a fun and festive way to serve food and display trinkets. Take your Christmas decorating ideas to the next level with this great craft projects. Paint and stencil your way to a tiered appetizer tray or create a wonderful Christmas tablescape with individual trays spread out. No matter what you choose, you'll know that your ideas for Christmas decorations will make a huge statement. Everyone will love the look of your homemade design and won't believe it wasn't picked up at a home goods store.

Materials:
- 3 Nested square wood trays: 14", 10", 8"
- Wood blocks:
- one 4"
- two 3"
- two 2 1/2"
- two 2"
- one 1 3/4"
- Acrylic paint
- Apple Green
- Light Foliage Green
- Opaque Red
- Mendocino Red
- Exterior/interior satin varnish
- Swirl stencils
- Four 3/8" stencil brushes
- Thick white craft glue
- Paintbrushes
- 1" glaze/wash
- #12 flat/shader Cotton swabs
- Low-tack tape
- Palette paper
- Paper towels
- Plastic sandwich bag
- Sandpaper
- Scissors
- Water basin
Instructions:
- Use one brush for each paint color.
- To keep paint from drying on bristles, place stencil brushes in plastic sandwich bag when not in use.
- Paint should be dry or almost dry by the time stencil is lifted.
- Stenciling is a dry brush technique requiring very little paint. Too much paint results in seepage or a raised edge around design; two light coats of paint are always better than one heavy coat.

- Allow paint to dry between coats.
- Preparation. Sand trays to smooth any rough areas or edges. Wipe with a damp paper towel to remove dust. Use the 1" brush to apply two smooth even coats as follows: large tray - Opaque Red; medium tray - Light Foliage Green; small tray - Apple Green (Photo A).
- Stencil red tray and blocks. For best results, cut swirl designs from rest of stencil. Position stencil in bottom of red tray and secure in place with low-tack tape. Pour a quarter-sized puddle of Mendocino Red on palette. Dip stencil brush into paint, tapping excess on palette until only a hint of color remains on brush. Use a pouncing motion color in the largest swirl on the stencil (Photo B). Carefully lift one corner of stencil and check color and coverage. If more paint is needed, reapply and recheck color and coverage.
- Continue working in this manner until you have 5 large and 7 small swirls on the inside of the tray. Turn tray over and add more swirls to outside of tray in same way. Add swirls to red blocks in same way.
- When changing paint colors, wash off stencil with a damp paper towel and dry thoroughly. Continue in same way as above, adding more swirls in Light Foliage Green and Apple Green.
- Stencil Light Foliage Green tray and blocks. Continue working in same way as Step 2, using dotted swirl from stencil and Mendocino Red, Opaque Red and Apple Green paint.
- Stencil Apple Green tray and blocks. Continue in same way as Step 2, stenciling large and small swirls with Mendocino Red, Opaque Red and Light Foliage Green paint.
- Edge trays. Use #12 paintbrush to paint tray edges as follows: large tray - Light Foliage Green; medium tray - Apple Green; small tray - Opaque Red (Photo C).
- Finish. Use 1" paintbrush to apply 2 to 3 smooth even coats of varnish to all surfaces. Use a doily or napkin when using trays. Do not place food directly on surfaces.

Read NextPretty Diy Napkin Rings With Flowers
Your Recently Viewed Projects
Thanks for your comment. Don't forget to share!
SissieSass
May 17, 2017
These trays make an excellent centerpiece for your holiday table. I love how creative you can get with these trays and blocks because they are so versatile and easy to customize. You can stack and paint them in any manner to make them fit your decor or needs. I like placing little truffles and chocolate candies on them for guests to munch on before and after the holiday meal.
floralsbyesther 36 18777
Mar 08, 2014
I made these for myself and my children a few years ago. I am a life member of Creative Homearts. At that time I researched all over including the person who gave the Club this project. Instead I used 3 of the sizes called for with trays, but it was hard to reach and get the cookies out. Also, the trays would fall if you weren't careful. Maybe I wasn't too bright buying trays that didn't work, but I'll suggest to you if you do make this set, it would be a good idea to glue the wood blocks to the trays so they don't fall.
bevm1663 6831572
Aug 31, 2013
cute - but I'd rather do something that stores easier. Remember, you have to store this between seasons if you make it for the holidays.
granny40
Dec 10, 2010
Excellent idea from Berta48. I wouldn't even do the bottom blocks so it will just sit on a table and no wobbling either. With her idea you don't need to use doilies, unless you really want to. I've wanted something like this for years.
Crafter 6828081
Mar 15, 2010
I checked Joann's and Michael's and didn't have the trays. any idea where I can get them
Berta48
Feb 17, 2010
Try useing the plastic trays you find at Christmas time.Glue the blocks to the squares.No need to paint the trays they are already colored!!! Be sure the glue you use is for plasticand wood.eLMERS GLUE WILL WORK FINE. I HOPE THIS HELPS.
djohn02
Oct 22, 2009
I love this idea. However, I can't find the nested wood trays anywhere. Any ideas where I might be able to order them online?
Report Inappropriate Comment
Are you sure you would like to report this comment? It will be flagged for our moderators to take action.
Thank you for taking the time to improve the content on our site.