Holiday Apron Tutorial
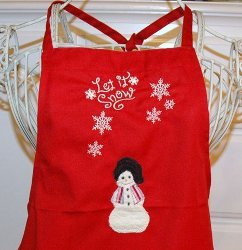
Sport this cute holiday apron while you prepare Christmas dinner for the family. This easy Christmas craft requires basic sewing skills. It makes a great Christmas gift or fun Christmas craft with your friends.

Materials:
- Apron
-
Fabric scraps (4" x 4" works best for easy drawing and cutting)
- 1 piece for the snowman body
- 1 piece for the hat
- 1 piece for the shawl
- Sewing Machine with zig zag stitching
- Sharp scissors
- Spray fabric adhesive
- Black fabric paint or black marking pen
- Matching threads for your fabrics
Instructions:
-
Purchase an apron at your favorite craft store that is ready for you to create your own holiday design. The apron can vary in price but seldom will cost you more than $5.00, making this entire project very affordable and fun!

-
Decide what design you want on your apron, snowman, reindeer, a saying, etc and create the design from fabric. In my example, I found a snowman online, printed it on my printer (4 copies) and used it as a pattern to cut out my fabric pieces. Be sure you allow 1/8” overlap between pieces that touch each other.
-
Cut out the printed image and pin it to your apron. Then sew a basting stitch around the outside edge of the design.
-
Now cut the image into the individual pieces. In my case I had a snowman body, scarf, and hat. I cut the snowman out of the fabric I was using for his body and another cut was made from a stabilizer (pellon) the same size as my fabric cutout. I did this with each piece of the snowman design.
-
Next I used fabric adhesive to place the stabilizer on my fabric making sure I placed it on the sewn outline for the body. Using the same technique I then placed my fabric for the snowman on the stabilizer. Now I was ready for the next layers, the scarf and hat. Using the same technique of a layer of stabilizer and then the fabric I laid all of the pieces on my apron outline.

-
Then, topstitch around the outside edges of each piece of fabric in the design. Use a narrow and short zig zag stitch to create a tight sewn edge on your design, changing threads to match the color of your design fabrics.
I used black fabric paint to create dots for the eyes and buttons and orange thread in a zig-zag stitch for the carrot nose and a straight black thread basting stitch for the mouth.
-
Finish off by using an off white thread the color of my snowman to embroidery “Let it Snow” and some embroidered snowflakes finish off the theme.

Crafter's Tip for Moms: You can make this a fun project for the entire family by letting them come up with the designs and cut them out while you help out with the sewing and embroidery. If you don’t have an embroidery machine there are lots of felt letters in the craft store that can work for your design. Happy Holidays Everyone.
Read NextSaint Wine Charms

Thanks for your comment. Don't forget to share!
Marilyn B
Nov 18, 2017
Great idea! The use of Pellon or a stiff interfacing is a great idea, and these do come in the iron on form which really helps things along. You could further embellish you designs with buttons, ricrac, crossgrain ribbon or even metalic threads and fabrics. This would make a very nice hostess gift too, especially for the holidays! A great gift for grandma created by the grandkids too....she would love it!
Report Inappropriate Comment
Are you sure you would like to report this comment? It will be flagged for our moderators to take action.
Thank you for taking the time to improve the content on our site.