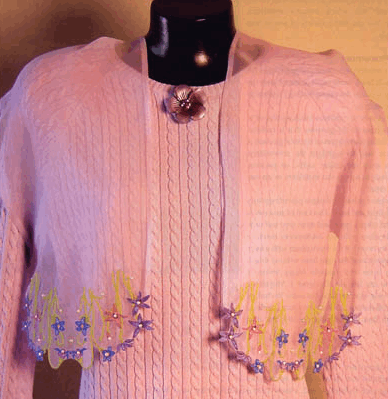
Sheer Floral Scarf
Embroider sheer fabric such as organza with delicate flowers for a beautiful scarf or wrap from Kandi Corp. Follow the machine embroidery technique or use the template method for hand embroidery.
The beauty of this scarf is the sculpted edging at the ends. Designs need to be chosen carefully as the portions of the designs must always touch each other. The designs should be stitched onto organza or a fabric that can be "melted" to get rid of the frays left after trimming the fabric. There are basically two ways to combine designs when perfect alignment is needed - using printed templates or using embroidery software. Adapt this project to our method as needed.

Materials:
● OESD Card #790 Watercolor Florals by Jan Woodman. Available in the following formats: 200 CD-ROM, 165-185 artista card, Babylock/Brother/Deco and compatibles, Janome 10000 card, Viking Designer 1 Floppy
● 1 3/4 yard organza
● Isacord polyester embroidery thread
● Bobbin thread - use Isacord embroidery thread in a color to match scarf
● Water-soluble marking pen
● EZ Glitzer® (Optional)
● Assorted 4 millimeter hot fix pearls
● Organ embroidery needles
● 505 temporary spray adhesive
● OESD badge master stabilizer
● Embroidery machine
● Sewing machine

Instructions:
Template Method:
- With the template method, the center point of each design is marked separately. (Center point sheets are provided in the packaging.)
- When using a design more than once, you will find it helpful to photocopy the design as many times as needed. This scarf uses two different designs twice on each end of the scarf. Photocopy the design in the mirror image, or trace the design onto the back of the paper.
- Cut a horizontal and vertical line at the center of the template(s).
- Fold back opposite corners at the center of the template(s).
- Place each template on the fabric at the desired position. It is important to place the designs so that a portion of the design touches a portion of the previously placed design.
- Mark the center point of each design through the template.
- Remove the template and extend the horizontal and vertical lines of each template.
- Each design is then stitched separately. Depending on the size of the hoop used, you may be able to stitch all the designs in one hooping, but will need to move the needle position at the beginning of each individual design. Check the orientation of each design to ensure that it will be stitched correctly.
Embroidery Software Method:
- The use of Explorations embroidery software will allow you to combine designs on screen and stitch the combined designs out as one. There will only be one center point to worry about with this method.
- To use this method, bring the first design (#24) into Explorations software via a Magic Box or a machine connection.
- Vertical mirror image the design.
- Duplicate the design, and horizontal mirror the duplicate.
Your Recently Viewed Projects
Thanks for your comment. Don't forget to share!
Report Inappropriate Comment
Are you sure you would like to report this comment? It will be flagged for our moderators to take action.
Thank you for taking the time to improve the content on our site.