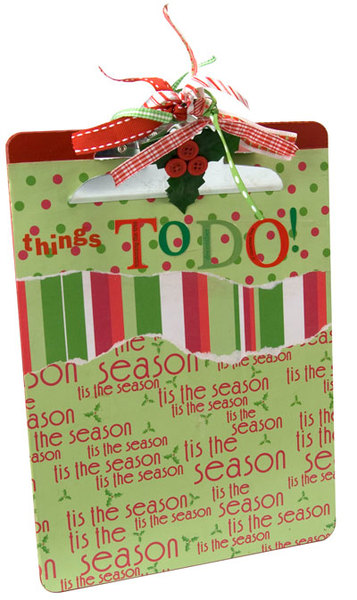
Holiday Clipboard
Who can't use some organizational help this holiday season? This holiday clipboard is the perfect way to keep track of all your holiday to-do's. Get organized in a decorative way!

Materials:
DecoArt Products Required
Americana Acrylics
- DA170 - Santa Red
Multi-Purpose Sealer
- DS17 - Multi-Purpose Sealer
Supplies
- Fine grit sandpaper
- Flat 3/4" brush
- Round #3 brush
- 3 sheets of 12" x 12" coordinating scrapbooking paper in holiday prints
- Craft knife
- Scissors
- Ruler
- Pencil
- Foam plate
- Craft wire or trash bag tie
- Aleene's Quick-Dry Tacky Glue
- Letter stickers (We used 7/16" red Franklin #716FGR by Stickabilities and 1 3/8" #50606 Christmas by Pebbles, Inc.)
- 3 red 1/2" buttons
- 3 small silk holly leaves
- E6000 clear industrial strength adhesive
- 7 1/4" to 1" wide coordinating ribbons
- Handheld flame stick lighter or woodburning tool
- 9 x 12 wood clipboard with spring clamp
Steps:
Preparation: Sand clipboard surface and remove dust with clean cloth.
- Use wire through holes of clipboard to hold spring clamp open while painting. Use flat brush and Santa Red to paint back, sides, top area surrounding clip, and 1/4" along edges at front of clipboard; let dry.
- Use flat brush and Multi-Purpose Sealer and apply to clipboard surfaces; let dry.
- Cut piece of holiday paper 10" x 12" to cover front of clipboard. Apply second coat of Multi-Purpose Sealer to front of clipboard. While sealer is wet, center holiday paper over front with top of paper aligned with base of clip. Smooth paper flat and secure edges well. Let Sealer dry.
- Lay clipboard face down on surface, with clip hanging off edge of surface. Use craft knife to trim paper evenly with edges of clipboard.
- Cut coordinating papers for top section to 4" x 10"; for lower section, cut paper 7 1/2" x 10".
- Tear across one short edge of larger piece. Repeat steps to center and attach paper to clipboard, with bottom straight edge aligned. Trim paper to edges of clipboard.
- Tear across two short edges of remaining piece of paper. Repeat steps to center and attach paper to clipboard, overlapping area where other patterns of paper meet. Trim paper to edges of clipboard.
- Refer to photo and attach stickers over paper, securing edges of stickers well.
- Apply two more coats of Multi-Purpose Sealer; let dry.
- To hide brand name on metal clip of clipboard, refer to photo and use adhesive to glue three holly leaves over clip. Glue buttons at center of leaves for berries.
- Center each ribbon length through hole of clip, knotting each at edge of clip. Trim ends if needed with woodburning tool or stick lighter to seal edges of ribbon and prevent fraying.
Helpful Hint
Plastic gift card (credit card type) can be used to smooth papers flat and remove air pockets when attaching papers to surface.
Read NextTin Can DIY Organizer