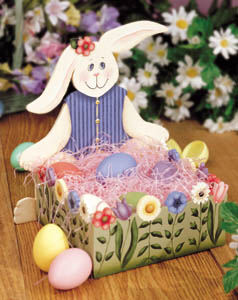
Garden Bunny Easter Box
A cheerful bunny presents a garden of Easter goodies in this painted wood box. Display painted eggs in this open box for the perfect Easter decor.
Materials:
DecoArt Products Required
Americana Acrylics
- DA110 - Blush Flesh
- DA114 - Light Cinnamon
- DA131 - Hauser Light Green
- DA152 - Shale Green
- DA154 - Pansy Lavender
- DA156 - Antique Rose
- DA163 - Honey Brown
- DA164 - Light Buttermilk
- DA168 - Golden Straw
- DA173 - Khaki Tan
- DA189 - Summer Lilac
Americana Spray Sealers
- DAS13 - Americana Matte Spray
Wood Sealer
- DS16 - Americana Wood Sealer
Supplies
- Brushes by Loew-Cornell - La Corneille: 3/4", 10, 6 & 2 Flats Series 7300; 3/8" & 1/4" Angular Shaders Series 7400; 1 Liner Series 7350; 2 Stencil Brush Series 1135; 4 Scruffy Flat Brush
- Supplies - Brush basin, palette, paper towels, tracing & transfer paper, pencil, stylus, sandpaper, 1/8" stripe stencil, masking tape, tack cloth &, if cutting your own wood, scroll saw with 5R blade, 3/4" brads, double-stick carpet tape, nails & nail-set, wood filler
- Bunny Box, available from Cabin Crafters, 1-800-669- 3920; OR
- 1/4" X 30" X 11" Baltic birch
- 1/8" X 2" X 2" Baltic birch
Instructions:
Preparation
Note: If purchasing the box already cut out, skip to step 5.
- Transfer pattern outlines of the four box sides to 1/4" Baltic birch. Cut two matching sides at once, using tabs of double-stick carpet tape between the two layers. Transfer the single flower pattern to 1/8" Baltic birch.
- Cut out the pieces using a scroll saw with 5R blade. Sand each piece well. Assemble the four sides, using photo as a guide. The two sides should be glued so the flowers run in opposite directions. Run a bead of wood glue on each piece, attach it and then secure the sides with 3/4" brads.
- Use assembled four sides as a pattern for the approximately 7-1/4" X 7-1/4" base. Cut the base, sand and insert into place with wood glue; secure with brads.
- Set nails using a nail set, fill all nail holes and any cracks between pieces with wood filler. When wood filler is dry, sand smooth and wipe away dust.
- Seal entire piece with Wood Sealer. Allow to dry and sand lightly again with fine sandpaper. Wipe piece clean of dust.
Painting Instructions
- Using 3/4" brush and 1:1 mix of Toffee and Light Buttermilk, basecoat inside and bottom of box and entire bunny with several coats, sanding lightly between coats.
- Basecoat the front, sides and lip between flowers Shale Green.
- Transfer the main lines of the bunny, flowers, leaves and stems.
Note: Use 10, 6 and 2 flat brushes to basecoat, and the 3/8" and 1/4" angular shaders to float shading, choosing the size brush that best fits the area. Use 1 liner for details and lining and 2 stencil brush for stenciling the stripes on the bunny's vest. The 4 scruffy brush is used for dry-brushing highlights.
Bunny
- Float Baby Pink shading on ears and, when dry, deepen slightly next to the fold with Blush Flesh. Directly above pink shading, highlight tops of folds with floated Light Buttermilk. Float Khaki Tan shading on the lower edge of the ears, on hands, arms, behind vest and on feet.
- Basecoat iris in eyes Uniform Blue and remainder of eye Light Buttermilk. Float Country Blue on lower half of iris, then dot shine marks Light Buttermilk.
- Basecoat nose Baby Pink; shade lower half with Blush Flesh and highlight Light Buttermilk. Paint line work on face with slightly thinned Lamp Black. Dry-brush Baby Pink cheek blush, using a circular motion.
- Basecoat vest Country Blue, and, when dry, stencil stripes Uniform Blue. Float Uniform Blue shading under chin and arms. Line trim on vest Hauser Light Green. With wooden end of brush, dot buttons Golden Straw. Shade lower third of buttons Light Cinnamon, and highlight upper third with dry-brushed Light Buttermilk. Dot Lamp Black buttonholes, then line the thread between them with Uniform Blue. Randomly dot the entire bunny with Light Buttermilk.
Stems & Leaves
- Basecoat Avocado, using liner and 2 flat brush. Float shading on leaves with 2:1 mix of Avocado and Lamp Black. Highlight by dry-brushing Hauser Light Green.
- Line leaf veins Hauser Light Green, thinned to inky consistency. Float Avocado shading along lower edge of box with 3/4" brush.
Coral Flowers
- Basecoat flowers Blush Flesh. Shade around centers with Antique Rose. Dry-brush highlights with 1:4 mix of Blush Flesh and Light Buttermilk, in center of each petal.
- Basecoat flower centers with Light Cinnamon; float shading of Burnt Umber and dry-brush highlights of Golden Straw. Paint flower cut-out and leaf same as above.
Purple Tulips
- Basecoat tulips Summer Lilac and shade Pansy Lavender. Highlight by dry-brushing with 1:4 mix of Summer Lilac and Light Buttermilk.
- For dot at base of tulip, dot first with Pansy Lavender; when dry, dot a smaller dot in center of the first one with highlight mix.
Yellow Flowers
- Basecoat flowers Golden Straw. With 1 liner and 1:1 mix of Toffee and Light Buttermilk, stroke petals, reloading after each petal. When dry, shade around center with Honey Brown. Line short spoke-like lines between petals near the center with Honey Brown.
- Basecoat centers Honey Brown. Shade centers Light Cinnamon and highlight by dry-brushing Golden Straw.
Blue Morning Glories
- Basecoat entire flowers Country Blue. When dry, transfer pattern for centers.
- Basecoat centers Uniform Blue; when dry, use Lamp Black to dot and line designs in middle. Dry-brush highlights with 1:3 mix of Country Blue and Light Buttermilk.
White Daisies
- Basecoat flowers Light Buttermilk and centers Light Cinnamon.
- Shade around centers Khaki Tan, then thin Khaki Tan to ink consistency and line varying length lines around centers.
- Shade centers Burnt Umber and dry-brush Light Buttermilk highlights. Dot Light Buttermilk around centers with stylus.
Pink Tulip
- Basecoat Baby Pink; shade Blush Flesh. Dry-brush highlights with 1:4 mix of Baby Pink and Light Buttermilk.
- Dot below flower Blush Flesh; when dry, over-dot with pink/buttermilk mix.
FINISHING INSTRUCTIONS
- Sand off paint where flower is to be glued; wood glue it into place.
- Spray box inside and out with several light coats of Americana Matte Spray.
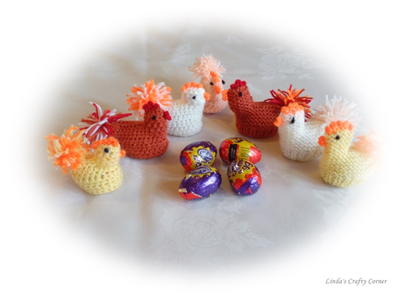
Find this project and many more Easter crafts in the 95-page Easter Craft and Recipe eBook.
Read NextGarden Bunny Easter Box
Your Recently Viewed Projects

Thanks for your comment. Don't forget to share!
Member 3750563
Mar 25, 2010
Muy linda la caja es una excelente presentacion para decorar. Besos.
Report Inappropriate Comment
Are you sure you would like to report this comment? It will be flagged for our moderators to take action.
Thank you for taking the time to improve the content on our site.