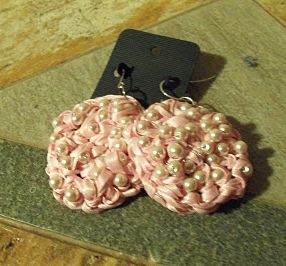
Crochet Ribbon and Pearl Earrings
Crochet with ribbon to make these gorgeous, feminine accessories. You can learn how to make earrings from pretty ribbon and pearls with this jewelry-making tutorial.

Materials:
- Ribbon-these are created with a satin ribbon about 1/2" wide. To start with, though, I would use the thinnest ribbon you can (about a 1/8" width) so that it does not get so twisted and difficult to manage
- Thin wire for jewelry making
- Beads (use a bead you are comfortable with for your first project- and keep in mind if you are creating earrings- too big will be too heavy on the ears!) I used approximately 14 small white acrylic beads because they are so lightweight.
- Crochet hook - I used a size F
Instructions:
- String your small beads onto the wire, keeping the wire attached to the spool. Wrap the wire back onto the spool once you have the beads loaded.
- Keeping the ribbon attached to the spool, grab your ribbon and the end of your wire and make a slip knot. Slide your hook in to make the first chain.
- Holding both the wire and the ribbon together make a chain stitch. Next make a beaded chain stitch (to make a beaded chain stitch, slide the bead up to your work so that it is laying next to the hook, crochet the chain by grasping your ribbon/wire just past the bead and pulling through your loop. It is literally the same as making a regular chain but just utilizing the ribbon/wire from past the bead for the next stitch.
- Make another chain stitch without the bead. Make another beaded chain stitch. You should have a chain of 4 stitches- 2 with beads and 2 without.
- Slip stitch into your first chain to make a loop
- Chain 1, then bead single crochet into the loop. To make the bead single crochet you are making a single crochet but pushing the bead up close to your hook first, then completely the single crochet so that the bead lies on the opposite side of your work when you complete the stitch. (a little more technical for those who may be feeling uncomfortable with the bead stitches: push the bead up close to your hook and keeping the bead in that position, take your hook and go into the center of the loop- NOT INTO A STITCH OF THE LOOP BUT IN THE CENTER OF THE LOOP, Yo, draw loop up and now you have your one loop with a bead and one without on your hook, yo and pull through both loops. Your bead should be sitting on the back of your work.)
- Bead single crochet into your loop 4 more times. You now have 5 BSC around the loop.
- Slip stich into the top of the first bsc to complete the round
- chain 2 (counts as first dbc). This round we are doing the same thing as last round but making double crochet stitches and increasing. To make the bead double crochet stitch, push bead close to hook, yo, insert into stitch indicated, yo, pull through stitch, yo and pull through first two loops, yo, pull through last two loops (the last one has the bead) and your bead should be on the opposite side of your work. So, bead double crochet into the same stitch you did your chain 2 with to start this round. Bead double crochet into next stitch of the previous round. Double crochet into same stitch you just completed then bead double crochet chain into. Bead double crochet into next stitch, then double crochet into same chain. Continue until you go all the way around. You are basically stitching 2 double crochet into each stitch of the previous round- one with a bead and one without. Slip stitch to top of first dbc of this round. You should now have 10 stitches.
- chain 1, then slip stitch around the entire piece.
- Cut your ribbon and wire from your work leaving about a 4" tail. Tie off. Hide your wires and ribbon ends, cut close. You may want to put a dab of glue on the back side to hide the ribbon end.
- Turn your work over so the beads are showing. Insert earring hooks through any of the last round of slip stitches. Make sure the hooks, when inserted, have the end of the hook facing to the wrong side (side without beads showing) so when worn the beaded side will be facing outward.
Read NextOceanside Opulence Earrings


Thanks for your comment. Don't forget to share!
Report Inappropriate Comment
Are you sure you would like to report this comment? It will be flagged for our moderators to take action.
Thank you for taking the time to improve the content on our site.