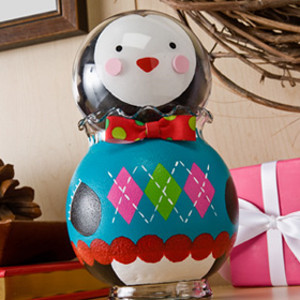
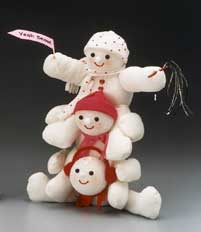
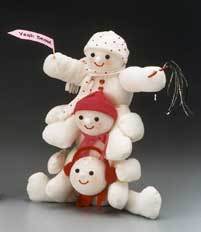
Snowman Totem Pole
Let the whimsy of the season into your heart with these three little snow children stacked up like a totem pole. Soon, you'll be cheering on Old Man Winter too!
Materials:
- STYROFOAM™ Brand Balls: 3"; 4", three each
Snowman Totem Pole pattern - Sewing machine and needle
- Matching sewing thread
- Scissors
- Serrated knife
- Utility knife with sharp blade
- Ruler
- Low-temperature glue gun and glue sticks
- Thick, white craft glue
- Cotton knit fabric
- White, 3/8 yd.
- Solids and/or prints: Two assorted 10" x 6"
- Solids and/or prints: One 10" x 2"
- White, 3/8 yd.
- Polyester fiberfill
- Black marking pen
- Red crochet thread
- Red chenille stem
- Six 1/4" black beads
- Two 1" red pom poms
- Three 3/8" white pom poms
- Two small red heart buttons
- Bright pink paper
- Strands of metallic tinsel
- Pink chalk or powdered blush
- Curl of white doll hair
- Cotton swab
- Cocktail straw
- Wooden toothpicks
Instructions:
- Using patterns, cut 12 arms and 12 legs from white knit fabric. Pair and sew pieces, leaving straight edges open. Note: When sewing fabrics throughout, sew right sides together using a 1/4" seam. Clip corners and turn. Lightly stuff each piece with fiberfill. Hand sew gathering stitches 1/4" from raw edges, pulling thread to gather stitches and close opening. Tuck any excess fabric inside gathered hole and knot thread to secure. Trim ends.
- See diagram to trim each 4" foam ball snowman body with a knife. Stack and glue bodies, angling them backward as indicated. Note: Arms and legs will provide counterweight needed to stand snowmen upright. Repeat to trim each 3" foam ball head and glue to corresponding body.
- Using photo as a guide, glue legs to bottom snowman, pointing outward as if doing the splits. Glue legs to remaining two snowmen so they hang down on opposite sides of head below.
- Glue arms to sides of bottom two snowmen, wrapping them around legs of snowman above. Tack arms to legs for added reinforcement. Glue arms to top snowman, raised slightly and stretched outward.
- Using photo as a guide, glue two black bead eyes and a 3/8" white pom pom nose to each snowman's face. Add a 3/4" length of red crochet thread shaped in a shallow smile. Brush pink chalk or powdered blush on cheeks with a cotton swab.
- Cut two 10" x 4" rectangles from solid and/or print knit fabric. Fold a rectangle in half widthwise and sew 4" edges together to form a tube. Hand sew gathering stitches along one raw edge. Pull thread to gather stitches and close opening. Knot thread to secure and trim. Turn hat right side out and place on top snowman's head. Fold up bottom edge for cuff. Repeat to sew hat for center snowman.
- Cut a 4-1/2" length from red chenille stem and bend in a U-shape headband. Place headband on bottom snowman's head and then glue 1" red pom poms to ends for earmuffs.
- Cut three assorted 2" x 10" strips from solid and/or print knit fabric for scarves. Fold each strip in half lengthwise and sew long edges to form tubes. Turn right side out and cut fringe in ends. Tie scarves around necks.
- Using photo as a guide, print "Yeah Snow!" on a narrow strip of bright pink paper. Wrap and glue one end around top of a toothpick to make a pennant. Cut a point in opposite end. Attach pennant to top snowman by tacking fabric at end of left arm to form a thumb and then sliding toothpick inside hole created.
- Make a cheerleading pom pom by gluing ends of several short lengths of tinsel inside a cocktail straw. Follow Step 9 to attach sign to top snowman's remaining free arm.
- Glue a curl of white doll hair to center top of bottom snowman's head. Glue heart buttons down center front of top snowman's body.
®™ Trademark of The Dow Chemical Company ("Dow") or an affiliated company of Dow. For more project ideas, please see styrofoamstyle.com.
Read NextTin Can Succulent Christmas Tree
Your Recently Viewed Projects
Thanks for your comment. Don't forget to share!
wmcc53 9617491
Sep 16, 2015
I'm having trouble accessing the pattern for this. Can you help please?
FaveCrafts Editor JL
Sep 17, 2015
Hi there, if you click on the pattern links in either the Materials or Instructions list, another window will open (so make sure you don't have a pop-up ad blocker enabled). The pattern is a PDF document, so you need to have a Adobe Reader installed on your computer. Thanks! - Julia from FaveCrafts
Patches1958
Jan 20, 2011
THIS IS THE CUTEST PATTERN I HAVE SEEN YET! IF ANYONE OUT THERE KNOWS OF A MINI DOLL PATTERN I NEED ONE DESPERATELY!!!!! YOU CAN SEND IT TO ME EMAIL ADDRESS patch@advnet.net just put mini doll pattern in the subject line please. Thank You
Report Inappropriate Comment
Are you sure you would like to report this comment? It will be flagged for our moderators to take action.
Thank you for taking the time to improve the content on our site.