Picnic Wreath
Ladybugs, flowers and cloth give the look of a picnic wreath. It can be put up in your kitchen or on the outside door.
Materials:
-
STYROFOAM* Brand Foam:
- Wreath, 18" x 2-1/2" x 2"
- Eggs, three each: 2"; 2-1/2"; 3"
- Sheet, 1" thick, large scrap
- Green/white gingham fabric, 45" wide, 1/2 yd.
- Acrylic paints: red; black; bright green; white
- Satin varnish
- Gesso
- Pre-mixed patching plaster
- 3 yds. Green ribbon, #40
- Green chenille stem
- Paintbrushes: medium flat; small round
- Artificial greenery, one each: ivy bush; white flower stem; forsythia stem
- Wire: cloth-covered floral, 18" length; black plastic-coated, 18- and 22-gauge, one package each
- Two floral "u" pins
- Serrated knife
- Candle stub or paraffin
- Round pencil with new eraser
- Yardstick, or ruler
- 16 Round toothpicks
- Disposable palette
- Water basin
- Paper towels
- Scissors
- Wire cutters
- Needlenose pliers
- Awl, or metal skewer
- Painter's mask (to be worn while sanding plaster)
- Sandpaper: medium; very fine
- Low-temp glue gun and glue sticks
- Thick, white craft glue
Instructions:
-
Cut gingham fabric into nine 2" x 45" strips. Overlapping strips and using glue gun to secure beginning and end of each strip, spiral wrap strips around wreath to cover surface.
-
For hanger, push floral pins halfway into top back edge of wreath, so pins are vertical and 3" apart. Insert chenille stem through pins; knot stem ends together. Adjust hanger so it does not show above wreath. Push pins firmly into wreath to secure hanger; use glue gun to apply layer of glue over floral pins.
-
Cut 12" length from ribbon for tails. Fold remaining ribbon length into eight-loop bow with center knot. Secure center of tails to bow center with floral wire. Wire bow to wreath at 10 o'clock position.
-
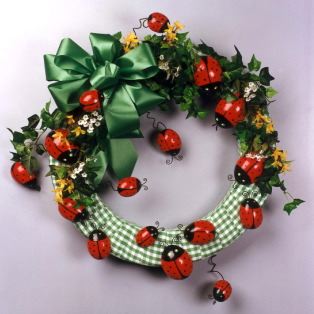
Use wire cutters to remove stems from all greenery. Using photo as guide, arrange and glue greenery to wreath around bow.
-
Wax serrated knife with candle stub or paraffin. Cut all eggs in half lengthwise; set aside one half of one small and one large egg for another project.
-
Insert toothpick into flat side (bottom) of each half-egg body. Holding toothpick, use fingers to coat rounded surface of body with plaster. Push toothpicks into scrap foam; let dry.
-
Sand bug bodies first with medium, then very fine, sandpaper. Recoat, let dry, and sand again. Repeat as needed until completely smooth surface is achieved.
-
Apply one coat gesso to all surfaces of each bug, let dry, then sand with very fine sandpaper. Repeat.
-
Use flat brush to paint bugs red; let dry. Apply second coat; let dry. Using photo as guide, use round brush to paint black head and wing separation line; use round brush handle to paint black wing dots. Let dry.
-
For large bugs, use pencil eraser to paint bright green dots for eyes; use round brush handle to add white highlight dots to centers. For medium and small bugs, use brush handle for eyes and toothpick for highlight dots. Let dry.
-
Apply three coats varnish to each bug; let dry between coats. Remove toothpicks.
-
For antennae, cut the following from 22-gauge black wire: ten 1-1/2" lengths (small bugs); twelve 2" lengths (medium bugs); ten 2-1/2" lengths (large bugs). Use pliers to bend spiral into one end of each antenna. Use awl to poke two 1/4"-deep holes in top of each head, 1/8" above bottom edge of body and 1/8" apart. Use white glue to glue antennae into holes.
- Using photo as guide, arrange ladybugs on wreath. Use glue gun to secure. For each "flying" bug desired, cut one 9" length from 18-gauge black wire. Use awl to poke hole in wreath at desired location. Leaving 1" straight wire tail, bend rest of wire length into three irregular loops. Use white glue to glue wire tail into hole in wreath. Glue opposite wire end into bottom of bug at desired angle; use glue gun to secure.
®™ Trademark of The Dow Chemical Company ("Dow") or an affiliated company of Dow. For more project ideas, please see styrofoamstyle.com.
Read NextFaux Flower Cupcake Liner Wreath
Your Recently Viewed Projects

Thanks for your comment. Don't forget to share!
SAH1
Aug 15, 2010
This is a beautiful wreath and I love ladybugs!!! But my comment is more a gripe!!! They often say "use photo as a guide" in many instructions on this site. Maybe I'm doing something wrong, but the only photo I can see or find is usually about 2 inches square and I find it next to impossible to see the detail they describe in the project instructions! Am I doing something wrong??
Report Inappropriate Comment
Are you sure you would like to report this comment? It will be flagged for our moderators to take action.
Thank you for taking the time to improve the content on our site.