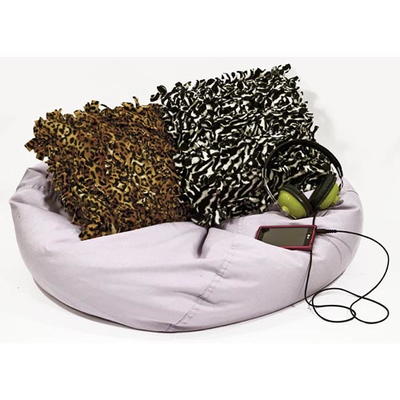
Knotted Spiral Accent Pillow

DIY throw pillows are a great way to add some creative flair to your space. Create a Knotted Spiral Accent Pillow and throw it on your couch for a unique and unexpected look. This project is so easy, you won't believe it's real. In fact, you don't need a crochet hook or a knitting needle to complete this yarn craft project. if you want to learn how to make a pillow but are too intimidated to get started, this is a great option. Simply grab some Premier Yarns Knot Easy yarn, a pair of scissors and pillow form to get started. Before you know it, you'll have a great throw pillow to show off.

Yarn Weight(6) Super Bulky/Super Chunky (4-11 stitches for 4 inches)
Materials:
- Premier Yarns® Knot Easy
- 1004-01 Black—1 roll for small pillow
- 1001-02 Sea Camo—2 rolls for medium pillow
- 1001-06 Tan Cheetah—2 rolls for large pillow
- Scissors, 10 (14, 16)" pillow form
Sizes: Small (Medium, Large)
Finished Measurements: 10 x 10" (14 x 14", 16 x 16") [25 x 25cm (36 x 36cm, 41 x 41cm)]
Save & Print! Learn how to take care of your yarn with our free PDF printable!
Instructions:
Pillow
Set-up Tapered End! Unroll 36” of Knot Easy, with fabric to the left and mark 28th (36th, 40th) fringe along lower edge with a safety pin. Taper beginning by cutting between 1st and 2nd fringe on the upper edge approx. 1½” deeper. Cut between 2nd & 3rd fringe approx. 1” deeper, and cut between 3rd & 4th fringe ½” deeper. Fold end of roll to the left and match 1st fringe along top edge to 28th (36th, 40th) fringe along lower edge marked with a safety pin.
Begin Knotting! Knot the 1st upper fringe to the marked 28th (36th, 40th) lower fringe with a double overhand knot (like tying your shoe). Continue in this manner, knotting 2nd upper fringe to the 29th (37th, 41
st) lower fringe, and so on, working in a spiral.
Large Pillow Only
Cut 3rd roll to 30” long.
Medium & Large Pillow Only
Adding a new roll of Knot Easy: When you have 3 fringes left in the 1st roll, open the 2nd roll and overlap the ends. Knot the next 3 fringes using both the 1st and 2nd roll to attach the new roll into the project.
All Sizes
When 4 fringes remain in last roll, stop and taper the final 4 lower fringes as for start, tapering the 1st 4 fringes at the beginning of the Pillow. Knot the final 4 fringes.
Finishing
Lay Pillow flat & knot 14 (18, 20) pairs of fringes at lower edge to close bottom of Pillow. Insert the pillow form. Knot the 14 (18, 20) pairs of fringes at top to close top of Pillow.