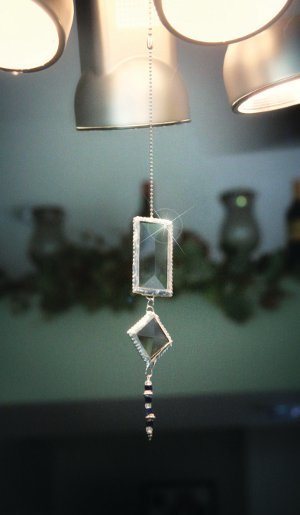
Diamond Fan Pull
Give your room a little vintage sparkle with this Diamond Fan Pull. Made with clear bevels and a silver chain, this fan or light pull will dazzle up any room. Use it in a closet or in the living room to make it easier to turn on a light or ceiling fan.

Materials:
- 1 pack 1x1 Studio Pro™ Bevels
- 1 pack 1x2 Studio Pro™ Bevels
- 18” Silver Ball Chain
- Studio Pro™ Soldering Iron
- Studio Pro™ 60/40 Solder
- Studio Pro™ 7/32” Black Backed Copper Foil
- Studio Pro™ Safety Flux
- Studio Pro™ Flux Brush (or a cotton swab)
- Studio Pro™ 2 Pack Fid (or craft stick or pencil)
- 4 – 7mm Jump Rings
- 1 Decorative Head Pin
- Assorted Beads and Spacers
- Flush Cutter
- Round Nose Pliers
- Long Tweezers
- Heat Resistant Work Surface
Tips:
- Before you begin find a place to work that has great ventilation where you can open a window and use a fan.
- An area safe from children and pets is recommended.
- The less you move an unfinished project, the less likely you are to have damage.
- Please read and follow all directions carefully. When working with glass, protect your feet and legs by wearing pants and closed toe shoes. Eye protection is essential.
- Use a heat resistant work surface.
Instructions:
-
Thoroughly clean the bevels and dry with a lint free cloth.
-
Peel 1" of the backing from a roll of copper foil. Center the edge of your bevel on the sticky side of the foil. Wrap the entire outer edges of the bevel with foil, overlapping the end by 1/4".
-
Use a fid or craft stick to burnish (rub) the surface of the foil to the edge of the glass. Press firmly, however too much pressure may cause the foil to tear.
-
Once foiled, lay bevels on a heat resistant surface and plug in your soldering iron.
-
Apply a small amount of flux with a brush or cotton swab along the foiled edges of one of the bevels.
-
Unroll a 6" length of solder; heat the solder with the tip of the soldering iron. Apply a thin layer of solder (tinning) over all foiled edges of the bevel. Using needle-nose pliers flip the bevel over, flux and solder the other side of the bevel. Repeat this process for the remaining bevel.
-
Align a segment of ball chain against one side of the 1x1 bevel, apply flux and solder at the midpoint to hold the chain in place. Use flush cutters to snip the chain at the end. Flux and solder the remaining ball chain in place. Repeat for each side of the bevels.
-
Following step 7, add the ball chain to the 1x2 bevel, allow bevel to cool.
-
Once cooled, use needle nose pliers to hold a jump ring to one corner of the 1x1 square bevel. Apply a bit of flux to the area where the jump ring connects with the corner of the bevel and apply a small amount solder to the joint. Allow to cool. For added strength, flux and add more solder to the back of the jump ring. Do the same on diagonal corner, so the square appears to be diamond shaped.
-
Next, solder a jump ring to the center bottom of the 1x2 bevel, following Step 9.
-
When the project has cooled, join the 1x1 bevel to the 1x2 bevel using a 7 mm jump ring.
- Thread beads and spacers onto a decorative head pin, leaving enough room at the top of the pin to create a loop of hanging. Open the loop and attach to the bottom of the 1x1 bevel, pinch jump ring closed.
Read NextFlower Pot Gnome Tutorial