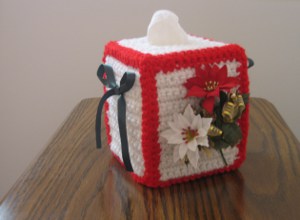
Flower of Christmas Tissue Box Cover
This Flower of Christmas Tissue Box Cover from Roseanna Beck is great for adding a festive touch to your home come Christmastime. This tissue box cover tutorial is easy to follow and great for beginners. Use this free tissue box cover pattern to make gifts for your loved ones this holiday season.
Materials:
- Red Heart Classic 4-ply worsted weight yarn – 3.5 oz/190 yds (1 skein) #001 white
- Red Heart Classic 4-ply worsted weight yarn – 3.5 oz/190 yds (1 skein) #902 jockey red
- H crochet hook or size needed for gauge
- Yarn needle
- 2 small silk poinsettias of your choice
- 1 yd. green 3/8” nylon ribbon
- Boutique tissue box
Gauge: 14 rows = 4”, 12 scs = 4”
Instructions:
Sides (make 4)
-
Row 1 – With white ch 14, sc in 2nd ch from hook, sc in each ch across. (13 sc)
-
Row 2 – Ch 1 and turn, sc in each sc across.
-
Rows 3-15 – Rep Row 2.
-
Row 16 – Rep Row 2, fasten off and turn.
- Side Edging: With red work 3 sc in upper right corner sc, 11 sc across the top, 3 sc in the corner sc, 15 sc evenly spaced along the side edge, 3 sc in corner sp, 11 sc along bottom edge, 3 sc in corner sp, 15 sc evenly spaced along the side edge, join to the beg sc and fasten off leaving yarn for joining sides together. When you are finished turn piece to other side – this is the right side.
Top
-
Row 1 – With white ch 14, sc in 2nd ch from hook, sc in each ch across. (13 sc)
-
Row 2 – Ch 1 and turn, sc in each sc across.
-
Rows 5-6 – Rep Row 2.
-
Row 7 – Ch 1 and turn, sc in each of next 3 sc, ch 7 (for tissue opening), skip 7 sc, sc in each remaining sc.
-
Row 8 – Ch 1 and turn, sc in each of next 3 sc, work 1 sc in each ch and remaining sc. (13 sc)
-
Rows 9-12 – Rep Row 2.
-
Row 13 – Rep Row 2, fasten off and Do Not Turn.
- Top Edging: With red work 3 sc in upper right corner sc, 11 sc across the top edge, 3 sc in the corner sc, 11 sc evenly spaced along the side edge, 3 sc in corner sp, 11 sc across the bottom edge, 3 sc in corner sp, 11 sc evenly spaced along the side edge, join to the beg sc and fasten off leaving yarn for joining the top to sides. When you are finished turn piece to other side – this is the right side.
Finishing
-
Make 2 ribbons and sew 1 on each of 2 sides.
-
Sew 1 silk poinsettia to each of 2 sides.
-
With red and wrong sides together whipstitch sides pieces together.
- With red and wrong sides together whipstitch sides and top together.
Read NextQuick Easy 2 Row Blanket