Free Crochet Christmas Tree Pattern
Learn how to crochet a Christmas tree to complete your holiday tablescape with this free crochet tree pattern.

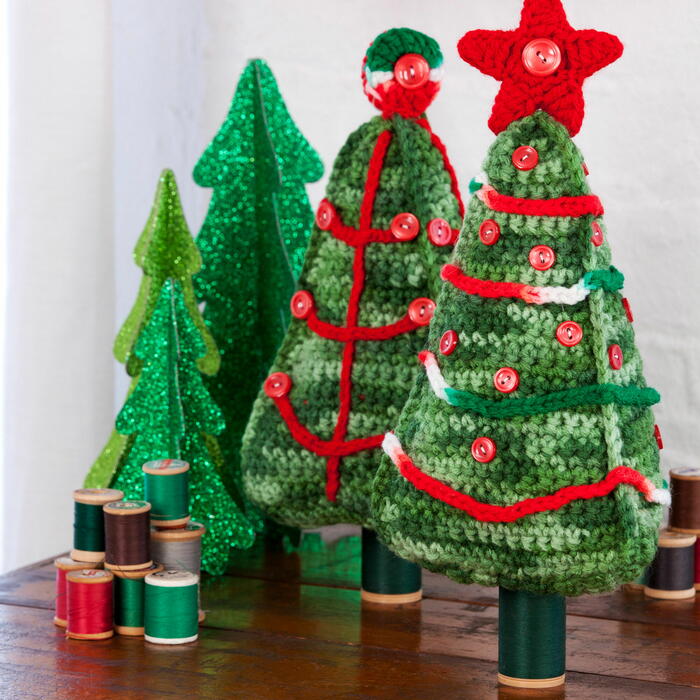
With this Free Crochet Christmas Tree Pattern, you can add a personal touch to your Christmas decorations! These soft trees are the perfect way to complete the look of your holiday tablescape this year. You can also use these festive trees to decorate your mantel or bring your office or desk a little holiday cheer.
For the intermediate crocheter, these crochet Christmas trees work up quickly and make a unique last-minute gift idea. Embellish with buttons of all colors for a colorful and fun tree that anyone is sure to admire. Christmas crochet patterns are usually left for ornaments or stockings, but this project is sure to become a staple when preparing for the holiday. Best of all, you only need a three skeins of Red Heart Super Saver Yarn to make two completely different trees!
If you love crafting for Christmas year-round, sign up for Crafty Christmas Ideas from our friends at AllFreeChristmasCrafts.
Sign Up for More Free Patterns >>>

Crochet HookH/8 or 5 mm hook
Yarn Weight(4) Medium Weight/Worsted Weight and Aran (16-20 stitches to 4 inches)
Crochet Gauge16 sts = 4”, 16 rows sc = 4”
Finished SizeTree measures 8½” tall | Base measures 5½” in diameter
Materials List
- 1 skein Red Heart® Super Saver® yarn in 629 Green Tones (A)
- 1 skein Red Heart® Super Saver® yarn in 979 Mistletoe (B)
- 1 skein Red Heart® Super Saver® yarn in 0319 Cherry Red (C)
- 5.0mm [US H-8] crochet hook
- Yarn needle
- For Tree 1: 21 to 24 – 7/16” red buttons and 2 – ¾” red buttons
- For Tree 2: 18 – 9/16” red buttons and 2 – ¾” red buttons
- 2 spools of Coats Cotton Machine Quilting Thread for Tree Trunk in color #8975
- Two ⅛” X 7½” long wood dowels or 1 set of wood chopsticks
- Sewing needle and red sewing thread
- Tacky Glue
Instructions:
Make two trees according to the first three sections (Tree Sides, Tree Bottom, Finishing).
Sides (Make 3)
-
Starting at bottom, with A, ch 2.
-
Row 1: 3 sc in 2nd ch from hook; turn – 3 sc.
-
Row 2: Ch 1, sc in each st across, turn.
-
Row 3: Ch 1, 2 sc in first st, sc in next sc, 2 sc in last st; turn – 5 sc.
-
Rows 4-6: Ch 1, sc in each st across; turn.
-
Row 7: Ch 1, 2 sc in first st, sc in each st across to last st, 2 sc in last st; turn – 7 sc.
-
Rows 8-27: Repeat rows 4-7 (5 times).
-
Row 28-32: Repeat Row 4. Fasten off.
Tree Bottom
-
With A, ch 2.
-
Row 1: 3 sc in 2nd ch from hook; turn – 3 sc.
-
Row 2: Ch 1, sc in each st across, turn.
-
Row 3: Ch 1, 2 sc in first st, sc in each st across to last st, 2 sc in last st; turn – 5 sc.
-
Row 4: Ch 1, sc in each st across; turn.
-
Rows: 5-16: Repeat rows 3 and 4 (6 times) – 17 sc at end of last row. Fasten off, leaving a sewing length.
Finishing
-
With wrong sides facing, sew bottom edge of 3 tree sides to the edges of tree bottom. With right side facing, sc 2 tree sides together. Add stuffing and sc the last 2 trees side together, adding additional stuffing as needed. Weave in ends.
Tree 1 Embellishments - Star (Make 2)
-
With C, Ch 4, slip st in first ch to form ring.
-
Round 1: Ch 1, work 10 sc in ring; join with a slip st in first sc – 10 sc.
-
Round 2: Ch 1, sc in first sc, *ch 5, sc in 2nd ch from hook, hdc in next ch, dc in next 2 ch, skip next sc in round 1**, sc in next sc, repeat from * around ending last repeat at **, join with a slip st in first sc – 5 points. Fasten off, leaving a sewing length.
-
With right sides facing, sew two stars together, matching sts. Sew star to top of tree. With sewing needle and thread, sew one ¾” button to center of each side of star.
-
Weave in ends.
Garland
-
With B, make 4 chains in different lengths for garland to wrap around tree. Fasten off, leaving a sewing length.
-
Start at the bottom or top, placing garland chains 1½” apart.
-
Sew garlands in place.
-
With sewing needle and thread, sew 7/16” buttons between garland, on each side of tree.
Tree 2 Embellishments - Circle (Make 2)
-
With B, ch 2
-
Round 1: 6 sc in 2nd, ch from hook; join with a slip st in first sc – 6 sc.
-
Round 2: Ch 3 (counts as dc), dc in first sc, 2 dc in each sc around; join with a slip st in top of beginning ch-3 – 12 dc. Fasten off leaving a sewing length.
-
With right sides facing, sew circles together, matching sts.
-
Sew assembled circle to top of tree. With sewing needle and thread, sew one ¾” button to center of each side of circle. Weave in ends.
Center Tree Stem (Make 3)
-
With C, ch 33. Fasten off, leaving a sewing length.
Tree Branches (Make 3 in each length)
-
Branch 1: With C, ch 15. Fasten off, leaving a sewing length.
-
Branch 2: With C, ch 19. Fasten off, leaving a sewing length.
-
Branch 3: With C, ch 23. Fasten off, leaving a sewing length.
-
Sew one stem to the center of each side of tree.
-
Sew the tree branches to the stem in a triangular shape as pictured. Sew one 9/16” button at ends of each branch.
Tree Trunk (for both trees)
-
Insert wood dowel into thread spool. Add glue to the top of the spool. Insert the remaining wood dowel into the center bottom of the tree and glue the spool to the tree.
Abbreviations
- A, B, C
- Color A, B, C
- ch
- chain
- dc
- double crochet
- sc
- single crochet
- []
- work directions in brackets the number of times specified
- * or **
- repeat whatever follows the * or ** as indicated
Up Next:
Read NextHawaiian Christmas Table Runner