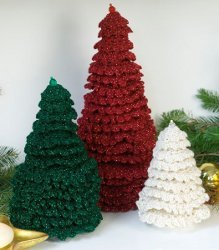
Crocheted Christmas Trees
Learn how to crochet an adorable DIY evergreen with this free crochet Christmas tree pattern.

Crocheting for the holidays is one of the best ways to spend your time inside during the cold winter months. This year add some color and style to your Christmas decor with these Crocheted Christmas Trees from Lily Sugar n' Cream. These crocheted trees are perfect for beginners and fun to embellish with buttons and beads. Use these plush trees as a mantel decoration or place them in a nursery to help add a soft Christmas touch to every room in your home.
We love these Christmas tree craft because it adds a soft and simple touch to your holiday decor. Decorated with buttons, you can easily personalize it your decor style. If you're feeling especially festive, you could even use some sparkly yarn.

Crochet HookG/6 or 4 mm hook
Yarn Weight(4) Medium Weight/Worsted Weight and Aran (16-20 stitches to 4 inches)
Crochet Gauge14 sc and 15 rows = 4 ins [10 cm].
Materials List
- 1 ball Lily® Sugar ‘n Cream® (Solids: 70 g/2.5 oz) in Hot Green
- 4 mm (U.S. G or 6) crochet hook or size needed to obtain gauge
- Stuffing
- Buttons for decorations
- 12 ins [30.5 cm] felt for base
- Light cardboard for base
Instructions
Large Tree
Note: Work all sts in back loops.
-
**Ch 2.
-
1st rnd: 6 sc in 2nd ch from hook. Join with sl st to first sc.
-
2nd rnd: Working in back loops, 2 sc in each sc around. Join with sl st to first sc. 12 sc.
-
3rd and 4th rnds: Ch 1. 1 sc in each sc around. Join with sl st to first sc.
-
5th rnd: Ch 1. *1 sc in next sc. 2 sc in next sc. Rep from * around. Join with sl st to first sc. 18 sc.
-
6th and 7th rnds: As 3rd and 4th rnds.
-
8th rnd: Ch 1. *1 sc in each of next 2 sc. 2 sc in next sc. Rep from * around. Join with sl st to first sc. 24 sc.
-
9th and 10th rnds: As 3rd and 4th rnds.
-
11th rnd: Ch 1. *1 sc in each of next 3 sc. 2 sc in next sc. Rep from * around. Join with sl st to first sc. 30 sc.
-
12th and 13th rnds: As 3rd and 4th rnds.
-
14th rnd: Ch 1. *1 sc in each of next 4 sc. 2 sc in next sc. Rep from * around. Join with sl st to first sc. 36 sc.
-
15th and 16th rnds: As 3rd and 4th rnds.**
-
Cont as established, inc 6 sts on next and every following 3rd rnd, until there are 66 sc.
-
Next 2 rnds: Ch 1. 1 sc in each sc around. Join with sl st to first sc. Fasten off at end of last rnd.
Small Tree
-
Work from ** to ** as given for Large Version. Fasten off.
Finishing
Cut 1 piece of felt and 1 piece of cardboard to fit circumference of bottom of tree. Stuff tree. Pin felt to bottom of tree, placing cardboard between felt and stuff. Sew felt in position. Sew buttons on tree as shown in picture.
Read NextHappy Snowman Crochet Basket Pattern