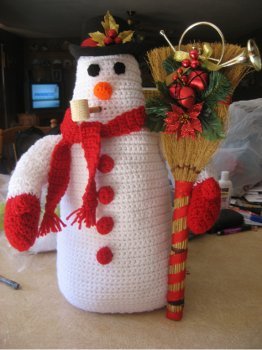
Crochet Frosty the Snowman
This adorable crocheted snowman is a great addition to your Christmas decor. Perfect for adding a whimsical winter touch to your living room, this Crocheted Frosty the Snowman is something that everyone will appreciate! This is a simple crochet pattern that anyone could make, and it also makes a wonderful holiday gift. Have this cute crocheted snowman out on display all winter long for a festive and fun way to keep your home in the holiday spirit.

Materials:
- 1 skein worsted weight 4-ply yarn in White
- 1 skein worsted weight 4-ply yarn in Red
- 1 skein worsted weight 4-ply yarn in Black
- 1 skein worsted weight 4-ply yarn in Orange
- 18” craft broom
- Various Christmas picks
- Small corncob craft pipe
- 5” Black felt craft top hat
- 9 yds ½” red ribbon
- Gold glittered holly leaves
- 3 red holly berries
- Musical button (Frosty the Snowman) (optional)
- 32 x 50 hole piece of 7-mesh plastic canvas
- Polyester fiberfill
- Tapestry needle
- G crochet hook
- 1 quart size plastic bag (ziploc style) filled with 2 cups sand, uncooked rice, or popcorn
Instructions:
Finished size: 20” high with hat
Body (Make 2)
-
Row 1: Start at the top of the head, with white ch 11, sc in second ch from hook, sc in each ch across, turn. (10 sc)
-
Rows 2-3: Ch 1, 2 sc in first st, sc in each st across to last st, 2 sc in last st, turn. (12 sc, 14 sc)
-
Row 4: Ch 1, sc in each st across, turn.
-
Row 5: Ch 1, 2 sc in first sc, sc in each st across to last st, 2 sc in last st, turn. (16 sc)
-
Rows 6-7: Ch 1, sc in each st across, turn.
-
Row 8: Ch 1, 2 sc in first st, sc in each st across to last st, 2 sc in last st, turn. (18 sc)
-
Rows 9-21: Ch 1, sc in each st across, turn.
-
Rows 22-26: Ch 1, 2 sc in first st, sc in each st across to last st, 2 sc in last st, turn. (28sc at end of row 26)
-
Rows 27-30: Ch 1, sc in each st across, turn.
-
Row 31: Ch 1, 2 sc in first st, sc in each st across to last st, 2 sc in last st, turn. (30 sc)
-
Rows 32-34: Ch 1, sc in each st across, turn.
-
Row 35: Ch 1, 2 sc in first st, sc in each st across to last st, 2 sc in last st, turn. (32 sc)
-
Rows 36-51: Repeat rows 32-35 consecutively. (40 sc at end of row 51)
-
Rows 52-69: Ch 1, sc in each st across, turn. At end of last row, fasten off leaving a length of yarn at the end of one body piece to sew the 2 body pieces and base together.
- Matching ends of rows 1-69, sew body sides together, leaving sts of row 69 unsewn for bottom opening. Leave the length of yarn to sew on the base when completed.
Base
-
Row 1: With white, ch 10, sc in second st from hook, sc in each ch across, turn. (9 sc)
-
Row 2: Ch 1, 2 sc in the first sc, sc in each st across to last st, 2 sc in last st, turn. (11 sc)
-
Row 3: Ch 1, sc in each st across, turn.
-
Rows 4-10: Repeat rows 2 and 3 alternately, ending with row 2. (19 sc at end of row 10)
-
Rows 11-19: Ch 1, sc in each st across, turn.
-
Row 20: Ch 1, sc the first 2 sts together, sc in each st across to last 2 sts, sc last 2 sts together, turn. (17 sc)
-
Row 21: Ch 1, sc in each st across, turn.
-
Rows 22-28: Repest rows 20 and 21 alternately, ending with row 20. (9 sc at end of row 28)
-
Row 29: Ch 1, sc in each st across. Fasten off.
- Using base as a pattern, cut plastic canvas. Stuff body firmly. Place bag of sand, rice or popcorn inside body to weight bottom. Easing to fit, sew base to row 69 of body, inserting plastic canvas before closing. (Using sand makes the snowman more stable than rice or popcorn. Stuffing firmly will insure the body won’t sag when completed.)
Arms with Mitten (Make 4)
-
Row 1: With red, for mittens, ch 6, sc in the second ch from hook, sc in each ch across, turn. (5 sc)
-
Row 2: Ch 1, 2 sc in the first sc, sc in each st across to last st, 2 sc in last st, turn. (7 sc)
-
Row 3: Ch 1, sc in each st across, turn.
-
Row 4: Ch 1, 2 sc in the first sc, sc in each st across to last st, 2 sc in last st, turn. (9 sc)
-
Rows 5-10: Ch 1, sc in each st across, turn. At the end of last row, change to white.
-
Rows 11-26: For arm, Ch 1, sc in each st across, turn.
- Row 27: Ch 1, sc the first 2 sts together, sc in each st across to last 2 sts, sc last 2 sts together, turn. (7 sc) Fasten off.
Thumb (Make 4)
-
Row 1: Ch 3, sc in second ch from hook and remaining ch, turn. (2 sc)
-
Row 2: Ch 1, sc in each st across, turn.
-
Row 3: Ch 1, 2 sc in the first sc, sc in each st across, turn. (3 sc)
-
Row 4: Ch 1, 2 sc in the first sc, sc in each st across, fasten off leaving length of yarn to sew to mitten. (4 sc)
-
Sew one thumb, using the 4 sc side of thumb, to end of rows 8 – 10 of one arm/mitten. Repeat for remaining thumbs and arm/mittens.
-
Matching ends of rows, sew two arms with mittens together inserting musical button in mitten and stuffing firmly before closing. Repeat with remaining arms with mitten, omitting musical button.
- Sew arms to body seams at approximately rows 24 through 28. Make sure the thumbs are pointing up and the musical button arm is on the opposite side where you will be placing the broom.
Nose
-
Rnd 1: With orange, ch 2, 6 sc in second ch from hook, do not join rnds. (6 sc)
-
Rnd 2: Sc in each st around.
-
Rnd 3: 2 sc in next st, sc in each st around (7 sc)
-
Rnd 4: Sc in each st around.
-
Rnd 5: 2 sc in next st, sc in each st around (8 sc)
-
Rnd 6: Sc in each st around.
- Rnd 7: 2 sc in next st, sc in each st around. (9 sc) Fasten off, leaving length of yarn to sew to snowman.
Eyes (Make 2)
- With black, ch 2, 6 sc in second chain from hook. Fasten off, leaving length of yarn to sew to snowman.
Buttons (Make 4)
-
Row 1: With red, ch 3, join with sl st to first ch to create loop. Ch 2 (first hdc), 7 hdc in ch 3 loop. (8 hdc)
- Row 2: Ch 1, sc in the back loop of each hdc, join with sl st in first sc. (8 sc) Fasten off leaving length of yarn to sew to snowman.
Scarf
-
Row 1: With red, ch 6, sc in the second ch from hook , sc in each st across, turn. (5 sc)
-
Row 2: Ch 1 (counts as first sc), sc in remaining st, turn.
-
Repeat row 2 until the length of the scarf is 32” long. Fasten off.
- For fringe, cut 20 3” pieces of red yarn. Holding 2 strands together and folded in half, insert hook into first sc at end of row, hook yarn at loop of 2 strands and pull through st. Insert ends of yarn through loop, even out before pulling tight. Repeat for remaining 4 sts on this end of scarf. Repeat for the 5 sts on the other end of scarf.
Finishing
-
Wrap scarf around snowman neck, cross and loop through, gently pull tight. Position black felt hat on snowman head. This will help position the eyes and nose on the snowman’s face.
-
Position top of eyes at the top of the 4th row down from hat and about an inch apart. Sew into place.
-
Stuff nose lightly. Position nose 2 rows down from bottom of eyes and between the eyes. Sew into place.
-
Stuff buttons lightly. Evenly position buttons down the front of the snowman, starting about 3 rows down from bottom of scarf. Sew into place.
-
Remove black felt hat. Measure and cut length of ribbon around base of hat near the rim, slightly overlapping ends of ribbon. Glue ribbon ends together at back of hat. Position a 3 leaf cluster of gold glitter holly leaves on front of hat. Glue to ribbon. Glue 3 holly berries to center of holly leaves. Position hat onto snowman and glue to snowman.
-
Starting at the back and bottom of broomstick handle, glue ribbon to broom. Wrap ribbon around the bottom and wind up the broomstick handle to the base of broom. Wrap around the top of broomstick handle and glue in place. Cut off remaining ribbon. Starting at the fron t of broom’s bristles, wrap remaining ribbon around the broom’s bristles, gently pulling bristles together to hold in place. Glue ribbon ends together on the front side of broom. Cut off remaining ribbon. Position Christmas pick(s) as desired over broom’s bristles, glue in place.
-
To attach the broom to the snowman, stand the snowman up. The base of the broomstick should be even with the base of the snowman. Wrap the snowman’s arm around the base of the bristle portion of the broom. Glue broom to snowman’s body, arm and base.
- Lastly, position the corncob pipe under the nose where a mouth would be. Gently insert the pipe between the stitches and into the stuffing to hold the pipe in place.

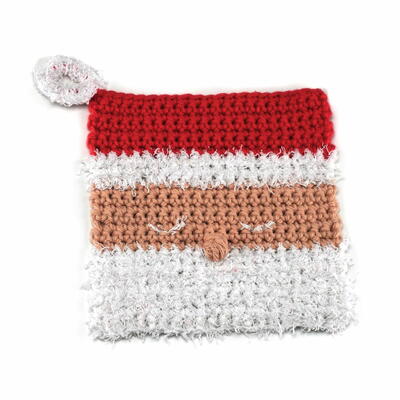
Read NextSanta Dishcloth Pattern
Your Recently Viewed Projects
Thanks for your comment. Don't forget to share!
monkmonk
Dec 18, 2013
i'm making frosty now, Iwant it to be all crocheted do you know where i can find a pattern for the hat?
karschreife 614123 2
Nov 23, 2010
I have this Snowman "Snowy", we call him. This is my sister-in-laws pattern, It is just beautiful...the snowman can be placed anywhere to give that Christmas feeling, he also becomes part of the family after awhile.
Report Inappropriate Comment
Are you sure you would like to report this comment? It will be flagged for our moderators to take action.
Thank you for taking the time to improve the content on our site.