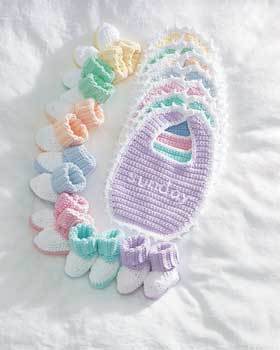
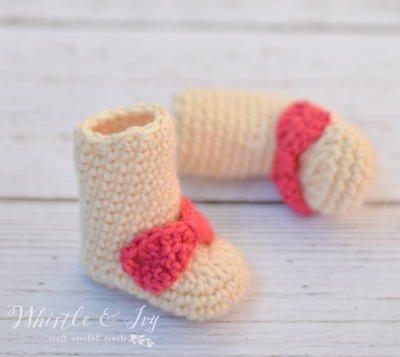
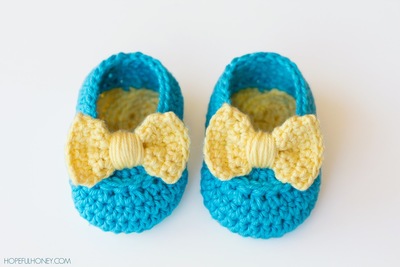
Day of the Week Bibs and Booties
Crochet a bib and booties set from Lily Sugar n' Cream for each day of the week with Monday through Sunday embroidered on the bibs. This clever and adorable idea for what to crochet baby makes for a great baby shower gift. A brand new mom can never have enough baby bibs or booties, so this set of seven adorable free crochet patterns is the perfect gift.
With a baby bib for each day of the week, this adorable crochet pattern is easily personalized. If you’re not a big fan of daily DIY ideas, you could easily use this pattern to create a bib with the bitty baby’s name displayed instead.


If you are looking for more homemade baby shower gifts to crochet, download our free collection of baby-friendly crochet projects:
14 Free Crochet Patterns for Babies & Toddlers.
Materials:
- Yarn: Lily® Sugar’n Cream (Solids: 70.9 g/ 2.5 oz/109 m/120 yds)
Main Color (MC): 2 balls
Contrast A: 1 ball
- Crochet Hook: Size 4 mm (U.S. G or 6) crochet hook or size needed to obtain gauge
- Buttons
Gauge: 14 sc and 16 rows = 4 ins [10 cm]
Instructions:
BIB
- With MC, ch 20.
- 1st row: (RS). 1 sc in 2nd ch from hook. 1 sc in each ch to end of ch. Turn. 19 sts.
- 2nd row: Ch 1. 2 sc in first st. 1 sc in each st to last st. 2 sc in last st. Ch 1. Turn.
- 3rd row: 1 sc in each st to end of row. Turn.
- 4th to 9th rows: Rep last 2 rows 3 times more. 27 sts.
- Cont even until work from beg measures 6½ ins [16.5 cm], ending with RS facing for next row.
- Shape neck: 1st row: (RS). Ch 1. 1 sc in each of first 6 sts. Yoh and draw up a loop in each of next 2 sts. Yoh and draw through all 3 loops on hook – sc2tog made. Turn. Leave rem sts unworked.
- 2nd row: Ch 1. Sc2tog over first 2 sts. 1 sc in each st to end of row. Turn.
- 3rd row: Ch 1. 1 sc in each st to last 2 sts. Sc2tog over last 2 sts. Turn. 5 sts.
- Work 10 rows even.
- Next row: (WS). Ch 1. 2 sc in first st. Pat to last 2 sts. Sc2tog. Turn.
- Next row: Ch 1. Sc2tog. 1 sc in each st to last st. 2 sc in last st. Turn.
- Rep last 2 rows twice more. Fasten off.
- With RS of work facing, miss next 11 sts. Join MC with sl st to next st. Ch 1. Sc2tog over this st and next st. 1 sc in each st to end of row. Turn. Work to correspond to first side, reversing all shapings.
- Edging: Join A with sl st to top left corner of neck edge. Ch 1. 1 sc in same sp as last sl st.
- Work 1 row sc evenly around all edges. Join with sl st to first sc.
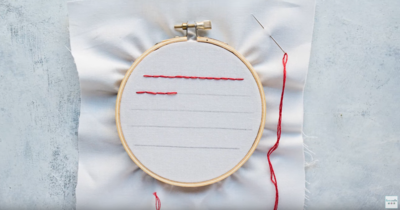
- Next rnd: Working around outer edge only, ch 1. *1 sc in each of next 3 sts. Ch 3. Ss in first ch – picot made. Rep from * to opposite side. Fasten off. With A, make button loop at center back on left side. Sew button in position. If desired, embroider day of week onto bib as illustrated.
- With A, split yarn into 2 plys and embroider letters using chain stitch.
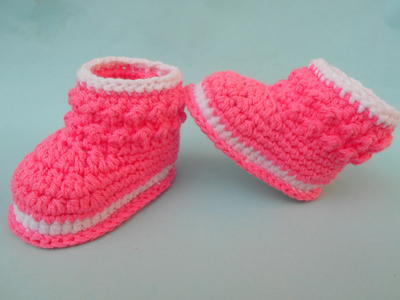
BOOTIES
- With MC, ch 16.
- 1st row: (RS). 1 sc in 2nd ch from hook. 1 sc in each ch to end of ch. Turn. 15 sts.
- 2nd row: Working into back loop only of each st, ch 1. Work 1 sc in each st to end of row. Turn.
- Rep last row until work from beg measures 6¼ ins [16 cm] when slightly stretched. Do not fasten off.
- 1st row: (RS). Ch 1. Work 23 sc evenly across long edge of cuff. Join A. Turn.
- 2nd row:With A, ch 1. Work 1 sc in each sc to end of row. Fasten off.
- Instep: 1st row: With RS of work facing, miss first 7 sts. Join A with sl st to next st. Ch 1. 1 sc in same sp. 1 sc in each of next 8 sts. Turn. 9 sts.
- 2nd to 4th rows: Ch 1. 1 sc in each st to end of row. Turn.
- 5th row: Ch 1. Sc2tog. 1 sc in each of next 5 sts. Sc2tog. Turn.
- 6th row: Ch 1. Sc2tog. 1 sc in each of next 3 sts. Sc2tog. Fasten off.
- Sew center back seam. With RS of work facing, join A with sl st at center back. Ch 1. 1 sc in each of next 7 sts. Work 5 sc down side of instep. 3 sc in corner sc. 3 sc across end of instep. 3 sc in corner sc. Work 5 sc along other side of instep. 1 sc in each of next 7 sts. Join with sl st to first st. 33 sts.
- Next rnd: Ch 1. 1 sc in each st around. Join with sl st to first st.
- Next rnd: Ch 1. 1 sc in each st around. Join MC with sl st to first st.
- Next rnd: With MC, ch 1. Working in back loops only, work 1 sc in each st around. Join with sl st to first st.
- Next rnd: Ch 1. Sc2tog. 1 sc in each of next 12 sts. Sc2tog. 1 sc in next st. Sc2tog. 1 sc in each of next 12 sts. Sc2tog. Join with sl st to first st.
- Next rnd: Ch 1. Sc2tog. 1 sc in each of next 10 sts. Sc2tog. 1 sc in next st. Sc2tog. 1 sc in each of next 10 sts. Sc2tog. Join with sl st to first st.
- Next rnd: Ch 1. Sc2tog. 1 sc in each of next 8 sts. Sc2tog. 1 sc in next st. Sc2tog. 1 sc in each of next 8 sts. Sc2tog. Join with sl st to first st. Fasten off. Join center foot seam.

You can make everything your little one will need with these
51 Free Crochet Blanket Patterns for Beginners.
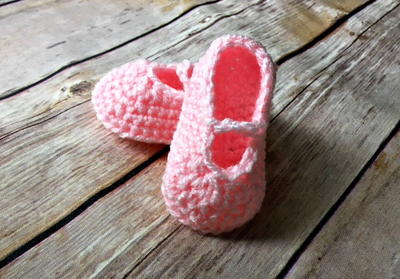
Read NextBaby Ballet Slippers Crochet Pattern
Your Recently Viewed Projects

Thanks for your comment. Don't forget to share!
Delphine Bryant
Nov 14, 2018
I just discovered we are expecting a new addition to our family times two. Yes! My sister will be having twins and expected to arrive in May. I have plenty of time to make two sets of these. Not knowing the sex of the babies I will be careful to select gender neutral colors. I am so excited to be an Aunt for the first time.
Morehouse17
Oct 31, 2018
You got to love this. Depending on your age you may remember when young girls had undies with the days of the week written on them. I thought that was practical for the anal retentive person that I am. This ranks right up there with that idea and of course I will be making these. Thanks so much for sharing this post.
elocin1104 2800379
May 27, 2018
These are so cute! I love the idea of Day of the Week bibs! They remind me of when I was a little girl and they had days of the week underwear. This would be the perfect baby shower gift. The only thing I am wondering is what size the baby booties are. Unfortunately, I do not have a baby that I could try them on.
agileca20 8656640
Oct 16, 2017
I love these baby patterns, just wonder is there instructions for personalising baby bibs
Stop55
Oct 03, 2017
Could someone please write out the pattern for the remaining side of this bib? I just can't seem to work it in reverse.
M Altenberg
Mar 14, 2017
This is an awesome handmade gift to give to a new baby. Cute and clever for sure and the new mom will be thrilled.
saphy98
Feb 20, 2017
This day of the week bib and bootie pattern is very unique. Looks like a great shower gift for that special that baby. The yarn suggested in this pattern is 100% cotton and easy to work with. The pattern reads very easily and is not that difficult. These could probably be made up within a week. This one project that I will look forward to working on.
saphy98
Feb 01, 2017
Bib and Bootie pattern looks like something to try. The finished items are so cute. I have been looking for a bootie pattern and this one looks quick and easy. I will also make a bib to see how they turn out. Looks like a fun project. Definitely making these. Lots of fun for a daytime project.
cropperhopper1 975 7134
Mar 11, 2016
I love this pattern for baby showers! The instructions are simple and easy to follow. The finished product looks stunning. The letters are easy to do too. They can be found on Inspirations.
lpalmer59 7490208
Mar 04, 2016
I just love this set and crocheted them up for a baby shower gift. The mom to be just loved them, and so did several of the other moms that attended the baby shower. The booties were so easy to crochet they are now my go to bootie for every sweater set that I crochet. Thank you so much for the pattern, it is just wonderful.
krissgibbns 138917 6
Jul 18, 2015
I wish the pattern was more clear, that she would write the whole thing out instead of reverse pattern , It's to hard to follow, very frustrating! I would love to get a hold of her and ask her to write out the pattern instead of just reverse shape. it's just a lazy way to write it and to hard to follow.
Stop55
Oct 03, 2017
Did you ever find the whole pattern, I would like it too.I can't work in reverse either.
diana1096 3169501
May 14, 2015
If you go to the yarnspirations site and download the pattern it tells you how to do the letters. "Know-How enlarge these words 250% trace onto bib with carbon paper for embroidery"
diana1096 3169501
May 14, 2015
If desired, embroider day of week onto bib as illustrated. With A, split yarn into 2 plys and embroider letters using chain stitch.
bebebout 4002427
Mar 22, 2015
I made the bib which turned out great. The instructions were easy to read. I tried to make the booties but the instructions were difficult to understand. I think diagrams would help. Thanks!
jennieleehunt 7188 496
Jun 10, 2014
Can anyone tell me where I can find the chart for the days of the week that goes on the bibs please thanks
FaveCrafts Editor JL
Jun 11, 2014
Hi jennieleehunt, This project was submitted by Lily Sugar n' Cream. The original pattern can be found here - http://bit.ly/1hPmzDQ. It appears that the original does not include a pattern for the days of the week. Hope this helps!
horningbarbara67 3 106546
Feb 05, 2014
I absolutly love this pattern,cant wait to start them .One question ,how do iI get the chart for the letters? Please can someone help me soon!!Thank you sooooo much
redpenny63 4328428
Jan 27, 2013
Hello, I am trying to make this bib, can you tell me how many rows are in the body of the bib.. I did it and had alot of rows to make it 61/2 inches long and then when I went to do the neck of it, could not get it to work for me .. Plse help me..
editorKS
Dec 01, 2011
Hi, dlgegg 7706243. I'm sorry to hear you are having trouble reading the directions. Our site is supported by advertisements, which is how we are able to offer all of our great craft projects for free. If you are having trouble viewing the pattern, I might suggest copying and pasting it into a Word document. For those who have specific questions about the pattern, I recommend contacting the pattern designer (specified in the byline). Hope this helps! --Editors of FaveCrafts
dlgegg 7706243
Nov 30, 2011
RE: EDGING join A with sl st to top left corner of neck EDGE (in green as tho it will explain what you mean). When I clked on the wod edge, I goan advertisement for Ford cars. What is going on? Al;so, overprints of laoding..... and visit us on and long live our dreams and another word I cannot make out make it difficult to read the directions.
sls405 8488248
Jul 30, 2011
I am a pretty good crocheter, but am stuck on this patt. Where is the instep row? I assumed it was one of the short ends, but not sure. Is it at the foundation row or at the top or neither. Doesn't seem like it would be the long edge for the # of stitches instructed (9). Also, on the 2nd to 4th rows, where it says to sc to end of row, does that include the 7 stitches we skipped as well? Which ends/sides make up the center back seam? Once I have these answers, maybe I can figure out the rest. Thanks a bunch.
pcasey714 4823147
Jun 19, 2011
I need to know about the booties pattern if the first long edge is on the right or left of the bootie and where is the center back seam and if I was suppose to put the instep on the opposite side of the long edge? I know I have alot of questions but I do not know if I am wrong to begin with or not on what I have completed so far. Also, I am left handed so things can get difficult to reverse for me. I do not know where the instep goes on the bootie is that top of the bootie? I know I have alot of questions but I am stuck now. Oh btw, the bibs are fabulous!!! I would love to able to match them up with the booties!
lindagarred 818477 4
May 14, 2011
I like this pattern but im a beginner n dont no what (PAT )to last 2 sts mean in the bib pattern
Gah
Aug 17, 2010
Any time I have a "how to stitch" question I search YOUTUBE.com and they usually have video to see.
Faye Hopkins
Aug 13, 2010
I still don't see the size listed anywhere for the booties nor the answer to another who questioned this. Could you please give an approximate size - newborn, toddler, or ages 0-3 mos, 3-6 mos, etc. It would be most helpful. This is a fun set! _
Crafter 3064244
Aug 13, 2010
Can you help me to understand how to yoh and draw up a loop in this pattern? Do you have any video to demonstrate how to do it? It will be easier for me to see and understand it. Thank you for your help. Maryse Phan
pld
Jul 03, 2010
Good questions and answers for a fun pattern, that a group of crocheters could make for a baby shower.
margaretjr
Mar 07, 2010
What a wonderful gift can,t wait to start making these. Thank you for all your lovely free patterns.
hootch395
Feb 13, 2010
PAT is the abbreviation for "pattern". Some crochet designers will say "continue working pattern so many stitches andor rows. you simply continue the same stitches you were doing before until the instructions tell you to work different stitches. For a great list of abbreviations try www.crochetmore.com123basics.htm
Artsy Grandma
Jan 16, 2010
I read the instructions above and believe that it wants you to repeat the pattern of stitches just before the word Pat. So I'm guessing that you would put 2 sc in each stitch up until the last two, where you would decrease. Don't know if this is right, but it's worth a shot, and you can always rip it out if it doesn't work out.
drachenin
Jan 14, 2010
Yoh = yarn over hook sc2tog = single crochet two together The pattern is giving instructions on how to reduce the number of stitches. Basically, you start a single crochet in the stitch indicated, then start another one in the next stitch indicated without working the 1st two loops off your hook. This leaves 3 loops on your hook. The final step is pulling a loop through all 3 loops on your hook. So the italicized instructions are on how to do a sc2tog. Whenever the pattern instructs you to do a sc2tog, repeat the italicized instructions. I hope this helps.
majo9jjjmj
Jan 01, 2010
Please what does PAT mean in the aqbreviations of this pattern shaping the neck. thanks mary
plowmanp
Dec 07, 2009
need a little help with an abreviation in this pattern what does Pat mean in the shaping of the neck?
Report Inappropriate Comment
Are you sure you would like to report this comment? It will be flagged for our moderators to take action.
Thank you for taking the time to improve the content on our site.

![Pill Bottle Crafts: Reuse Pill Bottles [15 Ideas]](http://irepo.primecp.com/2017/06/334076/PILL-BOTTLE-CRAFTS-Header_Category-CategoryPageDefault_ID-2274135.jpg?v=2274135)