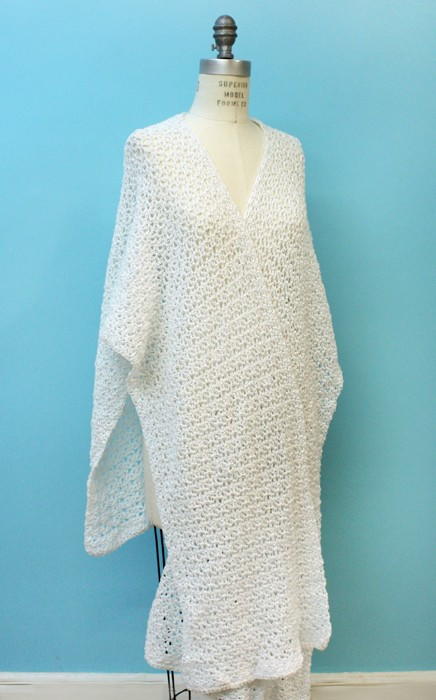
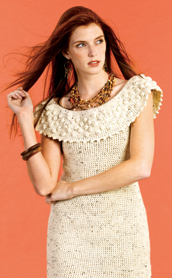
Tweed Off Shoulder Dress
This Tweed Off-Shoulder Dress is on an intermediate skill level, so it's just challenging enough for a learning crocheter. The process of making this free crochet pattern will improve your skills, and wearing it afterward will improve your confidence.
Materials:
- Caron International's Simply Soft Tweed (100% acrylic; 3 oz/85 g, 150 yds/137 m skein): #0002 Off White, 8 (10, 12) skeins
- One crochet hook size US I-9 (5.5mm), or size to obtain gauge
- Yarn needle
SIZES
Small (Medium, Large).
GAUGE
In exsc pat, using US size I-9 (5.5mm) hook, 15 sts and 15 rows = 4”/10cm.
In sc pat, using US size I-9 (5.5mm) hook, 13 sts and 15 rows = 4”/10cm
ABBREVIATIONS
Trc Cluster (Cl): 4 trc worked together in same st
Five Ch picot (picot): Ch 5, sl st in beg ch
Extended single crochet (exsc): Insert hook in designated stitch or row, pull up loop, yarn over, pull through 1 loop on hook, yarn over, pull through 2 loops on hook.
STITCHES USED
Chain (ch)
Extended SC (exsc)
Single crochet (sc)
Slip stitch (sl st)
Instructions:
NOTES
Stitch markers are used when working yoke to mark placement for increases.
BODY
Beginning at yoke, chain 26 (30, 34), place marker; ch 36 (40, 44), place marker, ch 26 (30, 34), place marker, ch 36 (40, 44), place marker, being careful not to twist, join with sl st to beg ch – 124 (140, 156) ch..
Rnd 1: Ch 2 (counts as first exsc here and at beg of each row), exsc in next and in each ch around, moving markers up as you work, join with sl st to beg ch 2.
Rnd 2: Ch 2, exsc in next and in each st around, moving markers up as you work, join with sl st to beg ch 2.
Rnd 3: Ch 2, exsc in next and in each st around, making 3 exsc in marked sts, moving markers up to middle of these 3 sts as worked, join with sl st to beg ch 2.
Rnd 4: Repeat Round 2.
Rnds 5: Repeat Round 3.
Rnds 6 - 13: Repeat Rounds 4 & 5 alternately, ending Round 2.
Rnd 14: Ch 2, exsc in next and each st around to marker, ch 5 (8, 11), skip all sts to next marker; exsc in marked st (armhole made) and in each st around to next marker, ch 5 (8, 11), skip all sts to next marker; exsc in marked st (armhole made) and in each st to beg, join with sl st to beg ch 2.
Rnds 15: Ch 2, exsc in next and each st and ch around, join with sl st to beg ch 2.
Rnds 16: Ch 2, exsc in next and each st around, join with sl st to beg ch 2.
Rnds 17 – 31: Repeat Round 16.
Rnd 32: Ch 2, exsc in next and each st around, making 12 evenly spaced decreases, join with sl st to beg ch 2.
Rnds 32 – 38: Repeat Round 16.
Rnd 39: Ch 2, exsc in next and each st around, making 12 evenly spaced increases, join with sl st to beg ch 2.
Rnds 40 – 51: Repeat Round 16.
Rnd 52: Repeat Round 39.
Repeat Rnd 16 until dress is desired length.
Edging: Ch 1, sc, ch 1 in each st around, join with sl st to beg sc. Fasten off.
Collar
Rnd 1: With WS facing, join yarn in beg ch, ch 1, sc in same and each free loop around, join with sl st to beg sc.
Rnd 2: Ch 2, exsc in next and each st around, join with sl st to beg ch 2.
Rnd 3: Ch 2, exsc in same sp, *exsc in next st; 2 exsc in next st; repeat from * around, join with sl st to beg ch 2 -- 186 (210, 234) exsc made.
Rnd 4: Ch 2, exsc in next and each st around, join with sl st to beg ch 2.
Rnd 5: Repeat Round 4.
Rnd 6: Ch 2, Cl in next st; *exsc in each of the next 5 st; Cl in next st; repeat from * around, ending exsc in last 4 sts, join with sl st to beg ch 2. Push clusters to front of work as work progresses.
Rnd 7: Repeat Round 4.
Rnd 8: Ch 2, exsc in next 4 sp; Cl in next sp, *exsc in next 5 sp, Cl in next sp; repeat from * around, join with sl st to beg ch 2. Push clusters to front of work as work progresses.
Rnd 9: Repeat Round 4.
Rnd 10: Repeat Round 6.
Rnd 11: Repeat Round 4.
Rnd 12: Repeat Round 8.
Rnd 13: Repeat Round 4.
Rnd 14: Repeat Round 6.
Rnds 15 & 16: Repeat Round 4.
Rnd 17: Ch 1, sc in same sp, picot, *sc in each of the next 3 sp, picot; repeat from * around, ending sc in last 2 sp. Fasten off.
Armhole Edging:
Rnd 1: With RS facing, join yarn in any underarm ch, ch 1, sc, ch 1 in same and each sp around, join with sl st to beg sc. Repeat on other armhole.
FINISHING
Weave in all ends. Lightly steam to set sts.
Read NextHigh Seas Crew Neck Top
Your Recently Viewed Projects


Thanks for your comment. Don't forget to share!
mountainmamamsb 87 58435
Jun 22, 2016
I love the dress, but do not want it to be off the shoulders as I will be wearing it to church. Is there a way I can alter the neckline to make it smaller or the shoulder part maybe wider?
Debbi918
Jun 18, 2016
I just made this in a really pretty fall colors self-striping yarn and thought I was going to love it The dress itself fits pretty well though even with the small size the neckline is a little too off the shoulder for me However once I put the collar on it fell completely off Adding all those stitches on the third row of the collar basically increasing the total count by made the neckline WAY too big Is that the way it is supposed to be Or is it supposed to drape way down in the back Since there isn't a photo of the back of the dress I wasn't sure But I took the collar completely off and will start it again to see if I can make adjustments for it to fit me properly I love the dress part of the pattern but the collar part is just not…Read More working right for me
Zeemer
Jun 12, 2016
The response to this off-shoulder dress is overwhelming. Seems like a lot of women really like the design. This can also be done in a different color. Thank goodness the pattern is just right on the same page.
christinegibson 59 57083
Jun 24, 2015
I wear about a size 18 and I tried the large for just a top, not the whole dress and it fell off of me! So I tried the small and used a smaller hook and it worked better, I just added increases about 3 rows before the arm hole row and got the body up to the size of the large and it fits very well! I love this pattern. I have made a dress for myself to wear to my son's wedding. Their colors are Navy and Gold and I made the dress navy with a gold row about an inch from the bottom of the collar and about 2-3 inches from the bottom of the dress. The possibilities for this pattern are endless. I only needed 5 skeins of the Caron Simply Soft to make the whole dress. less than 5 of navy and very little of the gold. cmpg
peg724 4844271
Apr 06, 2015
It would be helpful to post what dress sizes the instructions are for. Please?
FaveCrafts Editor JL
Apr 07, 2015
Hi there - I added information about sizing to the top of this pattern (right under the materials list). Thanks! - Julia from FaveCrafts
schoolhouse57 0705 271
Jun 23, 2015
Still too vague. How about using bust size to give more comparison? I think I am at least an xl but I don't know what your definition of large is for either bust, waist or hip.
Jaddah0729
Sep 12, 2012
Working this pattern now - and my question would be on rnds 6 -13 - directions say to repeat 4 & 5 alternately (which is rnds 2 & 3 with 3 being the increase) and end with rnd 2. Now in order to do that, I would either have to end at rnd 12 or end with rnd 14. Or if I keep with rnd 6-13, I'm going to end up with the increase rnd. So which one is it? Right now I'm opting for ending on rnd 14 which is the repeat of rnd 2.
tanya00
Jul 29, 2012
Dress is looking great, question; does it matter where you place the 12 evenly spaced decreases that one's making in round 32? Would you place them near the place markers or around them since the markers are for increases. Little confused Help Please.
Jaddah0729
Sep 12, 2012
You won't be using the markers any more after round 14. Divide the number of stitches you have by 12 and subtract 2 from that number. So if the result is 6, you would exsc in 6 stitches and then decrease in the next 2.
TheLoric
May 22, 2012
FYI the link, that someone else posted for this pattern's details at Caron, no longer exists. I even tried searching the Caron web site for this pattern and it does not exist in their "free projects". I also believe the type of yarn "Caron Simply Soft Tweed" has been discontinued.
deby222
Jul 05, 2011
If you click on the link, it will take you to Caron's website where the pattern for this dress is. That's where I found the directions stating the sizes given for S, M, and L. They have a lot of really nice patterns! http://www.caron.com/projects/tweed/a_index_tweed.html
Debbie Joseph
Jul 04, 2011
Does any one know what sizes this dress pattern is in? Also can it be sized to 3x ? Plus size is what I am after. Thank you Debbie Joseph
shl
Dec 27, 2010
At the top of the pattern under materials the first bullet point seems to indicate that the sizes are 8, 10, and 12 depending on which part of the pattern you follow. Also you can use the measurements on the diagram to figure out which one you'll need to make to fit based on the inches in the measurements. I haven't tried this yet, but hope to and this information is what I'm basing my sizing decisions on.
Bbartlett716
Sep 24, 2010
I have question about this pattern where is the size gauge. It gives the stitching in ( )'s but what are the sizes im thinking S, M, L. Does anyone have any idea what it is? bbartlett
Report Inappropriate Comment
Are you sure you would like to report this comment? It will be flagged for our moderators to take action.
Thank you for taking the time to improve the content on our site.