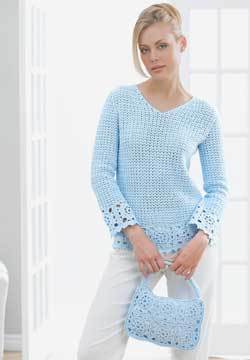
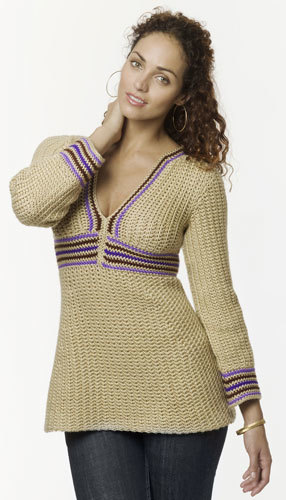
Empire Waist Stripe Tunic
This experienced crochet pattern creates a flattering tunic with empire waist and stripe details. Use this free tunic crochet pattern to create a stylish and comfortable sweater for the cooler months.

Materials: Small (Medium, Large, X-Large, XX-Large, XXX-Large)
- Yarn: Caron International's Simply Soft (100% acrylic; 6 oz/170 g, 315 yds/288 m skein):
#9703 Bone (A), 24 (30, 30, 36, 36, 42) oz/ 680 (849,849, 1019,1019, 1189)g
#9750 Chocolate (B), 6 oz/170g (all sizes)
#9747 Iris (C), 6 oz/170g (all sizes)
- Detail Yarn: Caron International's Simply Soft Brites (100% acrylic): #9610 Grape (D), 6 oz/170g (all sizes)
- Crochet Hook: One size US G-6 (4 mm) crochet hook, or size to obtain gauge, One size US H-8 (5 mm) crochet hook, or size to obtain gauge, One size US I-9 (5.5 mm) crochet hook, or size to obtain gauge
- 4 split-ring stitch markers
- Yarn needle
Gauge:
In single crochet worked in front loop only, using H-8 (5 mm) hook, 15 sts and 14 rows = 4"/10 cm
In wrapped single crochet, using G-6 (4 mm) hook, 16 sts and 16 rows = 4"/10 cm
In tunic skirt stitch pattern, using I-9 (5.5 mm) hook, 18 sts and 17 rows = 5"/12.5 cm
Stitches:
Chain (ch)
Half double crochet (hdc)
Single crochet (sc)
Slip stitch (slip st)
Special Terms:
sc2tog: Single crochet 2 together – Insert hook in next stitch, yarn over and pull up a loop, (2 loops on hook), insert hook in next stitch, yarn over and pull up a loop, yarn over and draw through all 3 loops on hook.
wsc: Wrapped single crochet – Bring yarn to front of work, work single crochet in next stitch wrapping yarn around front of stitch.
Notes:
1. When working a row of single crochet stitches in the front loops only, always work the last single crochet of the row in both loops, for stability.
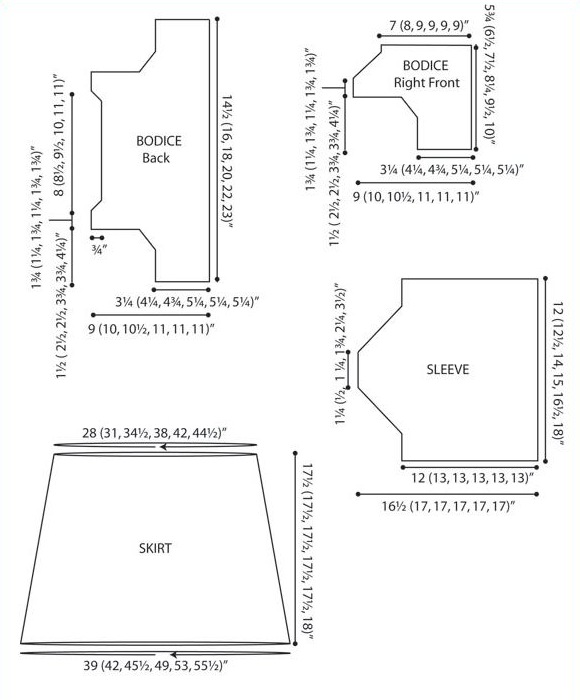
2. Front trim and internal bust shaping provide additional width at bust (not reflected in schematic).
Instructions:
BODICE BACK
Note: Bodice back is worked from side to side. Work in front loops only throughout.
With size H-8 (5 mm) hook and A, chain 13 (17, 19, 21, 21, 21).
Row 1: Sc in second ch from hook and in each remaining ch across, turn—12 (16, 18, 20, 20, 20) sc.
Rows 2–4 (6, 6, 8, 8, 10): Ch 1, working in front loops only, sc in each sc across, turn.
Continue working in front loops only throughout.
Shape First Armhole
Row 5 (7, 7, 9, 9, 11): Ch 1, sc in each sc across to last sc, 2 sc in last sc, turn—13 (17, 19, 21, 21, 21) sc.
Sizes Medium (Large, X-Large, XX-Large, XXX-Large) only:
Row 8 (8, 10, 10, 12): Ch 2, sc in second ch from hook, sc in each sc across, turn—18 (20, 22, 22, 22) sc.
Row 9 (9, 11, 11, 13): Ch 1, sc in each sc across to last sc, 2 sc in last sc, turn—19 (21, 23, 23, 23) sc.
Repeat last 2 rows 0 (0, 1, 1, 1) more times—19 (21, 25, 25, 25) sc.
Shape First Shoulder
All Sizes:
Row 6 (10, 10, 14, 14, 16): Ch 22 (20, 20, 18, 18, 18), sc in second ch from hook and in each remaining ch and sc across, turn—34 (38, 40, 42, 42, 42) sc.
Rows 7 (11, 11, 15, 15, 17)–11 (13, 15, 17, 19, 21): Ch 1, sc in each sc across, turn.
Shape Neck
Row 12 (14, 16, 18, 20, 22): Ch 1, sc2tog, sc in each remaining sc across, turn—33 (37, 39, 41, 41, 41) sc.
Row 13 (15, 17, 19, 21, 23): Ch 1, sc in each sc across to last 2 sc, sc2tog, turn—32 (36, 38, 40, 40, 40) sc.
Row 14 (16, 18, 20, 22, 24): Ch 1, sc2tog, sc in each remaining sc across, turn—31 (35, 37, 39, 39, 39) sc.
Rows 15 (17, 19, 21, 23, 25)–36 (40, 44, 48, 54, 56): Ch 1, sc in each sc across, turn.
Shape Second Shoulder
Row 37 (41, 45, 49, 55, 57): Ch 1, sc in each sc across to last sc, 2 sc in last sc, turn—32 (36, 38, 40, 40, 40) sc.
Row 38 (42, 46, 50, 56, 58): Ch 2, sc in second ch from hook, sc in each remaining sc across, turn—33 (37, 39, 41, 41, 41) sc.
Row 39 (43, 47, 51, 57, 59): Ch 1, sc in each sc across to last sc, 2 sc in last sc, turn—34 (38, 40, 42, 42, 42) sc.
Rows 40 (44, 48, 52, 58, 60)–45 (47, 53, 55, 63, 65): Ch 1, sc in each sc across, turn.
Fasten off.
Shape Second Armhole
Skip first 21 (19, 19, 17, 17, 17) sc, join A with slip st in next sc.
Row 46 (48, 54, 56, 64, 66): Ch 1, sc in same sc as join, sc in each remaining sc across, turn—13 (19, 21, 25, 25, 25) sc.
Row 47 (49, 55, 57, 65, 67): Ch 1, sc in each sc across to last 2 sc, sc2tog, turn—12 (18, 20, 24, 24, 24) sc.
Sizes Medium (Large, X-Large, XX-Large, XXX-Large) only:
Row 50 (56, 58, 66, 68): Ch 1, sc2tog, sc in each remaining sc across, turn—17 (19, 23, 23, 23) sc.
Row 51 (57, 59, 67, 69): Ch 1, sc in each sc across to last 2 sc, sc2tog, turn—16 (18, 22, 22, 22) sc.
Repeat last 2 rows 0 (0, 1, 1, 1) more times—16 (18, 20, 20, 20) sc.
All Sizes:
Rows 48 (52, 58, 62, 70, 72)–50 (56, 62, 68, 76, 80): Ch 1, sc in each sc across, turn.
Fasten off.
BODICE RIGHT FRONT
Work same as bodice back until a total of 8 (10, 12, 14, 16, 18) rows have been completed—34 (38, 40, 42, 42, 42) sc.
Shape Bust
Row 9 (11, 13, 15, 17, 19) (RS): Ch 1, sc in next 3 sc, hdc in next 5 (5, 6, 6, 7, 8) sc, sc in each remaining sc across, turn.
Row 10 (12, 14, 16, 18, 20): Ch 1, sc in each sc across, turn.
Row 11 (13, 15, 17, 19, 21): Repeat Row 9 (11, 13, 15, 17, 19).
Shape Neck
Row 12 (14, 16, 18, 20, 22): Ch 1, sc2tog, sc in each remaining st across, turn—33 (37, 39, 41, 41, 41) sc.
Row 13 (15, 17, 19, 21, 23): Ch 1, sc in next 3 sc, hdc in next 5 (5, 6, 6, 7, 8) sc, sc in each remaining sc across to last 2 sc, sc2tog, turn—32 (36, 38, 40, 40, 40) sc.
Row 14 (16, 18, 20, 22, 24): Repeat Row 12 (14, 16, 18, 20, 22)—31 (35, 37, 39, 39, 39) sc.
Rows 15 (17, 19, 21, 23, 25)–18 (20, 22, 26, 28, 30): Repeat last 2 rows—27 (31, 33, 33, 33, 33) sc.
Row 19 (21, 23, 27, 29, 31): Ch 1, sc in next 3 sc, hdc in next 5 (5, 6, 6, 7, 8) sc, sc in each remaining sc across, turn.
Row 20 (22, 24, 28, 30, 32): Ch 1, sc in each st across, turn.
Work 0 (1, 2, 1, 3, 3) more even rows as established.
Fasten off.
BODICE LEFT FRONT
Work as for bodice back until 9 (11, 13, 15, 17, 19) rows have been completed—34 (38, 40, 42, 42, 42) sc.
Shape Bust
Row 10 (12, 14, 16, 18, 20) (RS): Ch 1, sc in each sc to last 8 (8, 9, 9, 10, 11) sc, hdc in next 5 (5, 6, 6, 7, 8) sc, sc in last 3 sc, turn.
Row 11 (13, 15, 17, 19, 21): Ch 1, sc in each sc across, turn.
Shape Neck
Row 12 (14, 16, 18, 20, 22): Ch 1, sc2tog, sc in each sc to last 8 (8, 9, 9, 10, 11) sc, hdc in next 5 (5, 6, 6, 7, 8) sc, sc in last 3 sc, turn—33 (37, 39, 41, 41, 41) sc.
Row 13 (15, 17, 19, 21, 23): Ch 1, sc across to last 2 sc, sc2tog, turn—32 (36, 38, 40, 40, 40) sc.
Row 14 (16, 18, 20, 22, 24): Repeat Row 12 (14, 16, 18, 20, 22)—31 (35, 37, 39, 39, 39) sc.
Rows 15 (17, 19, 21, 23, 25)–18 (20, 22, 26, 28, 30): Repeat last 2 rows—27 (31, 33, 33, 33, 33) sc.
Row 19 (21, 23, 27, 29, 31): Ch 1, sc in each st across, turn.
Row 20 (22, 24, 28, 30, 32): Ch 1, sc in each sc to last 8 (8, 9, 9, 10, 11) sc, hdc in next 5 (5, 6, 6, 7, 8) sc, sc in last 3 sc, turn.
Work 0 (1, 2, 1, 3, 3) more even rows as established.
Fasten off.
ASSEMBLY
With yarn needle and A, seam shoulder and side seams.
Neck Trim
Work neck trim using G-6 (4 mm) hook.
Row 1: With RS facing, join A with slip st in lower inner corner of front edge; ch 1, sc evenly around inner edge, neckline and opposite inner edge, working 2 sc in each corner. Fasten off.
Row 2: With RS facing, join D with slip st in first sc of Row 1; ch 1, wsc in each sc around, working 2 wsc in each corner. Fasten off.
Row 3: With RS facing, join A with slip st in first wsc of Row 2; ch 1, wsc in each wsc around, working 2 wsc in each corner. Fasten off.
Row 4: With RS facing, join B with slip st in first wsc of Row 3; ch 1, wsc in each wsc around, working 2 wsc in each corner. Fasten off.
Waist Trim
Work waist trim using G-6 (4 mm) hook.
Row 1: With RS facing, join A with slip st in lower edge of bodice; ch 1, work 98 (110, 122, 134, 150, 158) sc evenly around entire lower edge of bodice. Fasten off.
Row 2: With RS facing, join D with slip st in first sc of Row 1; ch 1, wsc in each sc around. Fasten off.
Row 3: With RS facing, join A with slip st in first wsc of Row 2; ch 1, wsc in each wsc around. Fasten off.
Repeat Row 3 in the following color pattern: 1 row with B, 1 row with A, 1 row with C, 1 row with A, 1 row with B, 1 row with A, 1 row with D.
Final Row of Neck Trim
With RS facing and G-6 (4 mm) hook, join A with slip st in lower edge of waist trim at inner edge of front. Ch 1, wsc evenly around inner edge, neckline and opposite inner edge, working 2 sc in each corner. Fasten off.
Seam Inner Front Edge
Measuring down from top of shoulder, place a stitch marker 8 (8 1/2, 9, 9 1/2, 9 1/2, 10)"/20.5 (21.5, 23, 24, 24, 25.5) cm along front V-neck edge. With yarn needle and A, seam from lower edge of waist trim to stitch marker.
TUNIC SKIRT
Note: Skirt is worked in rounds from the lower edge of waist trim downwards.
With I-9 (5.5 mm) hook, join A with slip st to center back of lower edge of waist trim.
Round 1: Ch 1, work 100 (112, 124, 136, 152, 160) sc evenly around lower edge of waist trim; join with slip st in first sc.
Round 2: Ch 1, (sc, ch 1, sc) in same sc as join, *skip next sc, (sc, ch 1, sc) in next sc; repeat from * to last sc, skip last sc; join with slip st in first sc.
Round 3: Slip st in first ch-1 space, ch 1, (sc, ch 1, sc) in same ch-1 space and in each ch-1 space around; join with slip st in first sc—50 (56, 62, 68, 76, 80) ch-1 spaces.
Place four stitch markers evenly spaced around last round, as follows: Lay garment flat with front facing you. Place two stitch markers in ch-1 spaces, evenly spaced, using the center as a guide. With back of garment facing you, place two more stitch markers in opposite positions of the first two.
Round 4: Slip st in first ch-1 space, (sc, ch 1, sc) in same ch-1 space, *(sc, ch 1, sc) in each ch-1 space to next stitch marker, (sc, ch 1, sc, ch 1, sc) in marked ch-1 space; repeat from * around, (sc, ch 1, sc) in each ch-1 space to end; join with slip st in first sc—54 (60, 66, 72, 80, 84) ch-1 spaces. Do not remove stitch markers.
Rounds 5–7: Repeat Round 3.
Move stitch markers up, corresponding with the previous increase.
Repeat last 4 rows four more times—70 (76, 82, 88, 96, 100) ch-1 spaces.
Repeat Round 3 until tunic measures 26 1/2 (27 1/2, 28, 28 1/2, 28 1/2, 29)"/67.5 (70, 71, 72.5, 72.5, 73.5) cm from top of shoulder to lower edge. Fasten off.
SLEEVE (make 2)
Note: Sleeve is worked from side to side. Work in front loops only throughout.
With H-8 (5 mm) hook, chain 47 (49, 49, 49, 49, 49).
Row 1: Sc in second ch from hook and in each remaining ch across, turn—46 (48, 48, 48, 48, 48) sc.
Rows 2–3 (5, 7, 7, 9, 9): Ch 1, sc in each sc across, turn.
Shape Cap
Row 4 (6, 8, 8, 10, 10): Ch 2, sc in second ch from hook and in each remaining sc across, turn—47 (49, 49, 49, 49, 49) sc.
Row 5 (7, 9, 9, 11, 11): Ch 1, sc in each sc across to last sc, 2 sc in last sc, turn—48 (50, 50, 50, 50, 50) sc.
Rows 6 (8, 10, 10, 12, 12)–19 (21, 23, 23, 25, 25): Repeat last 2 rows—62 (64, 64, 64, 64, 64) sc.
Rows 20 (22, 24, 24, 26, 26)–23 (23, 27, 29, 33, 37): Ch 1, sc in each sc across, turn.
Row 24 (24, 28, 30, 34, 38): Ch 1, sc2tog, sc in each remaining sc across, turn—61 (63, 63, 63, 63, 63) sc.
Row 25 (25, 29, 31, 35, 39): Ch 1, sc in each sc across to last 2 sc, sc2tog, turn—60 (62, 62, 62, 62, 62) sc.
Rows 26 (26, 30, 32, 36, 40)–39 (39, 43, 45, 49, 53): Repeat last 2 rows—46 (48, 48, 48, 48, 48) sc.
Rows 40 (40, 44, 46, 50, 54)–42 (44, 50, 52, 58, 62): Ch 1, sc in each sc across, turn.
Fasten off.
Wrist Trim
With G-6 (4 mm) hook, join A with slip st in lower edge of sleeve. Work 42 (46, 50, 52, 56, 60) sc evenly across. Fasten off. Work as for bodice waist trim.
FINISHING
With yarn needle and A, set in sleeves. Seam sleeves. Weave in all ends.
Read NextChic Moves Poncho


Thanks for your comment. Don't forget to share!
Delphine Bryant
Nov 14, 2018
Sexy and sassy. I love this empire waist stripe tunic. Sizes in small medium and large are not always true tot he size of the bust line. I wonder if anyone can shed any light on that?
Morehouse17
Oct 31, 2018
Pretty, pretty. From the long waist to the long sleeves this stripe tunic will be a fun winter piece. I am not all that crazy about the plunge in the neck line though. The stripes is what really makes the look. I see there are options to make in larger sizes.and I would have loved to have seen it modeled on a plus size model though. Thanks for the post.
Cheryl Y
Oct 30, 2018
I really really like the look of this Empire Waist Stripe Tunic. I think this one will really test my crochet skills. I like the different single crochet stitch, wrapped single crochet. I use this stitch often for the different texture it gives. Looking forward to making and wearing this one! Thank you so much for sharing this free crochet Tunic pattern.
mulberrygalprinces s
Sep 10, 2018
This is a very nice project. It will look very nice when finished. It really isn't that hard if you are familiar with reading patterns. If so, I would recommend you pass it up. You also will need to know how to assemble a finished project. Thank you for sharing this great item.
jenniferg 4913349
Oct 18, 2015
Hello everyone, can anyone tell me, are you doing front loops only i making hdc? or only for sc?TIA
ghooshtygirl 54194 03
Mar 29, 2014
Couple of modifications I am making: 1. Using one color of yarn 2. Finished all the bodice trim rows then joined the bodice center front so that I could work the waist section in the round. Love the look of the wsc! Am currently working on the lower section. Stitches seem kind of bulky, so am using two chains instead of one between the sc.
kellyw201080 41873 07
Oct 26, 2013
the second part to the bodice front is not matching up i have done it 2x any idea why it don't match up? the stitche for the bust are on the wrong end, this is the bodice left front.
Stephani
Feb 09, 2012
How do you follow this? By the row number or just straight down the list?
hooie44 2160777
Feb 26, 2012
It doesn't matter which section you do first so long as you follow the pattern for each one. Each pattern goes by the row, top to bottom.
Kim Guzman
Apr 04, 2012
The bodice should be made first since the remainder is "built" on it (except for the sleeves, which are seamed). Once the bodice is complete, you pick up stitches to make the waistband and the skirting is worked straight down. Since this pattern includes a little-used stitch, wrapped single crochet, I've included a video for it here: http://www.youtube.com/user/crochetkim
Report Inappropriate Comment
Are you sure you would like to report this comment? It will be flagged for our moderators to take action.
Thank you for taking the time to improve the content on our site.