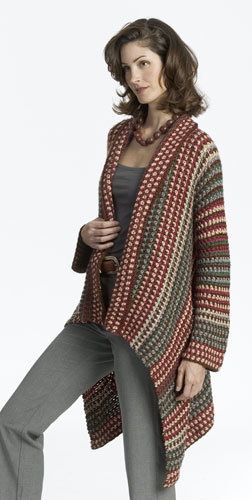
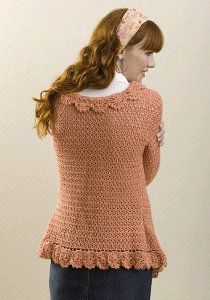
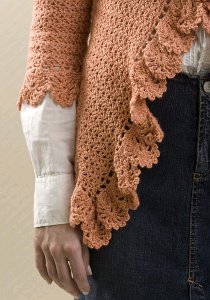
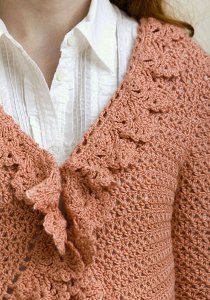
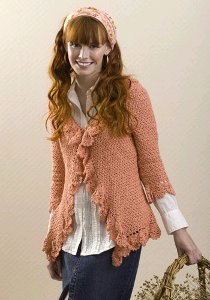
Ruffled Crochet Cardigan
Make a ruffled crochet cardigan using this free crochet sweater pattern and you'll be warm and trendy when the weather gets cold. This pattern shows you how to make a stretchy, lacy, ruffled cardigan.

Materials:
- One size US G-6 (4 mm) crochet hook, or size to obtain gauge.
- Small invisible snap closure
- Yarn needle
- NaturallyCaron.com Spa (75% Microdenier Acrylic/25% Bamboo); 6 (6, 7, 8, 9) skeins, Shown in: #0002 Coral Lipstick
- Pattern
Instructions:
SIZES
S (M, L, 1X, 2X)
FINISHED MEASUREMENTS:
Bust 34 (38, 42 1/2, 46 1/2, 51)"/86.5 (96.5, 108, 118, 129.5) cm, excluding edge lace
Length 21 (21, 22, 22, 22 1/2)"/53.5 (53.5, 56, 56, 57) cm, measured from center back neck and excluding edge lace
GAUGE
In V-st pattern, 8 1/2 V-sts and 11 rows = 4"/10 cm;
In Edge Lace pattern, 3 pattern repeats = 5"/12.5 cm; 5 rows = 2 1/2"/6.5 cm.
STITCHES USED
Chain (ch), double crochet (dc), half double crochet (hdc), single crochet (sc), slip stitch (slip st), treble crochet (tr)
SPECIAL TERMS
V-st: (dc, ch 1, dc) in same st.
beginning V-st: Ch 4, dc in indicated st.
PATTERN STITCHES
V-st Pattern
- Row 1: Ch 4 (counts as dc, ch 1), dc in first st (beginning V-st made), sk next dc, *sk next ch-1 sp, (dc, ch 1, dc) in next dc (V-st made), sk next dc; rep from * across to turning ch, dc in 3rd ch of turning ch, turn.
- Rep Row 1 for V-st Pattern.
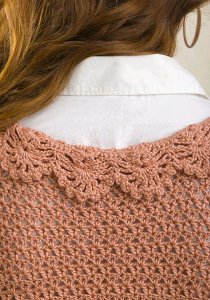
Edge Lace Pattern
- Row 1: Ch 1, sc in first dc, *2 sc in next ch-2 sp, (2 dc, ch 2, 2 dc) in next ch-2 sp, 2 sc in next ch-2 sp, sc in next dc; rep from * across, turn.
- Row 2: Ch 1, sc in first sc, *sc in next 2 sc, ch 2, (2 dc, ch 2, 2 dc) in next ch-2 sp, ch 2, sc in next 3 sc; rep from * across, turn.
- Row 3: Ch 1, sc in first sc, *sc in next sc, ch 3, sk next sc, sk next ch-2 sp, (2 dc, ch 2, 2 dc) in next ch-2 sp, ch 3, sk next ch-2 sp, sk next sc, sc in next 2 sc; rep from * across, turn.
- Row 4: Ch 1, sc in first sc, *sk next sc, sk next ch-3 sp, (tr, [ch 1, tr] 6 times) in next ch-2 sp, sk next ch-3 sp, sk next sc, sc in next sc; rep from * across, turn.
- Row 5: Ch 1, (sc, ch 2, sc) in each ch-2 sp across.
NOTES
- 1. Cuff, lower, and front edges will flare when lace edging is added.
- 2. Resulting fabric is stretchy.
BACK
- Ch 149 (169, 181, 201, 211).
- Row 1 (RS): Dc in 6th ch from hook (beginning V-st made), sk next 2 ch, *dc in next ch, ch 1, dc in next ch (V-st made), sk next 2 ch; rep from * across to last ch, dc in last ch, turn—36 (41, 44, 49, 54) V-sts.
- Rows 2: Work even in V-st pattern.
- Row 3: Ch 4, sk first 2 dc, sk next ch-1 sp, dc in next dc (beginning V-st made), sk next dc, *sk next ch-1 sp, (dc, ch 1, dc) in next dc, sk next dc; rep from * across to last 2 V-sts, sk next V-st, dc in first dc of last V-st, turn—34 (39, 42, 47, 52) V-sts.
- Rows 4–6: Work even in V-st pattern.
- Rows 7–14: Rep Rows 3–6 twice—30 (35, 38, 43, 48) V-sts.
- Rows 15–18: Work even in V-st pattern.
- Row 19: Ch 4, (2 dc, ch 1, dc) in first dc (counts as 2 V-sts), sk next dc, *sk next ch-1 sp, (dc, ch 1, dc) in next dc, sk next dc; rep from * across to turning ch, (dc, ch 1, 2 dc) in 3rd ch of turning ch, turn—32 (37, 40, 45, 50) V-sts.
- Rows 20–23: Work even in V-st pattern.
- Rows 24–33: Rep Rows 19–23 twice—36 (41, 44, 49, 54) V-sts.
- Rows 34 and 35: Work even in V-st pattern.
- Shape Armhole
- Row 36 (WS): Sl st to last dc of 2nd V-st, ch 4, dc in same dc, *sk next dc, sk next ch-1 sp, (dc, ch 1, dc) in next dc; rep from * across to last 3 V-sts, dc in last dc of next V-st, turn—32 (37, 40, 45, 50) V-sts.
- Row 37: Rep Row 3—30 (35, 38, 43, 48) V-sts.
- Row 38: Work even in V-st pattern.
- Rows 39–42 (46, 48, 52, 56): Rep last 2 rows 2 (4, 5, 7, 9) times—26 (27, 28, 29, 30) V-sts.
- Work even in V-st pattern until armhole measures 8 (8, 9, 9, 9 1/2)"/20.5 (20.5, 23, 23, 24) cm.
- Shape First Shoulder
- Row 1 (RS): Ch 2, sk first 2 dc, sk next ch-1 sp, (sc, ch 1, sc) in next dc, [sk next dc, sk next ch-1 sp, (hdc, ch 1, hdc) in next dc] twice, [sk next dc, sk next ch-1 sp, (dc, ch 1, dc) in next dc] 2 (2, 3, 3, 3) times, sk next dc, sk next ch-1 sp, dc in next dc, turn; leave remaining sts unworked (for neck and second shoulder).
- Row 2: Ch 3, sk first dc, [sk next dc, sk next ch-1 sp, (dc, ch 1, dc) in next dc] 2 (2, 3, 3, 3) times, [sk next hdc, sk next ch-1 sp, (hdc, ch 1, hdc) in next hdc] twice, sk next sc, sk next ch-1 sp, (sc, ch 1, sc) in next sc, sl st in ch-2 sp. Fasten off.
- Shape Second Shoulder
- Sk 13 (14, 13, 14, 15) V-sts following first shoulder, join yarn with sl st in 2nd dc of 14th (15th, 14th, 15th, 16th) V-st.
- Row 1 (RS): Ch 3, [sk next dc, sk next ch-1 sp, (dc, ch 1, dc) in next dc] 2 (2, 2, 3, 3) times, [sk next dc, sk next ch-1 sp, (hdc, ch 1, hdc) in next dc] twice, sk next dc, sk next ch-1 sp, (sc, ch 1, sc) in next dc.
- Row 2: Ch 1, sk first sc, sk next ch-1 sp, (sc, ch 1, sc) in next sc, [sk next hdc, sk next ch-1 sp, (hdc, ch 1, hdc) in next hdc] twice, [sk next dc, sk next ch-1 sp, (dc, ch 1, dc) in next dc] 2 (2, 2, 3, 3) times, dc in top of turning ch. Fasten off.
LEFT FRONT
- Ch 77 (85, 97, 105, 113).
- Rows 1 and 2: Work as for Rows 1 and 2 of Back—18 (20, 23, 25, 27) V-sts.
- Row 3: Ch 4, sk first 2 dc, sk next ch-1 sp, dc in next dc, sk next dc, *sk next ch-1 sp, (dc, ch 1, dc) in next dc, sk next dc; rep from * across to turning ch, dc in 3rd ch of turning ch, turn—17 (19, 22, 24, 26) V-sts.
- Rows 4–6: Work even in V-st pattern.
- Rows 7–14: Rep Rows 3–6 twice—15 (17, 20, 22, 24) V-sts.
- Rows 15–18: Work even in V-st pattern.
- Row 19: Ch 4, (2 dc, ch 1, dc) in first dc, sk next dc (counts as 2 V-sts), *sk next ch-1 sp, (dc, ch 1, dc) in next dc, sk next dc; rep from * across to turning ch, dc in 3rd ch of turning ch, turn—16 (18, 21, 23, 25) V-sts.
- Rows 20–23: Work even in V-st pattern.
- Rows 24–33: Rep Rows 19–23 twice—18 (20, 23, 25, 27) V-sts.
- Rows 34 and 35: Work even in V-st pattern.
- Shape Armhole
- Row 36 (WS): Ch 4, dc in first st, *sk next dc, sk next ch-1 sp, (dc, ch 1, dc) in next dc; rep from * across to last 3 V-sts, dc in last dc of next V-st, turn—16 (18, 21, 23, 25) V-sts.
- Row 37: Ch 4, sk first 2 dc, sk next ch-1 sp, dc in next dc (beginning V-st made), sk next dc, *sk next ch-1 sp, (dc, ch 1, dc) in next dc, sk next dc; rep from * across to turning ch, dc in 3rd ch of turning ch, turn—15 (17, 20, 22, 24) V-sts.
- Shape Neck
- Rows 38–42 (44, 46, 48, 50): Ch 3, sk first dc, *sk next dc, sk next ch-1 sp, (dc, ch 1, dc) in next dc; rep from * across to last V-st, dc in 3rd ch of turning ch, turn—10 (10, 11, 11, 11) V-sts.
- Row 43 (45, 47, 49, 51): Ch 4, dc in first dc, *sk next dc, sk next ch-1 sp, (dc, ch 1, dc) in next dc; rep from * across to last V-st, sk last V-st, dc in 3rd ch of turning ch, turn.
- Row 44 (46, 48, 50, 52): Ch 3, sk first 2 dc, *sk next ch-1 sp, (dc, ch 1, dc) in next dc, sk next dc; rep from * across to turning ch, dc in 3rd ch of turning ch, turn—9 (9, 10, 10, 10) V-sts.
- Rows 45 (47, 49, 51, 53)–50 (52, 54, 56, 58): Rep last 2 rows three times—6 (6, 7, 7, 7) V-sts.
- Work even in V-st pattern until armhole measures same as back armhole; end with a WS row.
- Shape Shoulder
- Rows 1 and 2: Work as for Rows 1 and 2 of Back first shoulder. Fasten off.
RIGHT FRONT
- Ch 77 (85, 97, 105, 113).
- Rows 1 and 2: Work as for Rows 1 and 2 of Back—18 (20, 23, 25, 27) V-sts.
- Row 3: Ch 4, dc in first st, sk next dc, *sk next ch-1 sp, (dc, ch 1, dc) in next dc, sk next dc; rep from * across to last 2 V-sts, sk next V-st, dc in first dc of last V-st, turn—17 (19, 22, 24, 26) V-sts.
- Rows 4–6: Work even in V-st pattern.
- Rows 7–14: Rep Rows 3–6 twice—15 (17, 20, 22, 24) V-sts.
- Rows 15–18: Work even in V-st pattern.
- Row 19: Ch 4, dc in first dc, sk next dc, *sk next ch-1 sp, (dc, ch 1, dc) in next dc, sk next dc; rep from * across to turning ch, (dc, ch 1, 2 dc) in 3rd ch of turning ch, turn—16 (18, 21, 23, 25) V-sts.
- Rows 20–23: Work even in V-st pattern.
- Rows 24–33: Rep Rows 19–23 twice—18 (20, 23, 25, 27) V-sts.
- Rows 34 and 35: Work even in V-st pattern.
- Shape Armhole
- Row 36 (WS): Sl st to last dc of 2nd V-st, ch 4, dc in same dc, sk next dc, *sk next ch-1 sp, (dc, ch 1, dc) in next dc, sk next dc; rep from * across to turning ch, dc in 3rd ch of turning ch, turn—16 (18, 21, 23, 25) V-sts.
- Row 37: Ch 4, dc in first st, *sk next dc, sk next ch-1 sp, (dc, ch 1, dc) in next dc; rep from * across to last 2 V-sts, sk next V-st, dc in first dc of last V-st, turn—15 (17, 20, 22, 24) V-sts.
- Shape Neck
- Rows 38–43 (45, 47, 49, 51): Ch 3, sk first dc, *sk next dc, sk next ch-1 sp, (dc, ch 1, dc) in next dc; rep from * across to last V-st, dc in 3rd ch of turning ch, turn—9 (9, 10, 10, 10) V-sts.
- Row 44 (46, 48, 50, 52): Ch 4, dc in first dc, *sk next dc, sk next ch-1 sp, (dc, ch 1, dc) in next dc; rep from * across to last V-st, sk last V-st, dc in 3rd ch of turning ch, turn.
- Row 45 (47, 49, 51, 53): Ch 3, sk first 2 dc, *sk next ch-1 sp, (dc, ch 1, dc) in next dc, sk next dc; rep from * across to turning ch, dc in 3rd ch of turning ch, turn—8 (8, 9, 9, 9) V-sts.
- Rows 46 (48, 50, 52, 54)–49 (51, 53, 55, 57): Rep last 2 rows twice—6 (6, 7, 7, 7) V-sts.
- Work even in V-st pattern until armhole measures same as back armhole; end with a WS row.
- Shape Shoulder
- Rows 1 and 2: Work as for Rows 1 and 2 of Back second shoulder.
SLEEVES (make 2)
- Ch 73 (73, 77, 77, 81).
- Rows 1 and 2: Work as for Rows 1 and 2 of Back—17 (17, 18, 18, 19) V-sts.
- Row 3: Work even in V-st pattern.
- Row 4: Ch 4, (2 dc, ch 1, dc) in first dc (counts as 2 V-sts), sk next dc, *sk next ch-1 sp, (dc, ch 1, dc) in next dc, sk next dc; rep from * across to turning ch, (dc, ch 1, 2 dc) in 3rd ch of turning ch, turn—19 (19, 20, 20, 21) V-sts.
- Rows 5–9 (8, 8, 7, 7): Work even in V-st pattern.
- Rows 10 (9, 9, 8, 8)–21 (23, 23, 23, 23): Rep Rows 4–9 (8, 8, 7, 7) 2 (3, 3, 4, 4) times—23 (25, 26, 28, 29) V-sts.
- Shape Cap
- Row 1 (WS): Sl st to last dc of 2nd V-st, ch 4, dc in same dc, *sk next dc, sk next ch-1 sp, (dc, ch 1, dc) in next dc; rep from * across to last 3 V-sts, dc in last dc of next V-st, turn—19 (21, 22, 24, 25) V-sts.
- Rows 2–4: Work even in V-st pattern.
- Rows 5–16: Ch 3, sk first dc, *sk next dc, sk next ch-1 sp, (dc, ch 1, dc) in next dc; rep from * across to last V-st, dc in 3rd ch of turning ch, turn—7 (9, 10, 12, 13) V-sts.
- Work 0 (0, 2, 2, 3) rows even in V-st pattern.
- Fasten off.
FINISHING
Sew shoulder seams. Sew sleeves into armholes. Sew side and sleeve seams.
Lower Edging
- With RS facing and working along opposite side of foundation chains across lower edge, join yarn with sl st in first ch.
- Row 1: Ch 5, dc in base of next V-st, *ch 2, dc in base of next V-st; rep from * across—72 (81, 90, 99, 108) ch-2 sps.
- Rows 2–6: Work Rows 1–5 of Edge Lace Pattern. Fasten off.
Front Edging
- With RS facing and working in ends of rows of fronts and sts of back neck, join yarn with sl st in last ch-2 sp of last row of lower edging.
- Row 1: Ch 5, dc in edge of 2nd to last row of lower edging, ch 2, dc in first row of Edge Lace Pattern, ch 2, dc in beginning of foundation ch of front, ch 2, dc in edge of first row of front, *ch 2, dc in edge of next row; rep from * along front and shoulder edge; *ch 2, dc in ch-1 sp of next V-st of back neck edge; rep from * across back neck; ch 2, dc in edge of next row of shoulder, *ch 2, dc in edge of next row; rep from * along shoulder and front edge.
Note: The number of ch-2 sps will vary depending on the number of rows worked to achieve armhole height. Work evenly and ensure that you have a multiple of 3 ch-2 sps. - Rows 2–6: Work Rows 1–5 of Edge Lace Pattern. Fasten off.
Sleeve Edging
- With RS facing and working along opposite side of foundation chain, join yarn with sl st in sleeve seam.
Sizes S (M) only - Round 1: Ch 5, dc in next ch-2 sp, *ch 2, dc in base of next V-st; rep from * around; join with sl st in 3rd ch of beginning ch—18 (18, 19, 19, 20) ch-2 sps.
Sizes L (1X) only - Round 1: Ch 5, dc in base of next V-st, *ch 2, dc in base of next V-st; rep from * around; join with sl st in 3rd ch of beginning ch—18 (18) ch-2 sps.
Size 2X - Round 1: Ch 5, dc in next ch-2 sp, *ch 2, dc in base of next V-st; rep from * around, ch 2, dc in last ch-2 sp; join with sl st in 3rd ch of beginning ch—21 ch-2 sps.
All sizes - Rounds 2–6: Work Rows 1–5 of Edge Lace Pattern, except do not turn at the end of each round, instead join with sl st in first sc and continue working in same direction. Fasten off.
- Sew snap closure inside front edges at beginning of neck shaping. Using yarn needle, weave in all ends.
See this pattern and more in 23 Free Flower Crochet Patterns and Other Girly Crochet Projects.
Read NextAsymmetry Jacket
Your Recently Viewed Projects
Thanks for your comment. Don't forget to share!
princess6860504
Jul 27, 2017
Wow, what a lonngg pattern, I must say! Holy cow! I would love a sweater like this for this upcoming fall season. It looks so fresh and pretty with the white blouse worn underneath. It is also a great way to jazz up a simple black tee and pair it with your favorite jeans.
mgsheffert 9234262
Nov 18, 2014
After shaping the arm hole (row36) I have the correct number of v-stiches - 37 for the medium size. Row 37 is to repeat rows 3-30, at the end I have 37 v-stiches instead of 35. With row 3 repeated 3 times for decrease and row 19 repeated 3 times for increase I don't understand how it is only 35 v-stiches Looking ahead at rowes 39-46 it says to repeat last 2 rowes? armhole is suppose to be 8 inches, with the repeat of rows 3-30 in row 37 the piece is already the same length as the bottom
candicesweet 47843 21
Nov 12, 2013
The naturally arson.com yarn used in this pattern is very hard to locate. What yarn would you recommend I use instead? I have come up with maybe using the Caron simply soft light yarn instead. What do you think?
ldfrankle 1104973
Mar 25, 2013
It looks like there is quite a bit of stretch to this probably because of the light weight of the yarn,has anyone tried it with # 4 weight. Does anyone have suggestions for the changes that should be used for the he aver yarn
jenny 9876068
Apr 03, 2013
I made this sweater and there is a lot of stretch to it, and the carons bamboo yarn they suggest does not hold up as well as I would like, it sheds. I would not go up in weight I would go down, and maybe use a cotton like knit picks cotton shine I had to go so far down in needle size to get the gauge to work for this I used a D verses the G recommended, I don' t think you would have a problem using a finer weight yarn. When making garments I find 4 weight yarns too thick with crochet.
lougwc2 8639124
Apr 29, 2012
When I ch 149 for the back and make the V I come up with 47 v-st what am i doing incorrect
jenny 9876068
Jun 25, 2012
on the foundation row make sure you start in 6th ch from hook then skip 2 chs dbl cr in the nxt ch ch 1 and then dbl cr in the nxt ch skip 2 ch etc the v stitch in the foundation row is not made with a dbl cr chn dbl cr in the same stitch as it is done in the rest of the pattern.
jenny 9876068
Mar 30, 2012
I just finished this and when it says it is stretchy they are not kidding, I checked my gauge over and over, and it really stretches in the front so much so that it looks like I made the front longer then the back when I put it on, but when it is laid flat it is the same length. The snap in the front is to try and keep the front up so it doesn't stretch so bad and look lopsided. Used the Spa yarn even went down on my needle size to keep gauge. It doesn't hold the shape that is in the picture. I am a bit disappointed with it.
jenny 9876068
Apr 10, 2012
I pulled my first attempt to make this jacket out and made it again I spent a lot of time this time on my gauge and found that I needed to use a D size hook to keep the gauge verses the G it recommends Once I got the gauge right the jacket fits really well the pattern is well written Just a couple places I think have small errors on the fronts when shaping the sides it has the decreasing start in the center edge verses the sides which I don't think is correct On the lace the directions on row state to tr ch tr but in row you need to sc ch sc in the ch sp after working with this I decided to tr ch tr in row then sc ch sc in row five the lace laid better this way The jacket is now worth the…Read More time and effort and I believe I grew in my crochet in the process of making this project
fwb 8751240
Nov 03, 2011
What a beauty! The front is a little too ruffly for me. Do you think it could still have that lovely edge but laying flatter more like it lays on the back of the neck?
Granny Dee
Aug 23, 2010
Crafter 4783318...To save on paper and ink I copied the pattern into Word, shrunk the pic and set them up for word wrapping, changed the margins and got rid of spaces. I saved it as a PDF and ended up with 7 pages.
Crafter 4783318
Jul 27, 2010
Thinking my daughter would look really cute in this sweater! But, wow! It was 14 pages long. Have you considered having your pattern instructions use fewer pages to save on paper and ink?
Report Inappropriate Comment
Are you sure you would like to report this comment? It will be flagged for our moderators to take action.
Thank you for taking the time to improve the content on our site.