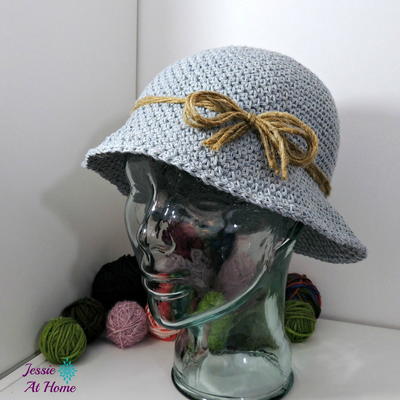
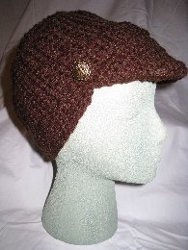
Sue's Fleece Lined Brimmed Hat
This free crochet hat pattern is fun and easy to make! Sue's Fleece-Lined Brimmed Hat looks great and is a perfect option during the cold winter months.

Materials:
- Size G crochet hook
- Redheart yarn (worsted – medium – 4)
- 1/8 of a yard fleece material to match yarn
- 2 3/4” buttons
- Yarn needle
- Straight pins or markers
- Sewing needle
- Thread to match yarn

Instructions:
Top of Hat
Ch. 5, ss to form a ring.
- Rnd. 1: Ch. 2 (chain 2 counts as 1 hdc), 11 hdc. in ring (12 hdc.), ss to top of chain 2 (do not turn).
- Rnd 2: Ch 2, 1 hdc in same st as ch 2, 2 hdc in eac st around (24 hdc), join with a ss to top of ch 2.
- Rnd 3: Ch 2, 1 hdc in same st at ch 2, hdc in next hdc, * 2 hdc in next hdc, 1 hdc in next hdc* repeat from * to * to the end (36 hdc), ss to top of ch 2.
- Rnd 4: Ch 2, 1 hdc in same st as ch 2, hdc in the next 2 hdc, * 2 hdc in next hdc, hdc in the next 2 hdc,* repeat from * to * to the end (48hdc), ss to top of ch 2.
- Rnd 5: Ch 2, 1 hdc in same st as ch 2, hadc in the next 3 hdc, * 2 hdc in the next hdc, hdc in the next 3 hdc* repeat from * to * to the end (58 hdc), ss to top of ch 2.
- Rnd 6: Ch 2, hdc in same st as ch 2, hdc in the next 4 hdc, * 2 hdc in the next hdc, hdc in the next 4 hdc,* repeat from * to * to the end (72 hdc). fasten off. This should measure approximately 6½” across the center.
Body of Hat
Ch 12
- Row 1: hdc in 3rd chain from hook and in each ch across (10 hdc), turn. Piece should measure 3 ½”.
- Row 2: Ch 2, hdc in each hdc across (10 hdc), turn.
- Row 3: Ch 2, hdc in each hdc across (10 hdc) turn.
- Row 4 – 45:( or until piece measures approximately ½” shorter then head measurement) repeat row 3. do not fasten off.
- With right sides together ss back seam. Fasten off.
- With top of hat (round piece) mark center front, center back and both sides. Do the same for the body of the hat.
- With right sides together match up straight pins and ss together all the way around. Fasten off.
- Rnd 1: with right side facing you working at bottom edge of hat attach yarn with a ss at center back ch 1, sc in same st as ch 1, sc around working evenly until you have approximately 67 sc, ss to top of ch 1. Do not turn. ( remember if you had to make more rows to the body of the hat you’ll need to do more scs).
- Rnd 2: Ch 1, sc in each sc around joining with a ss to ch 1.
- Rnd 3: Repeat rnd 2 ( you can add rows to make it longer) fasten off.
Brim
Find the center front st (mark with a straight pin) count 14 st to the right of the hat (right side facing you).
- Row 1: Attach yarn with a ss to the 14th st, ch 1, sc in same st as ch 1 and in the next 28 sc (29 sc) turn.
- Row 2: Ch 1 sk the 1st sc sc in each sc to the last 2, 2 sctog. (27 sc).
- Row 3: Repeat row 2 (25 sc).
- Row 4: Repeat row 2 (23 sc).
- Row 5: Repeat row 2 (21 sc).
- Row 6: Repeat row 2 ( 19 sc).
- Row 7: Repeat row 2 (17 sc).
- Row 8: Repeat row 2 (15 sc).
- Row 9: Repeat row 2 (13 sc).
- Row 10: Repeat row 2 (11 sc). Do not fasten off.
Brim Lining
- Row 11: Ch 1 sc in each sc across (11 sc).
- Row 12: Ch 1, 2 sc in the 1st sc, sc in each sc to the last sc, do 2 sc in the last sc (13 sc).
- Row 13: Repeat row 12 (15 sc).
- Row 14: Repeat row 12 (17 sc).
- Row 15: Repeat row 12 (19 sc).
- Row 16: Repeat row 12 (21 sc).
- Row 17: Repeat row 12 (23 sc).
- Row 18: Repeat row 12 (25 sc).
- Row 19 Repeat row 12 (27 sc).
- Row 20: Repeat row 12 (29 sc). Do not fasten off.
- With right sides together fold brim in half ss side seam.fasten off.
- Repeat for other side and turn.
- Pin lining to inside of hat and with yarn needle and yarn whip stitch brim lining to hat being careful that stitches do not come through to right side of brim.
- With right side facing you attach yarn with a ss to left side of brim work 1 sc in each sc around to other side of brim fasten off.
Band
Ch 4
- Row 1: sc in the 2nd ch from the hook and in the next 2 chs, turn (3 sc).
- Row 2: Ch 1, sc in each sc.
- Row 3: Repeat row 2 until piece measures 8 ½” long.
- Center band to front of hat over brim. Sew 1 ¾” button to each side through all thicknesses.
- Cut a piece of fleece 3 ½” ( wider if you made body of hat wider) wide by 22” long (longer if you made the body of hat longer. Add 1” to length for turning under at seam).
- Pin fleece to inside hat along seam at the top. Fold extra fleece over the cut edge along back seam. Pin fleece at bottom edge. With needle and thread whip stitch around top and bottom of fleece and at center back seam.
Abbreviations:
- hdc = half double crochet
- sc = single crochet
- ss = slip stitch
- ch = chain
- st = stitch
- sctog = single crochet together (decrease st)
Read NextGrey Garden Crochet Hat
Your Recently Viewed Projects
Thanks for your comment. Don't forget to share!
MissPP
Feb 04, 2011
Hi I love this hat, I'm just wondering if there is someone out there who has made one and has a picture of the top of the hat. Mine doesn't look right...
Report Inappropriate Comment
Are you sure you would like to report this comment? It will be flagged for our moderators to take action.
Thank you for taking the time to improve the content on our site.