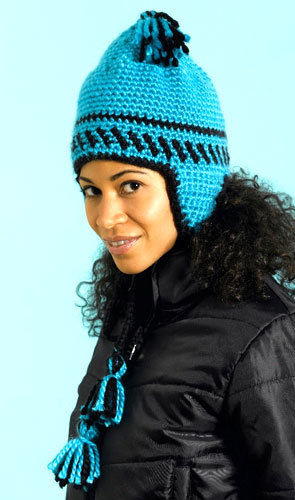
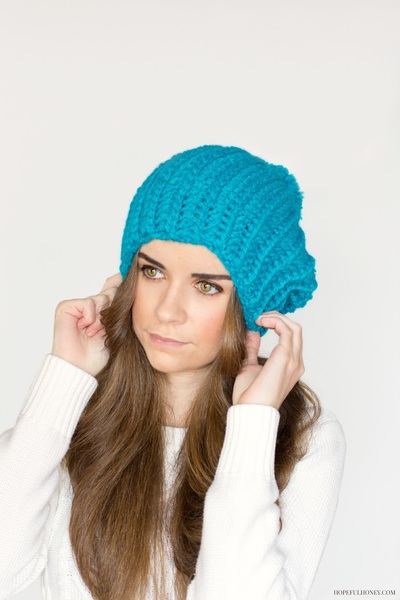
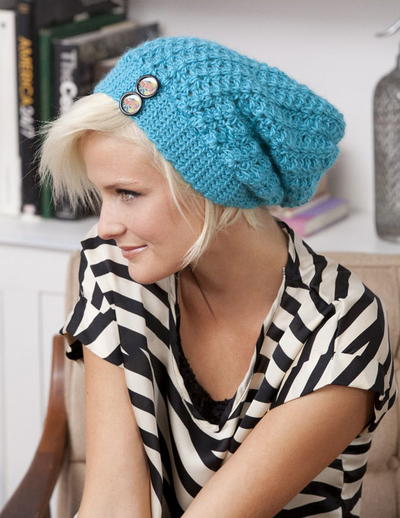
Blue Slouchie Beanie
This Blue Slouchie Beanie from Vickie Howell is an adorable accessory to wear during the fall or winter months. It's an easy crochet pattern that uses Stitch.Rock.Love. Sheep(ish) from Caron in a cool Turquoise color. The band is worked in rows while the body is worked in rounds, so this is a great project to help you fine-tune your crochet skills.
Make one in all your favorite colors so you have a cute crochet accessory for all of your best outfits! It also makes a great gift for birthdays and Christmas.


If you're looking for more simple crochet patterns, look no further. Here are 50+ Free Easy Crochet Patterns and Help for Beginners.
MATERIALS:
- 2 balls Stitch.Rock.Love. Sheep(ish) Yarn from Caron in Turquoise
- US I-9 (5.5mm) crochet hook, or size to obtain gauge
- Yarn needle
- 2 buttons—1"/25mm diameter (optional)
SIZES: S/M (L/1X)
FINISHED MEASUREMENTS: Beanie measures approximately 22 (23 1/2)"/56 (59.5) cm in circumference
GAUGE: In ribbing pattern, 18 sts = 4"/10cm.
INSTRUCTIONS:
Ribbed Band
Ch 10.
Row 1: Sc in 2nd ch from hook and in each remaining ch across, turn—9 sc.
Row 2: Ch 1, working in front loops only, sc in each sc across, turn.
Repeat last row until piece measures 22 (23 1/2)"/56 (59.5)cm from beginning. Fasten off, leaving a long tail for sewing. Use tail to sew short ends together to form band. Set aside.
Body
Beginning at top of beanie, ch 87 (93); join with sl st in first ch to form a ring, taking care not to twist ch.
Round 1: Ch 3 (dc, ch 2, sc) in same ch as joining sl st (counts as first pattern repeat), *sk next 2 ch, (2 dc, ch 2, sc) in next ch; repeat from * around; join with sl st in 3rd ch of beginning ch-3—29 (31) pattern repeats.
Round 2: Sl st to first ch-sp, ch 3, (dc, ch 2, sc) in first ch-sp, (2 dc, ch 2, sc) in each remaining ch-sp around; join with sl st in top of beginning ch.
Repeat last round until piece measures 11"/28cm from beginning. Fasten off.
Finishing
Close Top of Hat: At top of hat, bring center front and center back of beanie together. Join yarn with sc, inserting hook through center front and center back (joining front and back at center). Pinch side edges to the same center point and sc the edges together (by inserting hook through both thicknesses and completing a sc). The top of the beanie will now be in a star formation. Continue to pinch opposite edges and sc them together until top of beanie is completely closed. Fasten off.
Attach Band: Using yarn needle, sew band to lower edge of beanie. Sew buttons to band, if desired. Using yarn needle, weave in all ends.

If you're interested in making more crochet hats, take a look at these
16 Crochet Beanie Patterns.
Your Recently Viewed Projects
Thanks for your comment. Don't forget to share!
Linda
Feb 08, 2017
As long as I can recall my Grandmother and Mother always wore a bandana or hat while doing house or yard work. This crocheted hat pattern is very much to my liking for chores.
darcyuhrich 208568 6
Oct 24, 2014
I'm working on this right now. I think it would be a little more clear if it had the following: For the body, beginning on Round 2, the pattern should say Sl st to first ch2-sp, etc. instead of just ch-sp.
FaveCrafts Editor JL
Oct 24, 2014
Hey there - Thanks so much for your feedback! I'm sure fellow crocheters will really appreciate it. Have a great day! - Julia from FaveCrafts
Member 7657998
Aug 18, 2014
i loved the finished product. but i had to change the pattern up some. the s/m size was way to big and I am 31 and have an average head size. I made it 20" but probably could have made it a little smaller. I took the suggestion of someone elses reply of sc all the way around the one side of the band. instead of 87sc i believe i did 47sc. i used red heart Soft. 4ply worsted weight that also required the same hook size.
Melissa Ryan
Aug 19, 2014
Hey there! Thanks for sharing this! I'm sure it will help other crocheters as well. Glad you liked the pattern! --FaveCrafts Editors
jamontagne 4081302
Dec 04, 2013
Some changes to make the pattern easier and better: 1) do the ridge band in BLO instead of FLO - produces a stronger and prettier ridge 2) instead of making 2 separate pieces, simply sc along 1 side of band (after joining the ends), then work beanie pattern from there 3) to close top, simply weave in a piece of yarn all the way around the top, then pull closed tightly (like a draw string). stitch the end of the yarn inside to stop it from unraveling. I made this with these changes and it came out fabulous!
Member 7473063
Nov 20, 2014
I was loving the look of this but had the same ideas about tweaks so thanks for posting! Looking forward to making this!
meemerd 8266594
Nov 18, 2013
I made this hat and got all the way to the end and could not understand the closing of the hat. I am a published designer with Crochet World and have made many difficult crochet items but this one left me completely in the dark. I tried several times and got so frustrated with it that I tore it all out and looked for another pattern. The closing instructions are not clear at all.
ctygirl1307
Nov 17, 2013
Where would I find the Stitch.Rock.Love Sheep(ish) yarn from Caron? I can't find it even online. Somebody help me, please?
lvnvcheryl 0331161
Nov 14, 2013
But, it is apparently NOT too easy. I hope will have better luck than the previous reviewers!
dddelay 9828917
Nov 07, 2013
I finished the ribbed band. Which stitch should I use to sew the ends together?
Member 6486805
Oct 07, 2013
I'm already start this project except stuck with round 1 and 2. Wish you did provide the video and maybe it will be helpful. So I can complete and looks like this picture. It is frustrating.
Snicker_d0odle_
Sep 28, 2013
The instructions for this pattern aren't very clear. The finishing for the top of the hat doesn't make any sense really. And I'm confused how you attach the band to the hat. Could you possible revise the pattern and post it again?
bevallen88 7366759
May 10, 2013
I'm really having trouble with Round 2 of this pattern. Can anyone help please? Do you really use every chain space? It doesn't look anything like the picture and doesn't create a pattern
afmraz
Mar 14, 2013
I am so lost in the finishing directions and im pretty advanced when it comes to crocheting and knitting...PLEASE HELP!!! I really wanna make this hat.
xxprincesschaosxx 7181921
Feb 10, 2013
I'm just starting to learn how to read patterns since I normally just watch tutorials and I am having a little trouble reading Round 1 & 2 of the body. I'm just a little confused. It would help if I could see closer pictures so I can see what it's supposed to look like.
hodgy 2479537
Dec 13, 2012
Help... the FINISHING section needs some pictures to go with! Am having real hard time understanding the Finishing step 1 section, is it just pucker every stitch to the center stitch that was joined, doesn't seem like that would work?
hodgy 2479537
Dec 13, 2012
Help! I am having problem with the 'Finishing' portion! Once you sc to connect front/back, do you stitch rem edges together or do you draw them (what's them) ALL to the center sc made to join? Never stumped before on pattern, hoping someone can get me thru step1 of FINISHING! Thanks!! Tammy
Smurff
Feb 09, 2012
http://www.youtube.com/watch?feature=endscreen&NR=1&v=3IEKTFCp3Yw this video is helping me with this pattern
rownbell 3699428
Jan 24, 2012
I'm trying to make this hat and I'm also having problems with row 2. Anyhelp? I'm in the same boat at marisa007. thanks!
Melissa Ryan
Oct 10, 2012
@rownbell Thanks for the comment! Just wanted to let you know that I updated the directions. Hope it helps you!
marisa007
Jan 22, 2012
I'm new to crocheting, I've been knitting. Are the instructions to row 2 correct? seems like I'm going to end up w/hundreds of stitches. and now that I've finally got row 1 completed I'm not sure I can see all the V's to go into for row 2. Row 1 turned out kind of scalloped--is that right? it looks good but how many stitches do I have? thanks!
Melissa Ryan
Oct 10, 2012
@Marisa007 Thanks for the comment! Just wanted to let you know that I updated the directions. Hope it helps you!
Tibbles
Jan 05, 2012
I really like this hat, but am having trouble with the body part of it! I thought I was reading it right, but apparently not... it keeps coming out looking like granny square shells and not at all like the picture. Can anyone help or clarify what I might be missing?
Melissa Ryan
Oct 10, 2012
@Tibbles Thanks for the comment! Just wanted to let you know that I updated the directions. Hope it helps you!
kmaureli 2228362
Dec 28, 2011
I made this hat for my very fashion conscious 20-year-old daughter using Vanna's Choice Lion brand yarn in linen and it was absolutely beautiful. She wore it immediately. It is very flattering and looks even better than the picture here. I am making another for my sister right now!
kmaureli 2228362
Dec 29, 2011
I didn't mean to say that the picture above is not gorgeous, it is! Just meant that with thicker yarn it looks more like a winter hat and very flattering as well! (=
rownbell 3699428
Jan 24, 2012
when making row 2, did you repeat the pattern in every chain? i've been trying to make this hat for the past 3 days and it's not looking right. any insight is greatly appreciated. thanks!
Melissa Ryan
Oct 10, 2012
@kmaureli So glad your daughter loved it! Hope your sister did, too! It would be fun to have this hat in several colors so you always have something fun to wear!
hodgy 2479537
Dec 13, 2012
Hi! I'm stuck in the FINISHING part! After you join front to back with sc, what do they mean by "pinch side edges to the -same center point- & sc the edges together"?! This is the piece I don't get... I held the remaining edges together and stitched tog down to corner... don't think it's right because instructions say should have star, and then continue pinching opp edges and sc them tog. Any advice is aprpeciated! HELP ready to finish it off my own way... lol...
naturopath49 86177 01
Dec 09, 2011
This is a cute hat ! I have been looking everywhere for a pattern for these, I am just learning how to read the printed directions and this one I did okay with :) thank you ! It took me two days to do this but I have parkinson's so it takes me a bit longer then most to get the stitches done between the tremors..lol again thank you very much
Melissa Ryan
Oct 10, 2012
@naturopath49 What an accomplishment! If you're still looking for some easier crochet patterns, be sure to check out our friends over at AllFreeCrochet.com. They have lots of ideas and helpful tips for the beginner! :)
gscy8
Aug 31, 2011
This is the cutest pattern for a beanie I've seen so far. What colors would I make it in? You name it! One for all my winter outfits! Thanks for the pattern.
Melissa Ryan
Oct 10, 2012
@gscy8 I love this pattern, too! I want to make one in all colors of the rainbow so I have one to wear with every outfit! :)
Report Inappropriate Comment
Are you sure you would like to report this comment? It will be flagged for our moderators to take action.
Thank you for taking the time to improve the content on our site.