A Twist of Fate Headband
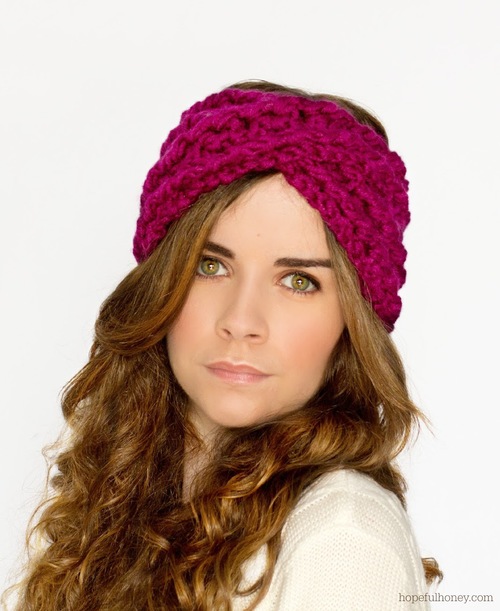
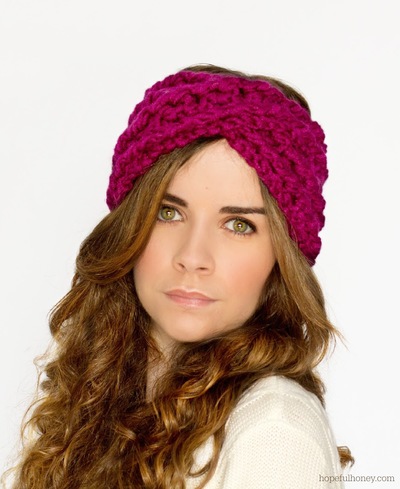
Just because it's cold outside doesn't mean you have to abandon all fashion! Crochet yourself A Twist of Fate Headband and make a functional and fashionable accessory for the winter months. This cute twisted crochet pattern can be made in any color and is a fun wearable for girls of all ages. It also does a wonderful job keeping your ears nice and warm...so don't forget to make one for all your friends and family as stocking stuffers during the holiday season.
Primary TechniqueCrochet

SeasonWinter
Yarn Weight(6) Super Bulky/Super Chunky (4-11 stitches for 4 inches)
Crochet HookN/15 or 10 mm hook
Materials:
- 10.00mm Crochet Hook
- 140g Super Bulky Yarn {14ply}
- Scissors
- Tapestry/Wool Needle
Instructions:
This headband fits all sizes
- Taking your super bulky yarn and 10.00mm crochet hook, start of by making a Slip Knot. Then crochet 10 Chains.
- Row 1 Chain 2. Crochet 1 Double Crochet into the fourth chain from your hook. Then crochet 1 Double Crochet into every chain across. You should have 10 double crochets now.
- Row 2 Chain 2. Crochet 1 Front Post Double Crochet into the next stitch. In the 3rd stitch crochet a Double Crochet. In the 4th stitch crochet a Front Post Double Crochet. In the 5th and 6th stitch crochet a Double Crochet. In the 7th stitch crochet a Front Post Double Crochet. In the 8th stitch crochet a Double Crochet. In the 9th stitch crochet a Front Post Double Crochet. In the last stitch crochet a Double Crochet.
- Row 3 Chain 2. Crochet 1 Back Post Double Crochet into the next stitch. In the 3rd stitch crochet a Double Crochet. In the 4th stitch crochet a Back Post Double Crochet. In the 5th and 6th stitch crochet a Double Crochet. In the 7th stitch crochet a Back Post Double Crochet. In the 8th stitch crochet a Double Crochet. In the 9th stitch crochet a Back Post Double Crochet. In the last stitch crochet a Double Crochet.
- Row 4 - 10 Repeat rows 2 - 3 eight times. {Note: You can either add or take away a couple sets of rows 5 - 8, depending on your head's circumference.}
- Row 11 Chain 2. Crochet 1 Back Post Double Crochet into the next stitch. In the 3rd stitch crochet a Double Crochet. In the 4th stitch crochet a Back Post Double Crochet. In the 5th stitch crochet a Double Crochet. You should have 5 stitches now. {Note: You're busy creating one of the two different strips you'll need to do the criss-cross.}
- Row 12 Chain 2. Crochet 1 Front Post Double Crochet into the next stitch. In the 3rd stitch crochet a Double Crochet. In the 4th stitch crochet a Front Post Double Crochet. In the 5th stitch crochet a Double Crochet.
- Row 13 - 21 Repeat rows 11 - 12.
- Fasten off, and weave in loose ends.
The Second Strip
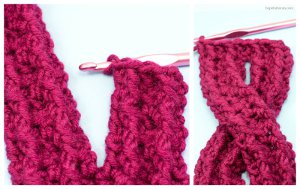
- To create the second strip you'll need to make the criss-cross, start of by attaching your bulky yarn to the first stitch of the headband, right at the front.
- Row 1 Chain 2. Crochet 1 Front Post Double Crochet into the next stitch. In the 3rd stitch crochet a Double Crochet. In the 4th stitch crochet a Front Post Double Crochet. In the 5th stitch crochet a Double Crochet.
- Row 2 Chain 2. Crochet 1 Back Post Double Crochet into the next stitch. In the 3rd stitch crochet a Double Crochet. In the 4th stitch crochet a Back Post Double Crochet. In the 5th stitch crochet a Double Crochet. You should have 5 stitches now. {Note: You're busy creating the second strip you'll need to do the criss-cross.}
- Row 3 - 11 Repeat rows 1 - 2
- Row 12 Now criss-cross the two strips you just created. Chain 2. Crochet 1 Back Post Double Crochet into the next stitch. In the 3rd stitch crochet a Double Crochet. In the 4th stitch crochet a Back Post Double Crochet. In the 5th and 6th stitch crochet a Double Crochet. In the 7th stitch crochet a Back Post Double Crochet. In the 8th stitch crochet a Double Crochet. In the 9th stitch crochet a Back Post Double Crochet. In the last stitch crochet a Double Crochet. {Note: You're connecting the two strips together by crocheting across.}
- Row 13 Chain 2. Crochet 1 Front Post Double Crochet into the next stitch. In the 3rd stitch crochet a Double Crochet. In the 4th stitch crochet a Front Post Double Crochet. In the 5th and 6th stitch crochet a Double Crochet. In the 7th stitch crochet a Front Post Double Crochet. In the 8th stitch crochet a Double Crochet. In the 9th stitch crochet a Front Post Double Crochet. In the last stitch crochet a Double Crochet.
- Row 14 Chain 2. Crochet 1 Back Post Double Crochet into the next stitch. In the 3rd stitch crochet a Double Crochet. In the 4th stitch crochet a Back Post Double Crochet. In the 5th and 6th stitch crochet a Double Crochet. In the 7th stitch crochet a Back Post Double Crochet. In the 8th stitch crochet a Double Crochet. In the 9th stitch crochet a Back Post Double Crochet. In the last stitch crochet a Double Crochet.
- Row 15 - 20 Repeat rows 13 - 14.
- When you've completed all the rows, connect the two ends of the headband together to create a circle and Slip Stitch them together. Once the band is slip stitched together fold the slip stitched part towards the inside.
- Fasten off, and weave in loose ends.
Your Recently Viewed Projects
c2cm 0799310
Aug 21, 2017
I am about to cry! lol easy...well I know I'm a novice ,but I can not understand the second strip!! can maybe someone help ,is there a video? I do not get the part start by attaching your bulk yarn to the first stitch of the headband..if I get that I prob can get the rest please...help!!!
Editor Dana
Aug 28, 2017
Hi there! Someone left a comment on the original pattern that might be helpful. I'll paste it here: "no you don't do 10 chains(pattern directions are unclear here.) You just reconnect at the base where the othe side starts and continue with the same pattern. Once you get this side same lenth as the first,then you cross them and do a continuous row of stitches (row 12) across to connect them. Hope this helps. Just look at the picture." Here is the URL for the original project as well---feel free to read those comments and see if they are helpful! Good luck! http://www.hopefulhoney.com/2014/05/chunky-criss-cross-headband-crochet.html
len10pin
Apr 07, 2017
I found is Twist of Fate Headband listed in my Favecrafts email today. It is one of my favorite headbands, too. It looks warm and comfortable. Another good gift idea after I ke one for myself.
KathrynAllison
Apr 07, 2017
I love the color and design of this crochet headband. You can easily wear it throughout many seasons while looking extra chic.
Crafty Suz
Mar 22, 2017
I like the look of this. It appears to be fairly easy to do too. Thanks Dana B. for your message. I'll make sure to pay attention to that when I make my first one. I think these would make nice gifts for family and friends. It's cold during three seasons of the year here so they would come in very handy. A smaller hook should enable me to make some for children too.
mbossi9355 9767083
Feb 25, 2017
What am I missing. If you chain 10 then 2 total 12. If you start in the 4 chain from hook you end up with 8 DC. Right?
Editor Dana
Feb 27, 2017
Hi there! I looked at the Hopeful Honey blog comments on this pattern and this is what one person discovered: "I thought the same thing at first but then realized 9, 10, 11, 12 making the 9th chain the 4th from the 12th and the first one you double crochet in; and then you have to count the chain two as your first double crochet in each row. making 10 stitches for each row. Hope this helps. I almost quit before beginning because I had the same thought. Glad I didn't. It turned out beautifully!" I hope that helps! -Dana from FaveCrafts
saphy98
Feb 16, 2017
This twist of fate headband is a great pattern for beginners. The pattern reads very easy and it will work up fast when using bulky weight yarn. The headband pattern would be good for a nice gift for that special person. Winter headbands are coming back and are cute for all age groups. Looks like a fun pattern to work up.
Crafty lady 007
Jan 25, 2017
This is a cute pattern for a winter headband. I have an old one that I want to replace but it keeps,going to the back burner. Big hook and chunky yarn makes a for a fast project.
lpalmer59 7490208
Mar 23, 2016
This is going to be perfect for my daughter and daughter in law. They are always asking me for something they can wear like a hat, which will keep their ears warm, but will not mess their hair. I think I just found the perfect solution for their problem, thank you so much for sharing this pattern with us.
Report Inappropriate Comment
Are you sure you would like to report this comment? It will be flagged for our moderators to take action.
Thank you for taking the time to improve the content on our site.

