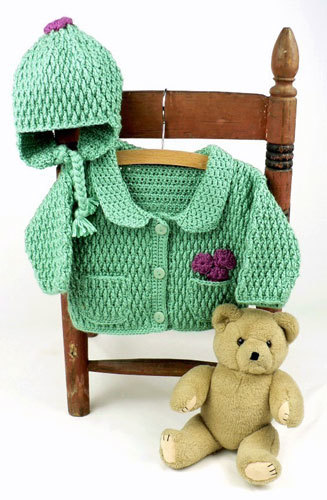
Eco Baby Set
Create a matching crocheted hat and jacket set for your baby with this Eco Baby Set. Great for little girls and boys, this crocheted baby set makes a great Christmas gift or baby shower present. Crochet these wearables in any color you'd like, and give them to a mother-to-be for a gift that's sure to last a lifetime. This Eco Baby Set is great for beginners and makes a wonderful project for a weekend of crafting. If you're short on time, you can make the hat and save the jacket pattern for later.

Materials:
- 15 (15, 20, 20) balls Caron International's Simply Soft Eco (80% Acrylic, 20% NatureSpun™ Polyester) yarn in Aqua Mist (MC)
- 1 ball Caron International's Simply Soft Eco (80% Acrylic, 20% NatureSpun™ Polyester) yarn in Heather Mist (A)
- US I-9 (5.5 mm) crochet hook, or size needed to obtain gauge
- Stitch markers
- Yarn needle
- 3 (3, 4, 4) Buttons – 5/8"/16 mm
Gauge: In Stitch pattern, 16 sts and 13 rows = 4"/10 cm, using MC
Abbreviations:
- FPtr: Front-post treble crochet: (RS) Yarn over twice, insert hook from right-hand side of stitch to WS of piece, return to RS at left-hand side of stitch, yarn over and draw up loop, complete as for tr.
- sc2tog: Single crochet 2 together – Insert hook in next stitch, yarn over and pull up a loop, (2 loops on hook), insert hook in next stitch, yarn over and pull up a loop, yarn over and draw through all 3 loops on hook.
- dc2tog: Double crochet 2 together –[Yarn over, insert hook in next st and pull up a loop, yarn over and draw through 2 loops] twice, yarn over and draw through 3 loops on hook.
- dc3tog: Double crochet 3 together –[Yarn over, insert hook in next st and pull up a loop, yarn over and draw through 2 loops] 3 times, yarn over and draw through 4 loops on hook.
- inc: Increase – work 2 sts in 1 st.
Notes:
- When working Jacket, beginning chain does NOT count as first stitch.
- When working Hat, beginning chain counts as first stitch.
- For attaching buttons, separate a length of MC into 2 plys and use to sew on buttons.
Finished Measurements:
3-6 (9, 12, 18) months
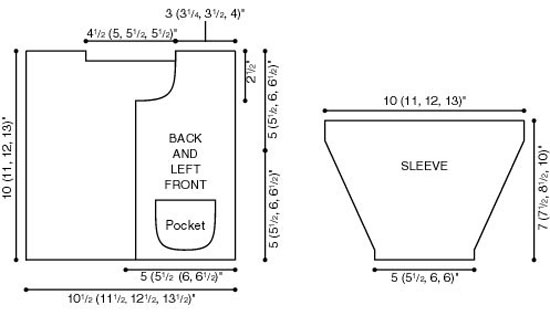
- Chest 20 (22, 24, 26)"/51 (56, 61, 66) cm
- Length 10 (11, 12, 13)"/25.5 (28, 30.5, 33) cm
Instructions:
Pattern Stitch
- Row 1 (RS): Dc in third ch from hook and in each ch across; turn.
- Rows 2 and 4: Ch 1, sc in each st across; turn.
- Row 3: Ch 2, dc in first sc, * FPtr around dc in row below next sc, skip the sc behind the FPtr, dc in next sc; repeat from * across to last sc, dc in last sc; turn.
- Row 5: Ch 2, dc in each of first 2 sc, * FPtr around dc in row below next sc, skip the sc behind the FPtr, dc in next sc; repeat from * across; turn.
- Repeat Rows 2-5 for pattern.
Back
- Using MC, chain 44 (48, 52, 56).
- (RS) Begin Stitch patt—42 (46, 50, 54) sts after Row 1.
- Continuing in Stitch patt, work even until piece measures 5 (5 1/2, 6, 6 1/2" from beginning; place a marker (pm) each side for underarm. Work even until piece measures 9 1/2 (10 1/2, 11 1/2, 12 1/2)" from beginning, end with a WS row.
Shape Shoulders and Neck
Right Shoulder
- (RS) Work 12 (13, 14, 16) sts in pattern.
- Fasten off.
Left Shoulder
- With RS facing, skip center 18 (20, 22, 22) sts for neck. Join yarn with a slip st in next st.
- (RS) Work in pattern to end.
- Fasten off.
Left Front
- Using MC, chain 22 (24, 26, 28).
- (RS) Begin Stitch patt—20 (22, 24, 26) sts after Row 1.
- Continuing in Stitch patt, work even until piece measures 5 (5 1/2, 6, 6 1/2" from beginning; place a marker (pm) each side for underarm. Work even until piece measures 7 1/2 (8 1/2, 9 1/2, 10 1/2)" from beginning, end with a WS row.
Shape Neck
- (RS): Work in pattern across to last 4 (6, 6, 6) sts, turn leaving remaining sts unworked at neck edge—16 (16, 18, 20) sts remain. Work 1 row even.
- (RS) Work across to last 3 (2, 3, 3) sts, dc3tog (dc2tog, dc3tog, dc3tog), turn—14 (15, 16, 18) sts remain. Work 1 row even.
- (RS) At neck edge, dec 1 st (dc2tog) every other row twice—12 (13, 14, 16) sts remain.
- Work even until piece measures same as Back to shoulder.
- Fasten off.
Right Front
- Work as for left Front until piece measures 7 1/2 (8 1/2, 9 1/2, 10 1/2)" from beginning, end with a WS row.
Shape Neck
- (RS) At neck edge, slip st across 4 (6, 6, 6) sts, work in pattern to end, turn—16 (16, 18, 20) sts remain. Work 1 row even.
- (RS) At neck edge, dc3tog (dc2tog, dc3tog, dc3tog), work in pattern to end, turn—14 (15, 16, 18) sts remain. Work 1 row even.
- RS) At neck edge, dec 1 st (dc2tog) every other row twice—12 (13, 14, 16) sts remain.
- Work even until piece measures same as Back to shoulder.
- Fasten off.
Sleeves
- Using MC, chain 22 (24 (26, 26).
- (RS) Begin Stitch patt—20 (22, 24, 24) sts after Row 1.
- Continuing in Stitch patt, work 1 row even.
Shape Sleeve
- (RS) Beginning this row, inc 1 st each side (work 2 dc in first st and last st), every 2 rows 10 (8, 9, 9) times, every 3 rows 0 (2, 2, 4) times, working increased sts in pattern—40 (44, 48, 52) sts.
- Work even until Sleeve measures 7 (7 1/2, 8 1/2, 10)" from beginning.
- Fasten off.
Finishing
- Sew shoulder seams. Sew Sleeves between markers. Sew sleeve and side seams.
Front Bands
Button Band
- With RS facing, join MC with a slip st at left Front neck edge.
- Row 1: Ch 1, working in row ends, sc evenly along left Front to lower edge [approx 2 sc in end of each dc row, 1 sc in end of each sc row], turn—34 (38, 43, 48) sc.
- Rows 2 – 5: Ch 1, sc in each sc across, turn.
- Fasten off.
- Place markers for 3 (3, 4, 4) buttons along band, first 1" from lower edge, last 1/2" from neck shaping, remaining 1 (1, 2, 2) evenly spaced between.
Buttonhole Band
- With RS facing, join MC at lower right Front corner.
- Work as for Button band for 2 rows.
- Buttonhole Row (RS): Ch 1, sc in next 4 sts, * [ch 2, skip next 2 sc] for buttonhole, sc to 2 sts before next marker; repeat from * for remaining buttonholes, work to end, turn. Row 4: Ch 1, sc in each sc and ch across; turn—39 (42, Complete as for Buttonband.
- Fasten off.
Pockets (Make 2)
- Using MC, chain 10.
- RS) Begin Stitch patt, working Row 1 as follows: Work 2 dc in third ch from hook, dc in next 6 ch, 2 dc in last ch, turn—10 dc.
- Row 2: Continuing in Stitch patt, work 1 row even.
- (RS) Beginning this row, inc 1 st each side every other row twice—14 sts.
- Work even for 2 rows, end with a RS row, turn.
Pocket Edging
- Work 3 sc in first st (corner made), sc in each st across to last st, work 3 sc in last st (corner); * [work 2 sc in end of each dc row and 1 sc in end of each sc row] along side of pocket); * working in free loops of foundation ch, sc in each ch across; repeat * to * along remaining side edge, join with slip st in first sc.
- Fasten off.
Small Flower (Make 3)
- Using B, chain 4; join with slip st to form a ring.
- Ch 1, work [sc, 2 dc, sc] in ring 4 times; join with slip st in first sc—4 petals.
- Fasten off.
Collar
Extra sts are worked on first row to allow Collar to shape nicely around neck edge; sc evenly around.
- With right side facing, join yarn with a sl st in first st of neck shaping (inside Front band).
- Row 1: Ch 1, work 60 (64, 68, 68) sc evenly spaced around neck shaping to opposite Front band, turn.
- Row 2: Ch 1, sc in each st across, turn.
- Row 3: Ch 1, sc in first st, sc in next st 2 rows below, *sc in next st, sc in next st 2 rows below; rep from * across, turn.
- Row 4: Ch 1, sc2tog, *sc in next st, sc in next st 2 rows below; rep from * to last 2 sts, sc2tog, turn.
- Rep last 2 rows 4 times. Fasten off. Weave in ends.
- Using MC, sew pockets 3/4"/2 cm up from lower edge and 2"/5cm in from Front edge.
- Using B, sew one flower 3/8"/1 cm into inside of pocket; sew second and third flowers above and to either side of the first (see photo).
- Using yarn needle, weave in ends. Sew buttons opposite button holes.
Hat
Hat is worked in-the-round, join at the end of each round with a slip st in beginning chain, do NOT turn. Beginning chain counts as first stitch on every round. Maintain Stitch pattern as established while working shaping.
- Beginning at lower edge, using MC, chain 64; join with slip st to form a ring.
- Rnd 1: Ch 3 (counts as first dc here and throughout), dc in each ch around; join—64 dc.
- Rnd 2 ands all even numbered rounds: Ch 1, sc in each st around; join with slip st in first sc.
- Rnd 3: Ch 3, *FPtr around dc in round below next sc, skip the sc behind FPtr, dc in next sc; repeat from * to last sc, FPtr around dc in round below last sc; join.
- Rnd 5: Work even, maintaining pattern. Note: At beginning of rnd, slip st across to second st, ch 3, continue as established to maintain pattern.
- Rnds 6 – 16: Repeat Rnds 2 – 5 twice, Rnds 2 – 4 once.
- Rnd 17: Ch 3, working as for Round 3, work across 3 sts (FPtr, dc, FPtr), dc3tog across next 3 sts (2 sts decreased), * work 5 sts in pattern, dc3tog; repeat from * around to last sc, FPtr in pattern, join—48 sts remain.
- Rnd 19: Beginning as Rnd 5, (slip st to second sc, ch 3), dc3tog, * FPtr, dc3tog (2 sts decreased across 4 sts); repeat from * around; join—24 sts remain.
- Rnds 21 and 23: Maintaining pattern, dec 2 sts across every 4 sts, join—12 sts after Rnd 21; 6 sts after Rnd 23.
- Fasten off, leaving an 8"/20.5cm tail.
- Turn hat inside out. Using yarn needle, thread tail through sts of last round, pull tightly and secure.
Ear Flaps
- First Ear Flap: With RS facing, join MC with slip st in any dc along lower edge of hat.
- Row 1: Ch 2, [FPdc around next dc, dc in next st] 6 times, FPdc around next dc, turn—13 sts.
- Row 2: Ch 1, sc2tog, sc in each st to last 2 sts, sc2tog, turn—11 sts.
- Row 3: Ch 2, [FPtr around next dc 2 rows below, dc in next st] 5 times, FPtr around next dc 2 rows below, turn.
- Row 4: Ch 1, sc2tog, sc in each st to last 2 sts, sc2tog, turn—9 sts.
- Row 5: Ch 2, [FPtr around next dc 2 rows below, dc in next st] 4 times, FPtr around next dc 2 rows below, turn.
- Row 6: Ch 1, sc2tog, sc in each st to last 2 sts, sc2tog, turn—7 sts.
- Row 7: Ch 2, [FPtr around next dc 2 rows below, dc in next st] 3 times, FPtr around next dc 2 rows below. Fasten off.
- Second Ear Flap: With RS facing, sk 19 sts following first ear flap, join MC with slip st in next dc. Complete as for first earflap.
Braids
- Cut 3 strands of yarn approximately 48"/122 cm long. Fold one strand in half; insert hook in first st of Row 7 of ear flap, draw strand through until ends are even. Fold 2nd strand; and draw through middle stitch of Row 7. Fold 3rd strand; and draw through last st of Row 7. Braid strands for 6–7"/15–18 cm. Tie a knot in the end of the braid to secure. Cut ends approximately 1/2"/1.5cm from knot.
- Repeat to make braid on second ear flap.
Large Flower
- Using B, ch 4; join with slip st to form a ring.
- Rnd 1: Ch 1, work 10 sc in ring; join with slip st in first sc—10 sc.
- Rnd 2: Ch 1, sc in first sc, work 3 dc in next sc (petal made), * sc in next sc, 3 dc in next sc; repeat from * around; join with slip st in first sc—5 petals.
- Fasten off.
Finishing
- Using yarn needle, weave in ends. Using B, sew large flower to top of Hat.
Read NextCrochet Newsboy Hat Pattern
Your Recently Viewed Projects
Thanks for your comment. Don't forget to share!
Meg12161 1726564
Feb 19, 2013
I love the pattern. I only made the hat. I thought I was making a hat for a toddler. The hat is almost too big for me. When I saw the beginning chair was 64 I thought this seemed a little big but, I kept on going. I came back to this te to see if I might have missed something. I didn't find anything I was missing. Any suggestions on making this hat to fit a 2 to 4 year? Meg
julesvisions
Feb 08, 2011
I have been crocheting for over 40 years. I am very experienced with a lot of different crochet stitches, I have never worked with a pattern, that is as messed up as this one. I must have ripped out my work at least 10 times. I finally modified the pattern, so I could get it to look right. There are stitches that should have been deleted. The right side of the sweater is made different than the left side, so the pattern looks right. The pockets on the sweater were huge. I DO NOT RECCOMEND THIS PATTERN TO ANYONE!!!!
theresa talbot
Jul 02, 2010
Good Morning, I need your help in working with part of the instructions for Eco Baby Set. The steps given for the Collar do not come out looking like the picture? I've even tried working it as a separate and was willing to attach after finish. Needless to say I'm confused and distressed. Stiches call for single crochets and the picture looks like double crochets? This Butterfly wants to finish the set and use it as a gift! Theresa
Crafter 14801
Feb 02, 2010
This is a darling pattern. I will be making this set for my new Great Niece. She will be born March 2010. Thanks for the great pattern!
Report Inappropriate Comment
Are you sure you would like to report this comment? It will be flagged for our moderators to take action.
Thank you for taking the time to improve the content on our site.