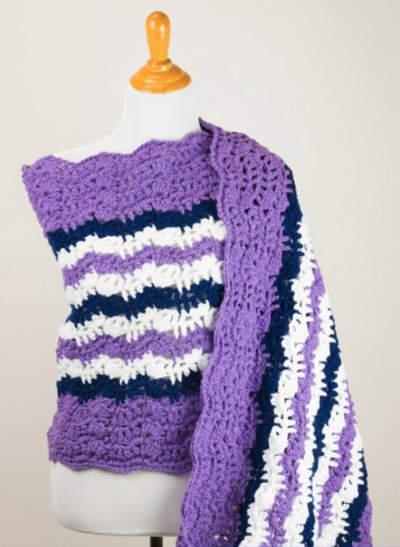
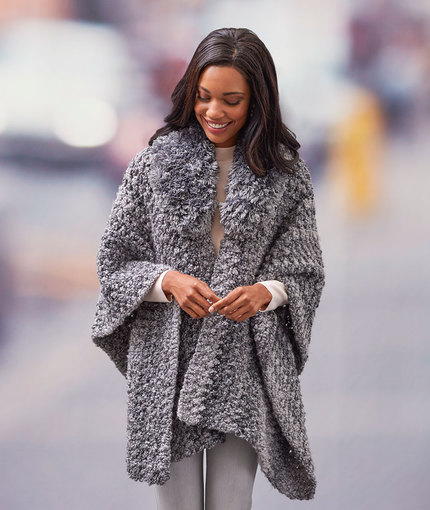
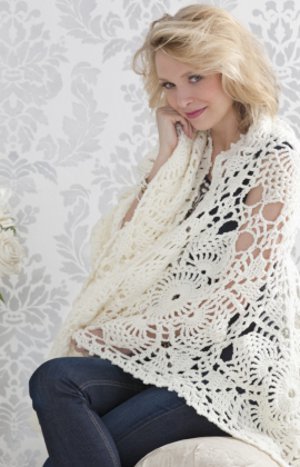
Downton Abbey Throw
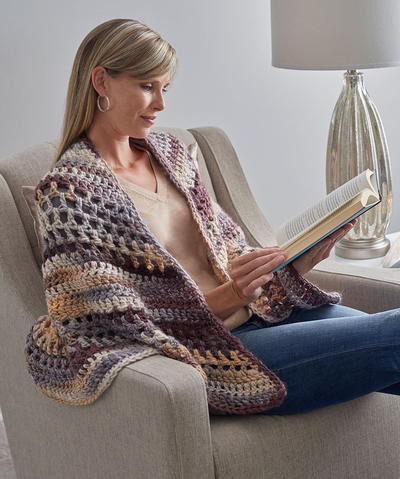
Love the costumes on Downton Abbey? Well here's a beautiful throw that's reminiscent of the costumes on the popular TV show. Sharpen your crochet skills and relax in luxury and style with this Downton Abbey Throw. The great thing about this project is that it can easily transition from summer to fall, winter to spring. This pattern can also be modified to create a beautiful shawl.

Materials:
- 5 skeins RED HEART® Super Saver® yarn in Aran
- 6mm [US J-10] Susan Bates® Crochet Hook
- Yarn needle
Gauge: One motif = 16” across.
CHECK YOUR GAUGE. Use any size hook to obtain the gauge.
Special Abbreviations:
- cl (cluster) = [yo and draw up a loop, yo and draw through 2 loops] twice all in space or st indicated.
- beg cl (beginning cluster) = ch 2, dc in joining.
- corner group = (2 dc, ch 3, 2 dc) all in loop or space indicated.
- picot = slip st in next dc, ch 2, slip st in 2nd ch from hook, slip st in same dc.
Instructions:
Throw measures 50” x 66”.
After the First Motif, all others are joined while working Round 11.
First Motif
- Ch 8; join with a slip st in first ch to form a ring.
- Round 1: Ch 4, 27 tr in ring; join with a slip st to top of ch-4 – 28 sts.
- Round 2: Ch 5 (counts as tr, ch 1), * tr in next tr, ch 1; repeat from * around; join with a slip st in 4th ch of ch-5.
- Round 3: (Slip st, ch 1, sc) all in first ch-1 space, * ch 3, sc in next space; repeat from * around; ch 1, hdc in first sc to join and form last loop – 28 loops.
- Round 4: Ch 2, dc over hdc, * ch 3, skip next 2 loops, 9 dc in next loop, ch 3, skip next 2 loops, cl in next loop; ch 3 **, cl in next loop; repeat from * around, end at **; skip ch-2, join with a slip st in next dc.
- Round 5: Beg cl, * ch 3, [tr in next dc, ch 1] 8 times, tr in next dc **, [ch 3, cl in next cl] twice; repeat from * around, end at **; ch 3, cl in next cl, ch 3; join to beg cl.
- Round 6: Beg cl, * [ch 3, sc in next ch-1 space] 8 times, ch 3, cl in next cl, ch 5 **, cl in next cl; repeat from * around, end at **; join.
- Round 7: Beg cl, * ch 3, skip next ch-3 loop, [sc in next ch-3 loop, ch 3] 7 times, cl in next cl, ch 3, corner group in next ch-5 loop, ch 3 **, cl in next cl; repeat from * around, end at **; join.
- Round 8: Beg cl, * ch 3, skip next ch-3 loop, [sc in next ch-3 loop, ch 3] 6 times, cl in next cl, ch 3, dc in next 2 dc, corner group in next ch-3 space, dc in next 2 dc, ch 3 **, cl in next cl; repeat from * around, end at **; join.
- Round 9: Beg cl, * ch 3, skip next ch-3 loop, [sc in next ch-3 loop, ch 3] 5 times, cl in next cl, ch 3, dc in next 4 dc, corner group in next ch-3 loop, dc in next 4 dc, ch 3 **, cl in next cl; repeat from * around, end at **; join.
- Round 10: Beg cl, * ch 8, holding back last loop on hook, tr in next 4 ch-3 loops, yo and draw through all 5 loops on hook, ch 8, cl in next cl, ch 3, dc in next 4 dc, ch 3, skip next 2 dc, corner group in next space, ch 3, skip next 2 dc, dc in next 4 dc, ch 3 **, cl in next cl; repeat from * around, end at **; join.
- Round 11: Ch 1, * (sc, ch 5, sc) all in next loop, ch 5; repeat from * around join to first sc – 56 loops. Fasten off.
Second Motif
- Work same as First Motif through Round 10.
- Joining Round 11: Ch 1, [(sc, ch 5, sc) all in next loop, ch 5] 4 times; now join 2 sides of 2 motifs as follows: sc in corner loop, ch 2, with wrong sides together slip st in corresponding corner loop on First Motif, * ch 2, sc in same loop on Second Motif, ch 2, slip st in next loop on First Motif, ch 2, sc in next loop on Second Motif, ch 2, slip st in next loop on First Motif; repeat from * to next corner loop; ch 2, sc in corner loop on Second Motif, ch 2, slip st in corner loop on First Motif, ch 2, sc in same corner loop on Second Motif – one side joined; ch 5, complete same as for First Motif begin at * on Round 11. Fasten off.
Assembly
- Make 3 rows of 4 motifs, joining motifs as before, joining on 2 sides where appropriate, and join corners to previous joining: where 3 or 4 corners meet, slip st in previous joining slip st.
Border
- Round 1: With right side facing, attach yarn to any of 4 corner loops; ch 3, 4 dc in same loop, * 3 dc in each ch-5 loop to next corner **, 5 dc in corner ch-5 loop; repeat from * around, end at **; join to top of ch-3.
- Round 2: Ch 1, sc in joining, sc in next dc, picot, * sc in next 3 dc, picot, ** sc in next 2 dc, picot; repeat from ** to next corner ***; sc in next 3 dc, picot; repeat from * to last st, end at ***; sc in next dc; join with a slip st to first
- sc. Fasten off. Weave in ends.
Can't get enough literary patterns? Check out the Jane Austen Book Club Tote or the Elizabeth Bennet's Lacy Hand Warmers.
Read NextSimply Savvy Crochet Ruana Pattern
Your Recently Viewed Projects
Thanks for your comment. Don't forget to share!
rainbow 1890739
Dec 18, 2018
Introduction and picture for this project says that it is for a shawl. What? Wait. 5 skeins!?? Throw measures 50 x 66 Wait, is this a two for one pattern? But where are the shawl measurements and the pattern for the shawl? I'm sorry but I don't wish to buy 5 skeins just to crochet till I figure out how many I need for a shawl. Since you advertised it as a shawl, can you please include that information? Thank you
Editor Dana
Dec 19, 2018
Thank you so much for bringing this issue to my attention. After cross-referencing our pattern with the one featured at redheart.com, I've made updates to the title and description to reflect that it is in fact a crochet throw pattern. Thank you again, and enjoy!
Delphine Bryant
Oct 03, 2018
Wow! This design takes a lot of material for a shawl. This is made with two motif designs that are joined. Each square measures 16" across so I am thinking that this is much more like a throw over a shawl.
Morehouse17
Sep 29, 2018
This finished motif design work includes a lacy design that ends with a border. These square are really epic in size and I think it is a classic design in the off white but would also be beautiful in any color you decide to make this downtown abbey shawl.
Zeemer
Mar 31, 2018
This Downtown Abbey Shawl is so beautiful. I love lacy designs and this one cannot be overlooked. It is vintage-looking but it is also modern in its own right. Love it.
lilbitsbiz 0948321
Jan 23, 2015
Beautiful throw! It takes 5 skeins, so you already know it's throw size, but it also says throw in the instructions. The title should be changed so people wanting a throw can make it.
FaveCrafts Editor JL
Jan 26, 2015
Hi there, thank you for pointing this out. I have modified the introduction. Thanks so much - Julia from FaveCrafts
Member 7366683
Sep 08, 2014
No one on Downton Abbey ever used such a thing as a shawl. Aran weight yarns became popular in the 1950s for afghans and sweaters. In the historic period of the TV show, laceweight yarns were the rule.
leslierawls 994041 1
Jul 31, 2014
This shawl is heavier and bigger than it looks. After finishing it, I named it a blanket instead of using it as a shawl.
Granny Pat
Jun 20, 2013
this pattern was originally from Coats & Clark pattern # B-727 Pineapple Parfait in one of their pattern booklets YEARS ago. Still beautiful, still pretty!
jabernat
May 08, 2013
I agree jackie, because it calls for 5 skeins of Super Saver? That's 35 ounces. I guess if someone really wants to make it for a shawl, you could do only half of it and adjust the pattern for a real shawl size. Otherwise, just use it for an afgan.
hellofromjackie 45 87591
May 05, 2013
I did ask a legitimate question (below) did anyone read it and was it not worthy of an answer. I don't know if the Downton Abbey shawl is really a shawl or is it an afghan?
teencybean 6779184
Jun 19, 2013
I had to look twice, too; just under the word "instructions" it says 'throw measures 50"x66" Since each motif is 16", I'd make 2 rows of 3 motifs making it approx 34"x50"
hellofromjackie 45 87591
May 01, 2013
I think that 50"x66" is awfully big for a shawl. This is usually the size of afghans. Is this an afghan, a throw or a shawl?
Report Inappropriate Comment
Are you sure you would like to report this comment? It will be flagged for our moderators to take action.
Thank you for taking the time to improve the content on our site.