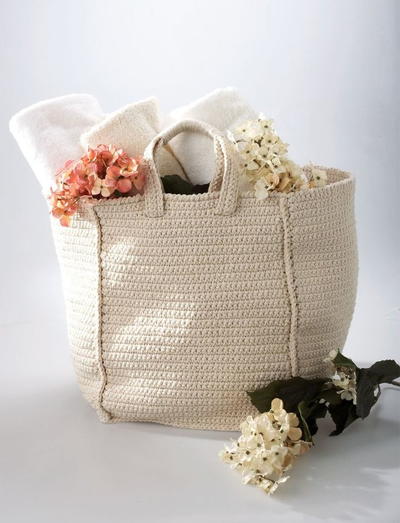
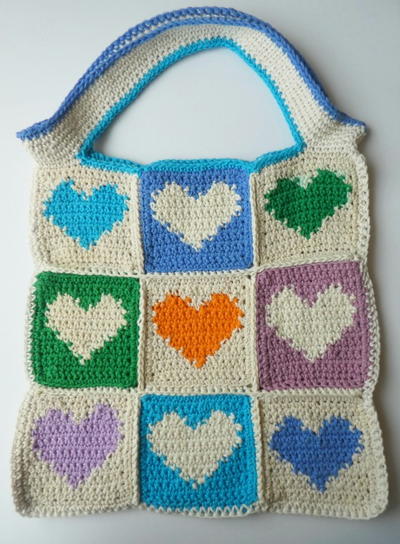
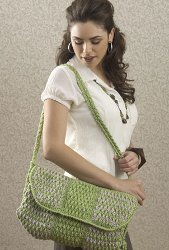
A Big Grove Isle Bag
This beautiful crocheted purse from Caron Yarns is great to take with you to the market or out shopping. Big enough to hold all your necessities and then some, crochet bag patterns like A Big Grove Isle Bag, are great for those who like to travel with everything and anything they might need. Moms will love it, too because it's even big enough to hold snacks for both you and the kids. Never worry about having too much to carry...with this Big Grove Isle Bag, you'll be able to tote everything you need with comfort and style.
Looking for more free printable shoulder bag patterns? Check out our 26 Fashionable Free Bag Patterns.

Materials:
- 1 ball Naturally Caron Spa Yarn in Green Sheen (A)
- 1 ball Naturally Caron Spa Yarn in Misty Taupe (B)
- US G-6 (4 mm) crochet hook, or size to obtain gauge
- 16"/40.5 cm metal internal bag frame with hex opening
- 1/2 yd/0.5 m craft felt (for lining)
- 1 yd/1 m grosgrain ribbon
- Stitch markers
- Pins
- Sewing needle and matching thread
- Yarn needle
Gauge: In post stitch pattern, 16 sts and 11 1/2 rows = 4"/10 cm, with 2 strands of yarn held together.
Special Terms:
- FPdc: Front-post double crochet—Yarn over, insert hook from front to back and then to front again around post of indicated stitch 2 rows below, yarn over and draw up loop, complete as dc. Skip the stitch in the working row behind the post stitch.
- FPtr: Front-post treble crochet—[Yarn over] twice, insert hook from front to back and then to front again around post of indicated stitch 2 rows below, yarn over and draw up a loop, complete as tr. Skip the stitch in the working row behind the post stitch.
- sc2tog: Single crochet 2 together—Insert hook in next stitch and draw up a loop (2 loops on hook), insert hook in next stitch and draw up a loop (3 loops on hook), yarn over and draw through all 3 loops on hook.
- dcdec: Double crochet decrease—Insert hook in next stitch and draw up a loop (2 loops on hook), insert hook in next stitch and draw up a loop (3 loops on hook), [yarn over and draw through 2 loops on hook] twice.
Instructions:
Bag measures approximately 10"/25.5 cm tall x 16"/40.5 cm long.
Left and Right Panels
-
With 2 strands of A held together, chain 22.
-
Row 1: Sc in second ch from hook and in each remaining ch across, turn—21 sc.
-
Row 2: Ch 3 (counts as dc here and throughout), dc in each sc across, turn—21 dc.
-
Row 3: Ch 1, sc in each dc across, turn.
-
Row 4: Drop A, but do not fasten off, carry unused color along edge of work. With 2 strands of B held together, join yarn with slip st in first sc, ch 3 (counts as dc), *FPtr around next dc 2 rows below, dc in next sc; repeat from * across, turn.
-
Row 5: With B, ch 1, sc in each st across, turn.
-
Row 6: Drop B, but do not fasten off, carry unused color along edge of work. Pick up the 2 strands of A, insert hook in first st and draw up a loop, ch 3 (counts as dc), *dc in next st, FPtr around next dc 2 rows below; repeat from * across to last 2 sts, dc in last 2 sts, turn.
-
Row 7: With A, ch 1, sc in each st across, turn.
-
Row 8: Drop A, but do not fasten off, carry unused color along edge of work. Pick up the 2 strands of B, insert hook in first st and draw up a loop, ch 3 (counts as dc), *FPtr around next dc 2 rows below, dc in next sc; repeat from * across, turn.
-
Row 9: With B, ch 1, sc in each st across, turn.
-
Rows 10–57: Repeat Rows 6–9 twelve times. Fasten off B.
-
Round 58 (border round): With A, ch 1, sc in first 2 sts, *FPdc around next dc 2 rows below, sc in next sc; repeat from * across to last st, sc in last st, do not turn; ch 1, work 84 sc evenly spaced across side of piece; working along opposite side of foundation ch, ch 1, sc in each ch across, ch 1, work 84 sc evenly spaced across opposite side of piece; ch 1, join with slip st in first sc. Fasten off A.
- Make the right panel the same as left panel.
Center Panel
-
With 2 strands of A held together, chain 16.
-
Row 1: Sc in second ch from hook and in each remaining ch across, turn—15 sc.
-
Rows 2–57: Work Rows 2–57 of left panel, using 2 strands of A throughout (do not change colors).
- Round 58 (border round): With A, work Round 58 of left panel.
Left Flap
-
With 2 strands of A held together, chain 22.
-
Rows 1–8: Work Rows 1–8 of left panel.
-
Row 9: With B, ch 1, sc in each st across to last 2 sts, sc2tog, turn—20 sc.
-
Row 10: Drop B, but do not fasten off, carry unused color along edge of work. Pick up the 2 strands of A, insert hook in first st and draw up a loop, ch 3 (counts as dc), FPtr around next dc 2 rows below (this will be the second dc of that row), *dc in next st, FPtr around next dc 2 rows below; repeat from * across to last 2 sts, dc in last 2 sts, turn.
-
Row 11: With A, ch 1, sc in each st across to last 2 sts, sc2tog, turn—19 sc.
-
Row 12: Drop A, but do not fasten off, carry unused color along edge of work. Pick up the 2 strands of B, insert hook in first st and draw up a loop, ch 3 (counts as dc), FPtr around next dc 2 rows below (this will be the second dc of that row), *dc in next st, FPtr around next dc 2 rows below; repeat from * across to last st, dc in last st, turn.
-
Row 13: With B, ch 1, sc in each st across to last 2 sts, sc2tog, turn—18 sc.
-
Row 14: Drop B, but do not fasten off, carry unused color along edge of work. Pick up the 2 strands of A, insert hook in first st and draw up a loop, ch 3 (counts as dc), dcdec over next 2 sts, *FPtr around next dc 2 rows below, dc in next st; repeat from * across to last st, dc in last st, turn—17 sts.
-
Row 15: With A, ch 1, sc in each st across to last 2 sts, sc2tog, turn—16 sc.
-
Row 16: Drop A, but do not fasten off, carry unused color along edge of work. Pick up the 2 strands of B, insert hook in first st and draw up a loop, ch 3 (counts as dc), dcdec over next 2 sts, *dc in next st, FPtr around next dc 2 rows below; repeat from * across to last st, dc in last st, turn—15 sts.
-
Row 17: With B, ch 1, sc in each st across to last 4 sts, [sc2tog] twice, turn—13 sc. Fasten off B.
- Round 18 (border round): With A, ch 3, *FPtr around next dc 2 rows below, dc in next sc; repeat from * across to last 2 sts, dc in last 2 sts, do not turn; ch 1, work 24 sc evenly spaced across side of piece; working along opposite side of foundation ch, ch 1, sc in each ch across, ch 1, sc evenly spaced across curved side of piece; ch 1, join with slip st in first sc. Fasten off A.
Right Flap
-
With 2 strands of A held together, chain 22.
-
Rows 1–8: Work Rows 1–8 of left panel.
-
Row 9: With B, ch 1, sc2tog, sc in each remaining st across—20 sc.
-
Row 10: Drop B, but do not fasten off, carry unused color along edge of work. Pick up the 2 strands of A, insert hook in first st and draw up a loop, ch 3 (counts as dc), dc in next st, *FPtr around next dc 2 rows below, dc in next st; repeat from * across, turn.
-
Row 11: With A, ch 1, sc2tog, sc in each remaining st across, turn—19 sc.
-
Row 12: Drop A, but do not fasten off, carry unused color along edge of work. Pick up the 2 strands of B, insert hook in first st and draw up a loop, ch 3 (counts as dc), *FPtr around next dc 2 rows below, dc in next st; repeat from * across, turn.
-
Row 13: With B, ch 1, sc2tog, sc in each remaining st across, turn—18 sc.
-
Row 14: Drop B, but do not fasten off, carry unused color along edge of work. Pick up the 2 strands of A, insert hook in first st and draw up a loop, ch 3 (counts as dc), dc in next st, *FPtr around next dc 2 rows below, dc in next st; repeat from * across to last 2 sts, dcdec over last 2 sts, turn—17 sts.
-
Row 15: With A, ch 1, sc2tog, sc in each remaining st across, turn—16 sc.
-
Row 16: Drop A, but do not fasten off, carry unused color along edge of work. Pick up the 2 strands of B, insert hook in first st and draw up a loop, ch 3 (counts as dc), FPtr around next dc 2 rows below, *dc in next st, FPtr around next dc 2 rows below; repeat from * across to last 2 sts, dcdec over last 2 sts, turn—15 sts.
-
Row 17: With B, ch 1, [sc2tog] twice, sc in each remaining st across, turn—13 sc. Fasten off B.
- Round 18 (border round): With A, ch 3, dc in next sc, *FPtr around next dc 2 rows below, dc in next sc; repeat from * across to last st, dc in last st, do not turn; ch 1, sc evenly spaced across curved side of piece; working along opposite side of foundation ch, ch 1, sc in each ch across, ch 1, work 24 sc evenly spaced across side of piece; ch 1, join with slip st in first sc. Fasten off A.
Center Flap
-
With 2 strands of A held together, chain 16.
-
Row 1: Sc in second ch from hook and in each remaining ch across, turn—15 sc.
-
Rows 2–17: Work Rows 2–17 of left panel, using 2 strands of A throughout (do not change colors).
- Round 18 (border round): With A, ch 3 (counts as dc), *dc in next st, FPtr around next dc 2 rows below; repeat from * across to last 2 sts, dc in last 2 sts, do not turn; ch 1, work 24 sc evenly spaced across side of piece; working along opposite side of foundation ch, ch 1, sc in each ch across, ch 1, work 24 sc evenly spaced across opposite side of piece; ch 1, join with slip st in first sc. Fasten off A.
Gusset (Make 2)
-
With 2 strands of A held together, chain 5.
-
Row 1: Sc in second ch from hook and in each remaining ch across, turn—4 sc.
-
Rows 2–39: Ch 1, sc in each sc across, turn.
-
Row 40: Ch 1, [sc2tog] twice. Fasten off.
- Border: With 2 strands of A held together, join A with sc in first free loop along opposite side of foundation ch, sc in next 3 ch; ch 1, work 40 sc evenly spaced across side edge, ch 1, sc in each sc of Row 40, ch 1, work 40 sc evenly spaced across opposite side edge, ch 1; join with slip st in first sc. Fasten off.
Braided Straps (Make 6)
Note: Sometimes foundation chains this long are difficult to match, length for length. Try to keep your yarn tension even so that each cord comes out close to the same length.
-
With 2 strands of A held together, and leaving a 6"/15cm tail, chain 250.
-
Row 1: Slip st in 2nd ch from hook and in each remaining ch across. Fasten off leaving a 6"/15cm tail.
- Braiding: Secure three cords together at the fasten-off end and tie to a door handle or drawer pull. Braid the cords together. Tie the end of the braid in a knot (do not tie the fasten-off ends of the braid yet). Repeat for second set of three cords.
Finishing
-
Using yarn needle, weave in ends.
-
Lining: Cut lining from craft felt to correspond to each panel and flap. Cut each piece 3/16"/0.5cm smaller all around. With sewing needle and thread, whip stitch each lining to the WS of each piece. Take care to leave border stitches free for connecting panels and flaps.
-
Note: Foundation chain edge of each panel is the 'top.'
-
Assemble Panels and Flap: With RS together (WS facing you), and matching foundation rows of each panel, attach side edge of left panel to side edge of center panel, as follows: Work through both thicknesses by inserting the hook in front loop of left panel and back loop of center panel (leaving center loops free). With 2 strands of A held together, join yarn with sc in first stitches at top corner, sc across joining side edges from top to bottom. Fasten off. Join right panel to center panel in same manner. Take care to ensure that foundation rows are all placed at the top. Join flap pieces in same manner. Weave in all loose ends and draw ends through behind felt linings to hide.
-
Join Gussets to Panels to form Bag Body: Fold connected panels in half, bringing bottom edge up to meet top edge. Place one gusset to form side of bag, aligning stitches with stitches of side edges of panel. With 2 strands of A held together, RS facing and working through both thicknesses, join yarn with sc in top corner, continuing to work through both thicknesses, sc in next 43 sc (44 sc total worked), count back and place a marker in the 4th, 14th, 24th, 34th, and 44th st back, ch 7, slip st in first marked st back, slip st in each of 7 chs just made, insert hook through both ends of the ch-7 loop and complete a slip st to secure and close the loop (gusset loop made), *continuing to work through both thicknesses, sc in next 10 sc; ch 7, slip st in next marked st back, slip st in each of 7 chs just made, insert hook through both ends of the ch-7 loop and complete a slip st to secure and close the loop (gusset loop made); repeat from * to top of gusset and panel. Fasten off. Repeat to join second gusset to opposite side of connected panels—5 gusset loops on each side of bag.
-
Join Flap to Bag Body: With 2 strands of A held together and WS (inside) of bag facing, join yarn with sc in first st of back edge (foundation chain end of body should form back edge), sc in each st across to opposite end of back edge. Turn, ch 1, hold flap against back with RS together (WS/inside of bag flap faces you), working through front loop of flap and back loop of back edge, sc in each st across to opposite end of back and flap. Slip st into first st of front curved edge of flap and work rev sc in each remaining st across front edge of flap. Slip st into first st of opening of bag and work rev sc in each remaining st around opening of bag. Fasten off.
-
Assemble and Install Hex Frame: Assemble frame according to package directions. Slip frame just inside bag opening. Place and pin grosgrain ribbon over frame. With sewing needle and matching thread, sew top and bottom edges of grosgrain ribbon to bag, encasing the frame.
- Attach Braided Straps: Use the fasten-off ends of one cord and a large crochet hook to draw the braided strap, from bottom to top, through the gusset loops on one side of the bag. Draw the strap through the gusset loops until the knotted end of the strap is stopped at the bottom loop. Gently pull the strap again so that the bottom two loops come together and "pinch" the bottom of the bag. Continue to draw the strap, from top to bottom, through the gusset loops on the opposite side of the bag. Tie the fasten-off ends of the braid into a knot and gently pull the straps so that the bottom two loops of the opposite side of the bag are "pinched" together. Leave the yarn ends for tassels, or weave them into the ends of the braid. Repeat this process to attach the second braided strap.
Your Recently Viewed Projects


Thanks for your comment. Don't forget to share!
lcarr
May 28, 2017
Oooh, I love this bag! It is stylish and is large enough to carry around small projects, or even use as an overnight bag (for those people who pack light). I am going to have to make a couple of these. I know a few of my family members will want one too!
CCUK 2272297
Mar 24, 2013
Is it possible to have a knitted version of this please and how can I obtain a hex frame? Is there another name for this? With so many shops closing and unable to travel far I would greatly appreicate any information. Thank you. Ann G.B.
Melissa Ryan
Nov 15, 2012
I love this bag! I'm curious for those who have made it, how much will it hold? :)
Report Inappropriate Comment
Are you sure you would like to report this comment? It will be flagged for our moderators to take action.
Thank you for taking the time to improve the content on our site.